Monday, December 31, 2018

How to Generate Sales With Welcome Emails

Email marketing is alive and thriving more than ever. 80% of marketing professionals name email as the top driving factor of customer acquisition and customer retention. And it’s got a great ROI: For every $1 spent on email, you can expect an average of $38 in return.

It doesn’t matter if you’re growing your first email list from scratch or adding new subscribers to your existing list, you need be sending out welcome emails.  

At their simplest, welcome emails confirm that a new subscriber was added to your list.

If you’re only using this message for that purpose, you’re missing out on a huge opportunity to make money. Compared to other promotional emails, welcome messages generate an average of 320% more revenue.

Furthermore, customers who buy products from email campaigns spend 138% more than customers who haven’t subscribed to your list.

Stop missing out on your opportunity to make money with welcome emails. This article will tell what you need to do to drive sales directly with these campaigns.

Use a double opt-in strategy

Lots of businesses use a single opt-in strategy. With this method, a new subscriber submits their email address and automatically gets added to your list. That’s it.

But there are a few problems with this method.

If you’re not using a double opt-in, it’s possible that customers think they signed up for your emails but actually didn’t. Maybe they misspelled their email address — they’ll never know.

On the flip side, a new subscriber could also sign up by mistake, thinking that they’re submitting the email address for another reason.

In this case, you’re going to be emailing people who don’t want to receive your promotional content, and not emailing the people who do want to receive it.

The double opt-in strategy eliminates these problems. That’s why the majority of welcome emails are double opt-in.

79% of welcome emails are double opt-in

Without a double opt-in strategy, you’ll also end up with fake email addresses and spam accounts on your list. This will throw off your metrics. A huge list of email subscribers won’t do you any good if they aren’t qualified leads who are ready to buy.

When you force new subscribers to confirm their subscription to your email list, it increases their lead score.

Sure, it’s an extra step, and you may lose some subscribers as a result. However, the people who follow through with the double opt-in genuinely want to receive your promotional content. As a result, it’s much more likely that they’re willing to spend money.

It’s also worth noting that double opt-in messages have higher unique open rates than single opt-in campaigns.

We already talked about the fact that welcome emails have higher open rates than other types of emails. By using a double opt-in strategy, you can increase those open rates even more.

Opening the email is the first step in subscribers completing the end-goal action: making a purchase.

Send welcome emails immediately

The timing of your welcome message is crucial. As soon as someone signs up, the welcome email needs to be sent.

Some companies wait and batch out all of their welcome emails for the week at the same time, but that’s not as effective. Here’s why: Your new subscriber was just on your website and signed up to receive your email content because of some benefit that you’re offering, so your brand is fresh on their mind.

Don’t miss out on this opportunity to make a sale. This new subscriber is definitely more likely to buy something if the message is sent in real-time.

Just look at transaction rates for real-time welcomes compared to batched emails.

real time emails get 10X results

Furthermore, real-time welcome emails have an 88% open rate compared to just 53% of bulk welcome emails.

Though 29% of people click on the CTA of welcome emails that are sent immediately, only 12% of subscribers click on CTAs that are sent in bulk welcomes.

If you’re not sending a welcome email within seconds of the person subscribing, you’re lowering the chances of that customer making a purchase.

Thank your new subscribers

By thanking your customers for signing up to receive promotional content from your company, it shows that you appreciate them. Here’s an example of this strategy used by Kate Spade.

kate spade thank you email

Saying thank you is just good manners. Even though they haven’t bought something yet, you can still thank them for having enough interest in your brand to subscribe to your email list.

Saying thank you can be more beneficial than you think. That’s why you need to nurture your leads with thank you pages. Take this same strategy and apply it to your welcome email.

Set a precedent for relevant content

Your welcome emails should be a good indication of what consumers can expect from you moving forward.

Tell your customers how often they’ll get emails from you, and what kind of messages they’ll be receiving. Make sure you follow through with that promise.

For example, if someone signs up for a monthly newsletter, don’t send them an email every day. That’s not what they asked for.

In fact, too many irrelevant emails from brands is the top reason why people unsubscribe from email lists.

top reasons consumers unsubscribe from email

The last thing you want to do is bother a new subscriber with too many messages. You just went through all of the trouble and effort to get them to sign up in the first place. All of that hard work goes out the window if they unsubscribe.

To learn more, here’s how to get more email subscribers without annoying your customers.

Start a drip campaign

Welcome emails should be the first message of a drip campaign, which is a series of emails that entice an action. Ultimately, you want your subscribers to buy.

Drip campaigns nurture your leads by sending them timely information. As soon as someone signs up, you can have them automatically entered into a drip cycle.

After the welcome email, they’ll receive subsequent emails spaced out over the coming weeks, or however you set it up.

Here’s an example path of what a drip campaign will look like:

example of an email drip campaign

The great part about a drip campaign is that the customer doesn’t need to buy something right away in order for the message to be effective.

While you definitely want to create an actionable drip campaign, it’s not the end of the world if that first message doesn’t result in a conversion. You can still plant the seed for a future purchase.

After all, this new subscriber just signed up to receive your emails. Depending on the circumstances, they may not be familiar with your brand, products, and services just yet. But as these subscribers continue to receive subsequent messages throughout the drip campaign, it will increase the chances that they’ll buy something down the road.

Provide valuable information

To get the most out of your email campaigns, you need to understand why people are signing up in the first place.

It’s a common misconception that people only join email lists to get a discount. While that’s definitely a motivating factor, there are other reasons why people sign up for promotional content from your brand. Your welcome letter needs to provide all of this to be most effective.

why people subscribe to email lists

As you can see, receiving a special offer or a gift ranked third on this list. The majority of people say they subscribe to newsletters to learn more about topics and stay up to date on new content. It’s still worth giving a discount to new subscribers, but it doesn’t necessarily have to be your top priority.

You can also keep them engaged by giving a new subscriber an added benefit that they wouldn’t have received if they didn’t sign up for emails. Talk about new or exclusive product releases. Give them an opportunity to create an account to benefit from a more personalized customer experience.

Offer an incentive to buy

Even though it isn’t first on the list of reasons, getting a gift or something in return is still one of the top three reasons why people sign up for emails. And, offering a discount is a great way to get people to sign up for emails in the first place.

Let’s look at an example from Freemans:

By signing up for emails, this welcome message gives the new subscriber 10% off of their purchase. In addition to providing a discount, this message thanks the new subscriber for signing up. It’s personalized with her name. It also gives a sense of inside information with phrases like, “Be the first to hear” and “Here’s all you need to know.” All of these tactics used in one message will definitely increase the chances that a customer will make a purchase.

Send personalized content

People don’t want to feel like they are just a number on your list, when in reality, that may actually be the case. If you’re sending out generic welcome emails with opening lines like “Dear Sir or Madam,” it’s not going to convey the personalized touch that you want to offer.

Start simple by personalizing the subject line.

personalized subject lines have higher open rates

Getting your new subscribers to open your message is half of the battle. Obviously, nobody is going to buy anything if the message goes unopened. Good news: personalized subject lines have higher open rates.

However, opening the message alone won’t automatically translate to a sale. You need people to engage with your messages as well. The best way to do this is by providing interactive content. For example, adding a video to your welcome email can increase clicks by 300%.

It’s also worth noting that 64% of people are more likely to buy something online after watching a video about a product. By combining engaging content with a personalized message, your welcome emails will have a greater chance of driving sales.

Encourage customer referrals

Welcome emails can be used to get even more people to subscribe to your list. In order to do this effectively, you need to implement a customer referral program that drives sales.

Give your new subscribers a reason to invite their friends and family to sign up as well. Take a look at how Blinq does this in their welcome email:

blinq referral email

This refer-a-friend program offers an incentive to the current subscriber as well as any new people who sign up. Both receive a $10 credit. The more people who join as a result of the referral, the more rewards the new subscriber gets. This will also increase their chances of buying.

Here’s something else to consider, if someone who gets referred by a new customer ends up signing up for emails as well, they’ll also receive the same welcome message. As a result, it will increase the chances that they’ll refer new customers too. This strategy encourages business growth without much work on your end.

Plus, consumers are four times more likely to buy something if they are referred by a friend.

Conclusion

Your company needs to prioritize its email marketing strategy. But you don’t need to wait months to encourage new subscribers to make a purchase. You should be trying to drive sales right away with your welcome emails.

  • Send welcome messages immediately.
  • Use a double opt-in strategy to increase opens and qualify your leads.
  • Let your welcome email serve as the first message of your drip campaigns.
  • Don’t forget to thank your new subscribers for signing up.
  • Give them what they’re looking for by providing valuable information, and tell them what to expect from you in the future.
  • Personalize your content and add other incentives to increase the chances that people will buy.
  • Use your welcome email as an opportunity to promote your customer referral program.

By applying these strategies to your welcome emails, you’ll be able to generate more sales from new subscribers.

How is your brand leveraging welcome messages to drive sales?


from Quick Sprout http://bit.ly/2Rofkcw
via IFTTT

Thursday, December 27, 2018

How to Increase Average Order Values With Product Bundling

Every business needs to strive for growth.

This isn’t a secret. However, many business owners hear growth and they jump to customer acquisition strategies, new product launches, and ways to increase their conversion rates.

All of these tactics are great for your company growth. But, they’re not the only way to boost revenue and grow your business.

You can also grow when you make more money with your existing products, services, and conversion rates simply by increasing your average order value.

Are you currently tracking this metric? It’s easy to calculate with this formula.

How to calculate your Average Order Value (AOV)

Average order value formula

In order to increase your AOV, you need to encourage your customers to spend more in each transaction. Sounds great in theory. We’ll walk you through how to actually accomplish it.

There are tons of ways to get your current customers to spend more each time they shop. One of the best methods for increasing AOV is with product bundling. This marketing tactic employs a combination of upsells, cross-sells, and discounts. It also helps you generate more profit by focusing on your pricing strategy.

Basically, the psychology behind product bundling entices people to spend more with every transaction simply by buying more things at once. As a result, your average order value will rise.

Whether you sell products or services, your company can benefit from a product bundling strategy. But it’s not as simple as lumping any two or three random items together. In fact, that can do more harm than good.

If you’ve never done this before it can be a bit of a challenge to determine which products should be bundled together and how to showcase those options to your customers. So use this guide as a blueprint for increasing your average order value. Here’s what you need to know.

Don’t pair inexpensive items with premium products or services

This is the most common mistake we see when businesses attempt a product bundling strategy for the first time. It makes sense: they’re trying to maximize their profits and someone is buying something cheap, why not try to get them to buy something that’s expensive too.

Product bundling doesn’t mean you should just throw any two or three items together and assume your customers will pay more for them.

Put yourself into the mind of the consumer for a minute here.

For example, let’s say you’re shopping for a new car and your price range is roughly $20,000. If the dealer throws in a free t-shirt and a baseball cap with the purchase of a vehicle, is it going to entice you to buy the car?

Or, on the flip side, let’s say you’re shopping for a t-shirt and a baseball cap with your favorite car company logo on them. Together the two cost about $40. But then, at checkout it’s suggested you buy a car, too. This brings your total to $20,040. Do you do it?

Two items that don’t belong together are not a product bundle. This is especially true if one item is significantly cheaper than the other. But so many brands think two items = a bundle, and it ends up hurting them.

Instead of encouraging your customer to buy more things, a grouping like this actually confuses their initial purchase. Let’s take a closer look.

There’s a study from the Journal of Consumer Research on consumer perception and product bundling called The Presenter’s Paradox.

Here’s what happened. They gave people two options of how to bundle products for prospective customers. The first option was an iPod Touch bundled with a cover. The second option was an iPod Touch bundled with a cover and a free song download. Nearly everyone (92%) chose the second option, which included the free download. However, the study concluded that consumers were willing to pay more money for the first bundle, without the song download.

Why? The benefit and cost of that download aren’t enough to enhance the perceived value of the bundle.

In fact, the cheaper item — One song? What am I going to do with one song? — lowers the perceived value of the total package. That’s not what we want to do. Rather than diminish the perceived value of a bundle, we want to increase it. You can charge more for your products by enhancing the perceived value.

Perceived value calculation

A cheap add-on paired with a premium product makes the whole bundle feel less appealing to the consumer.

This Harvard Business Review article discusses a set of similar studies that had the same results. The study showed that consumers were more likely to pay $2,299 for a home gym than they were to pay that very same amount for the same gym was bundled with a workout DVD. Again, that’s because a DVD doesn’t enhance the perceived value. It actually has the opposite effect and lowers that value.

So if you’re currently using a strategy like this, it could be hurting your average order value as opposed to helping you out. You can fix this quickly and easily.

This guide will also you examples of the right types of products and services to bundle.

Emphasize savings

Offering a discount is a great way to make your product bundles more appealing. It’s a very simple strategy.

If a customer buys two or more items together, their total purchase will be cheaper than if they bought each one individually. However, you need to make it obvious that they are saving money. So tell them exactly how much money they can save by buying the bundle.

Here’s a great example of this from Lowe’s.

product bundling example washer dryer

The product bundle here is a washing machine and a dryer. If customers buy the pair together, they can save $340. The customer might think, That’s getting close to the price as of either the washer or dryer alone! However, people won’t know how good of a deal they’re getting if you don’t tell them.

You shouldn’t be making your customers do the math manually or hunt through your prices. Make it obvious and plaster the savings on your website, just like the example above. In this instance, by bundling the savings together, it’s much more entcicing. The customer isn’t simply saving $170 on each, which doesn’t seem like that much. They’re saving $340, which has a lot more wow factor.

As a result, they will be more likely to buy these together to get the savings.

Bundle items commonly purchased together

Remember the hypothetical scenario earlier: the car bundled with a t-shirt and hat? Those items are not commonly purchased at the same time, and that’s another reason why that bundling strategy won’t work.

You need to figure out what items people will also need when they buy something specific. Refer back to our last example from Lowe’s. If a customer is in the market for a washing machine, there’s a good chance they also need a dryer. Bundling those two items together is a winning strategy. This makes much more sense than bundling a dryer with a dishwasher. Sure, they are both home appliances, but they are completely unrelated to each other.

If your company sells shampoo, you can bundle it with conditioner. If you’re selling a mattress, you can bundle it with a box spring and frame. These are all products that go hand in hand.

Check out this example from AT&T.

ATT bundle example

It’s extremely common for people to purchase TV, Internet, and phone services from the same provider. The price bundling strategy here is a well-oiled machine. Just look at the three options above to see what I’m referring to.

It’s $60 per month for just TV. But when you bundle TV and internet together, it’s only $15 more.

This type of product bundle increases the perceived value: Customers are getting something that would normally cost $110, if purchased separately, for $75. That’s a great deal.

This is much better than offering a TV package with free remote batteries, or something cheap that doesn’t add value or entice people to buy. By doing this, AT&T can increase their order value by 25%. Think about that for a second here.

If your company does $1 million in sales annually, you can make an extra $250,000 per year just by increasing the AOV from $60 to $75.

AT&T takes this one step further by adding another bundle option, which includes home phone services. By getting customers to buy this bundle instead of TV alone, the order value is 58% higher.

Use anchor pricing

Anchor pricing is another way to show value in your product bundles.

The idea behind this methodology is that you have different prices on your website that establish a perceived value in the mind of your customers.

It’s an age-old strategy.

How do you sell a $500 watch? Put it next to watch that costs $1,300. The $1,300 item will serve as the anchor, which makes the $500 product seem like a much better deal.

Let’s take a closer look at AT&T’s third option — adding a home phone for an additional $19.99 a month. How many people do you imagine want a phone line? This option may be less about increasing the order value and giving another point of comparison to make the middle option more interesting. Because the $75 package isn’t the most expensive package, the price point seems more reasonable.

The $60 TV package also serves as an anchor. It sets the value of TV alone, so all of the product bundles after it seem like a great deal based on the customer perception of the one product.

You can use this same strategy with your product bundles by adding more expensive bundles, or selling the solo products at a higher price than when they’re bundled. It doesn’t matter if your customers don’t purchase the higher priced packages. They can serve as anchors to make the rest of the options more appealing.

Recommend products to your customers

Show your customers products that will enhance the item that they’ve already added to their cart. Depending on the circumstances, the customer may not even realize that you sell those additional products or remember that they need to buy them until you do this.

Amazon uses this strategy better than anyone else.

Amazon frequently bought together

If you’re browsing for razors on their platform, Amazon will show you which products are frequently bought with those razors: shaving cream and blade refills. The customer will realize that they need these items to complement what they were initially shopping for.

Instead of having to go back and browse for these products, Amazon has a button that makes it easy to add all three items to the shopping cart. You can get more conversions by optimizing your checkout process. Click to add and Amazon has increased the order value with product recommendations.

Here’s the kicker: none of the products are even discounted.

You don’t necessarily need to offer sales or drastically slash your prices to have an effective bundling strategy. Just by showcasing and recommending similar items that add value to the consumer, you can increase your AOV.

Offer volume discounts

But, you can also offer discounts. In addition to bundling products with other items, you can bundle the same product or service with itself. Amazon does this with Subscribe & Save. It gives your customers a reason to buy more, order-value wise, than what they were going to buy — and to make that next repeat purchase from you, instead of wherever else they would be in the future.

Just like the 5% subscription discount on Amazon, as the volume increases, the price per item decreases. But your average order value will still rise. Here’s a perfect example from Todo Bien Tours.

volume discount example

This company provides a service: bus tours. The price per ticket for their tours varies by the number of tickets sold at once. If you buy two tickets, they will cost $84.15 each, so the total transaction will be $168.30. But, groups of ten pay $69.30 per ticket. While the price per item is less, the total transaction ends up being $630. That’s more than a 400% increase in order value.

Notice how their pricing structure is set up on the website.The chart displays the percent discount based on the number of tickets purchased as well as the monetary value saved per ticket. This is an example of one of our previous points: emphasizing savings. By combining this strategy with volume discounts, Todo Bien Tours can benefit from higher average order values.

Allow customers to create custom bundles

Studies show that 80% of customers are more likely to buy something if they are offered a personalized experience.

Furthermore, 68% of customers will pay more for this type of experience. That’s why customization can highly benefit your bundling strategy. It’s a great way to increase your average order value. Rather than telling your customers which products you’re bundling, let them decide for themselves.

Look at how Texas Beard Company accomplishes this.

By purchasing the bag, their customers can benefit from discounted prices on other products. The customized bundle makes it more enticing for people to buy. Here’s why. Let’s say that the bundle was preset with a bag, beard balm, mustache scissors, and beard brush, but the customer already owns a pair of mustache scissors. For that person, the bundle isn’t enticing. They don’t need one of the products offered, so it’s not a good value for them.

This goes back to perceived value. Though the mustache scissors have a literal value, the value to that customer is $0, so the entire perceived value of the package is lowered. Customized options make the bundle so much more enticing.

Find a way to implement this strategy for your business as well. It can work regardless of if you’re offering products or services.

Conclusion

One of the easiest ways to grow your company is to increase your average order value.

That’s because you don’t need new products, new customers, or higher conversion rates to accomplish this.

All you need to do is find ways to get your customers to spend more money each time they shop:

  • Make sure you’re not bundling something inexpensive and irrelevant with one of your premium products.
  • Bundle similar items. You can even recommend products to your customers to create a bundle.
  • The savings should be obvious, which enhances the perceived value of what you’re selling.
  • Focus on your pricing strategy. Offer volume discounts and use anchor prices.
  • You can charge more for your products by letting your customers customize their own bundle.

If you follow these strategies, you’ll be able to increase your AOV.

What types of product bundles is your business offering to increase the average order values on your website?


from Quick Sprout http://bit.ly/2Q79EPi
via IFTTT

Monday, December 24, 2018

10 Tips and Tricks to Improve Your YouTube Content in 2019

Traditional marketing is slowly becoming obsolete. Brands need to prioritize digital marketing strategies to stay relevant and successful in 2019. To approach this properly, you’ll need to start producing more video content.

When it comes to video, YouTube is king. The platform has more than 1.9 billion monthly active users, and 180 million hours of video content is consumed there every day.

Furthermore, 48% of people named YouTube as their favorite online video provider.

It’s ranked first over Netflix, Facebook, and Hulu, which got 29%, 10%, and 7% of votes, respectively. YouTube isn’t just the favorite; it’s more popular than the other three networks combined.

If you think that’s impressive, wait until you hear this: YouTube is the number two ranked website in the world, second only to Google, according to Alexa rankings.

The reason why YouTube is great for marketers is because its content is easy to repurpose across multiple platformsOnce you add a video to your YouTube channel, it’s easy to share it on other social media sites, send it to your email subscribers, and add it to your website.

I’ve identified the top ten tips to enhance your YouTube videos in 2019. Use this list as a reference to help you produce better content.

1. Share links that start playback at a specific time

Once videos are uploaded to YouTube, you can share them on other platforms. But there are instances when you’ll want to share only a portion of your video.

For example, maybe you’re discussing a specific topic in a social media post. You realize that you’ve already covered this in a YouTube video. 

However, the video is five minutes long. The content that’s relevant to your post doesn’t get addressed until the three-minute mark.

No problem. Just click on the share link to get started. (This is how you would normally share any video on YouTube.) By default, the video will play from the beginning, as expected. You have the option to change this by using the options that pop up after you click on the share button. Here’s what it looks like:

YouTube start at timestamp

At the bottom of this menu, check the “Start at” box, and type the time mark at which you want the video to start playing. (Alternatively, you can pause the video before you click on the share button. The timer will automatically be set at that point. You still need to check the box for it to work.)

Once this feature is enabled, the URL’s share link changes. As you can see, the link in the image above ends with “t=158.” This link will start playing the video 158 seconds in, which is the 2:38 mark.

2. Add a transcript

Adding a transcript will make it easier for users to find your videos and your channel through YouTube as well as Google searches.

By default, YouTube will automatically generate a transcript for all your videos once they are uploaded. You just need to make sure you haven’t hidden this option from your audience. (You have the ability to edit your transcripts as well, so review them to catch any errors.)

YouTube also provides a feature for you to manually type your own transcripts as you play the video. Here’s an example of what a final transcript looks like once a video is uploaded:

YouTube Transcript

In some instances, you may want a video or audio file transcribed for other purposes. For example, maybe you have a recording of a seminar you recently spoke at or of an important conference call. Now, you want to refer to the video to help you write a blog post. It’s much easier to use a transcript instead of constantly having to pause, fast forward, and rewind a video to catch your speech.

Upload that content to YouTube, and get a free transcript of it. You don’t have to share or publish the video on your channel if you want to keep it private. You’ll still be able to get the content transcribed free.

3. Create a GIF with any YouTube URL

GIFs are one of the top visual elements you can use to improve your marketing strategy.

Rather than using GIFs from a library everyone has access to, you can create a GIF from a YouTube video. You have the option to use either your own videos or videos from other channels.

This is very easy to do.

First, find the YouTube video with the clip you want to use. Next, insert the word “gif” after the www. The URL will go from www.youtube.com/watch to http://www.gifyoutube.com/watch. After you change the URL, you’ll automatically get redirected to gifs.com.

The video will be ready to edit and turn into a GIF. Here’s what the screen will look like:

Making a gif from a video
You’ve got lots of options here to make your GIF unique. Start by determining what portion of the video you want to turn into a GIF. Next, you can determine the length of your GIF. Add captions. Crop the video. Play around with effects.

Once you create your GIF, download it, and share it on your other marketing channels.

4. Organize your videos with playlists

If you have lots of videos uploaded to your YouTube channel, playlists are the best way to keep them organized. When a user navigates to your channel, they will have the option to watch different playlists that have similar videos grouped together.

Here’s an example from the Food Wishes page:

Using playlists to organize YouTube topics

As you can see, the videos are organized by different types of recipes based on holidays and other events, e.g.:

  • Super Bowl
  • Christmas
  • New Year
  • July 4th
  • Memorial Day

It will be much easier for viewers to find what they’re looking for here.

YouTube also allows you to collaborate on your playlists with a friend. From your playlist settings, navigate to the “Collaborate” tab. Here’s what it looks like:How to collaborate on a YouTube playlist

Once you add a collaborator, this user will be able to add videos to the playlist. This can be a useful way to manage your relationships with social influencers—simply have an influencer upload content directly to your channel through a playlist.

5. Create a custom URL

You want to make sure your business has a custom URL on YouTube. You won’t get this by default.

If you have a new YouTube channel, you won’t be able to create a custom URL right away. These are the requirements:

  • account is 30 days old
  • photo set as channel icon
  • channel art uploaded
  • at least 100 subscribers

Once you hit these marks, you’ll be eligible to get a custom URL.

You can find this option within your account settings. Just navigate to the Advanced menu:

YouTube custom url

Before you claim your custom URL, make sure you think it through clearly: you won’t have the option to change it once it gets approved.

6. Add an actionable end screen

What do you want a viewer to do when they finish watching one of your videos? If you want the user to keep watching more videos or visit your website, you can add these CTAs to an end screen.

From your video manager page, click the “Edit” button for the video you want to change. Then find the “End screen & Annotations” link from the drop-down menu:

How to add CTA to YouTube videos

A pop up will appear. Depending on your marketing goals, you can add one or more of these elements to your end page:

Four CTA options in YouTube

7. Use enhancements to edit videos

You might already be using some third-party software to edit videos before you upload them to your channel. (Editing is a great way to create killer video promotions to increase engagement.) But if you don’t need to do anything elaborate, you can take advantage of the YouTube enhancements feature. This allows you to edit directly on the platform.

The enhancements feature lets you add or change music and audio, apply filters, trim sections out of your video, and blur portions of it.

You can even edit content after a video has already been uploaded to your channel. However, unless you are part of the YouTube partner program, you might not be able to make all the changes to videos with more than 100,000 views. 

You’ll always have the option to blur faces, even if your video has more than 100,000 views and you’re not part of the partner program. YouTube allows this to help protect the identity of people in your video.

8. Broadcast live streams

Has your business jumped on the live video bandwagon?

If not, it’s time for you to hop on board. That’s because 82% of people say they prefer live videos over social media posts from business profiles. Furthermore, 80% of people say they would rather watch live video content than read blog posts about a topic. 

Believe it or not, consumers actually prefer YouTube live streams over Facebook Live. 

YouTube more popular than Facebook Live

YouTube allows you to go live from your desktop computer or mobile device. You can keep an archive of your live streams that were added to your YouTube channel so people can watch the content even after the stream is over. But you can disable this feature if you want.

Want to grow your audience even more? Consider this: 87% of people said they would watch more live videos if they contained behind the scenes content.

8. Upload 360-degree videos

We now know that 360-degree videos increase engagement rates. These videos have a 14% higher ROI than regular videos. They also have a 46% higher completion rate than traditional videos.

This is the type of content people want to see with 360-degree videos.

When it comes to a 360-degree video, 98% of consumers living in the United States say they think it is more exciting than any other type of video.

And 90% of people believe content will be improved if it can be viewed as a 360-degree video instead of a traditional format.

Having a 360-degree video increases the chances that viewers will interact with it by 66%.

What’s even more impressive is that 70% of marketers believe that adding 360-degree video content has helped improve their businesses.

9. Use Google Trends to find popular search terms

How do you know what type of content you should upload to YouTube? Try searching for keywords related to your company on Google TrendsThis will show you the popularity of a search term over time and tell you whether you should be creating content on that subject.

Here’s what “content marketing” looks like on Google Trends:

Content Marketing searches

As you can see, this is the interest in the term over time in web searches. You can’t assume it’s the same on YouTube. Click on the menu, and select “YouTube Search.”

Content Marketing searches on YouTube

As you can see, the trends are different. 

This free Google tool will enhance your marketing strategyYou can also use it to help you create titles and descriptions that are search-friendly on YouTube.

10. Run ads on YouTube

YouTube is owned by Google. This means you can set up YouTube ads through your Google Ads account.

You’ll have the option to do the following:

  • select your audience
  • choose locations you want to target
  • set your budget

This is very easy to do, especially if you’re already using Google Ads for other purposes.

Here are the different formats you can choose from to advertise on YouTube:

YouTube advertising formats

The type of ad you select will impact the price you pay.

It’s worth noting that 51% of marketers in the United States advertise on YouTube and 52% of brands plan to increase their advertising budgets on the platform. (There is a good chance that at least half of your competitors are already advertising on YouTube. Get on it!)

Conclusion

By the year 2020, 80% of Internet traffic will come from videos. That means you need to keep up with the times and produce video content in 2019.

YouTube is the best place to upload your videos. From there, you’ll be able to distribute the content on other channels as well. 

But you have to be doing more than simply uploading videos and leaving them there with no further action. You need your videos to have an edge to be successful. 

These tips and tricks will definitely bring your content to the next level. 

What type of video content is your brand adding to your YouTube channel?


from Quick Sprout http://bit.ly/2LEQ2Sl
via IFTTT
Friday, December 21, 2018

How to Write Blog Posts Faster Without Sacrificing Quality

I write a ton of blog posts.

By the end of 2018, I’ll have published over 150 posts on Quick Sprout alone. Once you factor in the posts on my other websites and my guest posts, that number roughly doubles.

People ask me all the time how I manage to produce such a large amount of quality content.

With all my in-depth and informative guides backed up with good research, people assume it takes me 10 hours to write one post. That’s not the case.

It takes me significantly less than half of that time to do so.

Blogging is like anything else. The more you do something, the better you get at it.

That said, there is definitely a formula behind producing effective blog content.

As a business owner, you recognize the benefits of blogging in terms of SEO, driving traffic to your website, and increasing conversions.

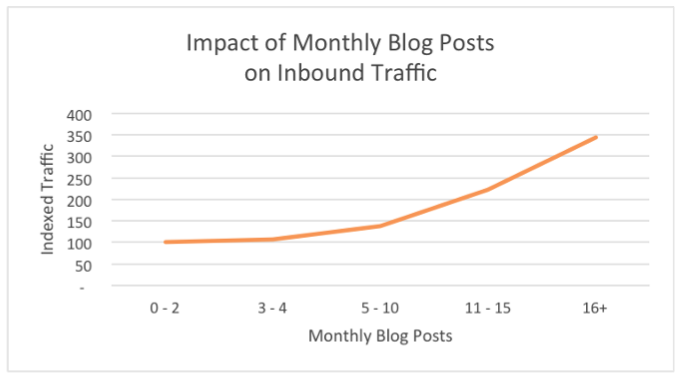
traffic

This graph clearly shows there is a direct correlation between publishing frequency and website traffic. That’s why you can scale lead generation through blogging.

You know you want to publish more content. But there are only so many hours in the day, and you have a business to run.

It’s a common problem I see in my consulting work.

As a result, businesses usually resort to one of two solutions. They either don’t blog as often as they should be, or they rush through writing to meet a certain benchmark. But neither of these approaches are effective.

You need to learn how to write more posts faster without sacrificing the quality of your work.

Use this guide as a blueprint for producing quality content for your blogs. Here’s what you need to do.

Have your blog topics ready

When you sit down to write a post, you shouldn’t be asking yourself what you’ll be writing about that day. This is not an efficient use of your time.

I like to have lists of topics ready for me to choose from.

Spend 30 minutes to an hour once a month coming up with a long list of titles, depending on your publishing frequency.

I usually have lists with 20 or 30 topics at a minimum. Once I start running low, I go through this process again.

Coming up with this many subjects is easier than you think.

I recommend looking at some of your competitors’ sites to see what they’re blogging about. You can use their posts as an inspiration for your own.

You’ll have a big advantage here. Since their content is already published, you can make your posts even better and more informative than theirs.

Take advantage of online tools that will help you come up with new titles to write about, such as the blog ideas generator from HubSpot:

hubspot

Write posts that tell a story about a personal experience.

Look through comments on social media and your previously published posts for inspiration for new ones. Turn other content you’ve already created into a post. Here are some examples of content you can repurpose:

  • YouTube videos
  • podcasts
  • ebooks
  • webinars
  • slideshows

There are tons of opportunities here.

If you’re having trouble coming up with a list of blog topics, refer to my guide on the best ways to come up with new content ideas.

When you do this work ahead of time, you’ll make your writing process much easier. Rather than wasting 15 minutes on brainstorming, you can pull a topic from your list and get straight to work.

Always start with an outline

Starting to write with a blank page, trying to go from beginning to end without a plan, will hurt your quality and productivity.

All too often I see new writers skip the outline process because they think it’s extra work. But the outline will save you time in the long run.

Your outline will give you an idea of the flow of your post.

At a minimum, you should have all your subheaders determined with some notes for each section. But you don’t have to stop there.

The more detailed your outline is, the faster you’ll be able to write.

I like to jot down my thoughts in short bullet points for each section. I can expand on those notes when I’m writing the final copy.

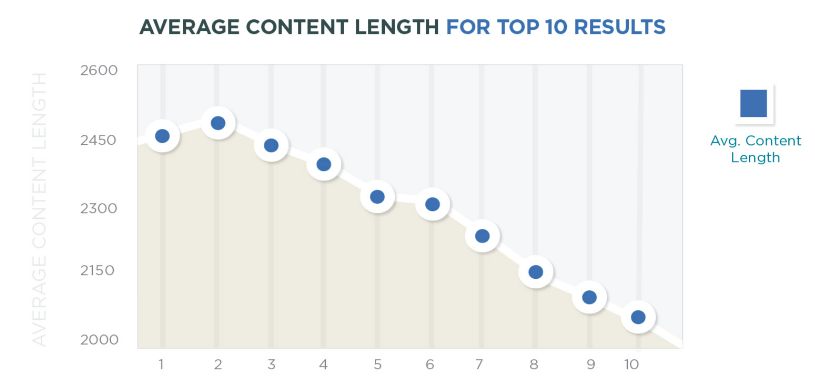
Outlining will also make it easier for you to reach your desired word count. Here’s a look at the average content length for the top results of a Google search:

content length

As you can see from this graph, longer posts have higher rankings. On average, all the top ten posts are over 2,000 words.

You should have a word length range for each post you write.

Obviously, this won’t be exact every time. By nature, some posts will be longer than others, depending on the subject matter.

But let’s say you want all your posts to be a minimum of 2,000 words.

If you’ve got eight subheadings in your outline, you know that each section needs to be roughly 250 words to meet that 2,000-word minimum.

This is a highly effective way to write quality content. It will prevent you from rambling, repeating yourself, and filling the post with useless information.

If you’re starting with a blank page and no outline, you’ll have no sense of how long each section should be or how many sections you should have in the first place.

Using an outline will help you not only write faster but also produce better quality and longer blog posts, which will be great for SEO purposes.

Finish writing in one sitting

Blogging effectively is all about time management. I do not recommend multi-tasking when writing.

Writing posts will require your complete focus and attention.

Put your phone on silent. Don’t check your emails. Stop taking breaks for snacks or lunch in the middle of your post.

Just sit down and write.

It might be taking some of you longer than necessary to write posts because you’re getting distracted by other things.

Here’s a look at the average time people take to write a blog post to give you a better idea of how long it should take you:

time

In just four years, it’s taking bloggers roughly an hour longer to write each post.

You can aim to spend 3.5 hours writing a post, but you can write even faster than that. However, I don’t want you to over-focus on the time right now.

When you start looking at the clock instead of focusing on your work, the quality of your work begins to suffer. Here’s why.

When you hit the three-hour mark with only 70% of the post done, you might start thinking the post needs to be finished within the next 30 minutes. Under such pressure, the quality of your content might start to go down.

So what if some posts take you a little bit longer? It’s not the end of the world.

I write very efficiently, but every once in a while, it takes me upward of four or more hours to write a post.

Am I happy when this happens? I can’t say I’m thrilled. But I refuse to let my quality suffer.

Other times, I’ll knock out a post in 2.5 hours, so it balances out.

You also need to make sure you’re in the mood to write. Find a time of day that works best for you.

People differ in their preferences for writing. I know bloggers who write first thing in the morning while they’re still in bed, others who write at their offices, and still others who write late at night.

No matter when you write, make sure you’re in the right mindset.

If your mind is elsewhere and you can’t focus, pick another time to write. Put it off until you’re mentally able to concentrate to complete the post in one sitting.

Writing a post over the course of several days typically adds at least 20 minutes to each sitting.

Write while everything is fresh in your mind. The words will flow better, and it will be easier for you to work faster.

Conduct relevant research

Adding statistics and relevant data to your content will drastically improve its quality. It gives your audience proof you know what you are talking about.

Plus, citing and linking to authority websites is great for SEO purposes.

However, I see many bloggers shy away from this tactic because they think research is too time-consuming. That’s not the right way to think.

Sure, it may require a little extra work, but it’s not that difficult to conduct a quick Google search.

Including research in your blog gives you something to talk about. You’d be surprised how much easier it is to write about a subject when you have something to reference.

Let me give you an example.

Here’s an excerpt from a recent blog post I wrote about how blockchain is changing the digital marketing industry:

blockchain

By taking the time to conduct some research, I was able to find an image and statistic, which are both highlighted above.

These two pieces of information allowed me to write an entire section.

When you have a reference to help you make a point, you’ll find the words to describe it. A statistic from a recent study may just be one sentence, but you can write paragraphs before and after that one piece of information explaining it and talking about its application.

If you’re familiar with my content, you know I use research and images in all my posts.

Even if this is the first time you’re reading one of my blogs, you can see I’ve used research throughout this post to illustrate my points.

Edit your own work

You don’t need an editor to review your posts.

You can do it on your own.

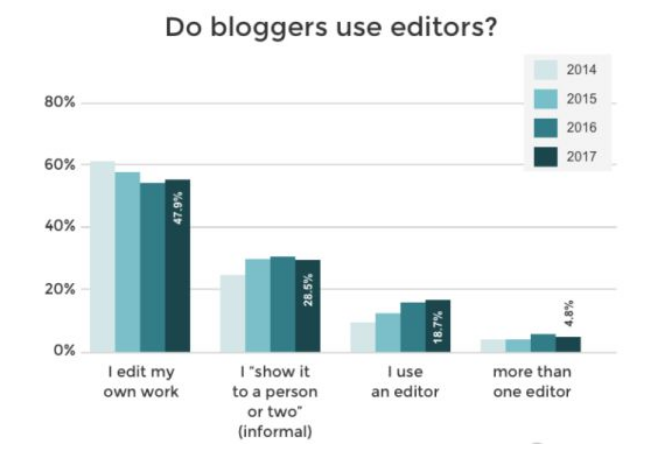
In fact, studies show that the majority of bloggers don’t use editors for content published on their websites.

editors

Using editors is another example of something I see people do because they think it will save them time. But ultimately, it ends up being inefficient.

If you send your work to an editor, you need to rely on their schedule to get the post finished.

When I write something, I want to make sure it’s done.

You don’t want your posts sitting in limbo waiting to be edited and then sent back for feedback and other revisions. By the time you get those notes back, the topic is no longer fresh in your mind.

Instead of using an editor, put your posts through editing software, such as Grammarly.

You don’t need to make all the recommended changes. Just see whether there are any glaring errors that need to be fixed.

After that, read your post out loud to yourself.

This is the best way to catch any other mistakes before you publish your content. You’ll be able to tell whether something sounds funny and needs to be rewritten.

Depending on the length of your content, editing should take no longer than 10 or 20 minutes.

If you’re using an editor or spending much longer than this, you need to look at how you can improve the efficiency of your editing process.

Conclusion

It shouldn’t be taking you all day to write a blog post. At the same time, you don’t want to write so fast that the quality of your content suffers.

Fortunately, there are ways for you to write quality content at a reasonable speed.

Make sure you have a list of blog topics to choose from so you’re not wasting time figuring out what to talk about when you sit down to write.

Outline your posts before you start writing.

Blogging requires your full attention. Try to write when you can complete a post in one sitting.

Add research, statistics, and images to your posts. This will improve the quality and give you something to talk about.

Don’t use an editor. This will prolong the process. You can do this yourself.

If you follow the tips I’ve covered in this guide, you’ll be able to write high quality blog posts faster than ever before.

By the way, for those of you who are curious, I finished writing this post in less than three hours.

How long does it typically take you to write a high quality blog post?


from Quick Sprout http://bit.ly/2CsVDb2
via IFTTT

Wednesday, December 19, 2018

How to Increase Engagement on Facebook Videos

Videos are a crucial component of your content marketing strategy. Once your videos are created, you need to distribute them on as many channels as possible.

With more than 2.2 billion monthly active users, it’s only logical for Facebook to be one of those distribution platforms.

Overall, this should be a winning strategy for your business. Here’s why.

According to research, 90% of consumers report that videos help them making purchasing decisions. And 64% of people say that watching a video increases their chances of buying something.

Further, 77% of businesses are using videos on their social media channels. Consumers are used to seeing this type of content from brands.

By using videos to improve your social media marketing strategy, your company will be able to:

  • generate leads
  • create brand awareness
  • increase website traffic
  • drive sales

But there’s a catch. You can’t assume that all your videos will be effective just because you published them on Facebook.

Your videos need to drive engagement.

If people aren’t engaging with your content, this strategy will not be effective.

Fortunately, there are plenty of ways for you to increase the engagement rates of your Facebook videos. That’s what inspired me to write this guide.

Use this as a reference to help you produce better videos moving forward and fix some of the videos you already shared. Here’s what you need to do.

Add subtitles

Usually, good audio is a key factor of a good video. Spoken words and other sounds can help you convey a message.

But if you’re relying on audio to drive engagement on Facebook videos, it’s going to be a problem.

That’s because 85% of videos on Facebook are watched without sound.

If people are speaking in your video, you need to add subtitles to the video. Even if your video doesn’t have people speaking, you can use subtitles as a way to narrate your video.

Explain what’s happening. Your video must be optimized for silent viewing.

Plus, Facebook videos automatically start playing on mute when users scroll through news feeds on both desktop and mobile devices.

If your videos require volume to get the message across, it could be why your engagement rates are so low.

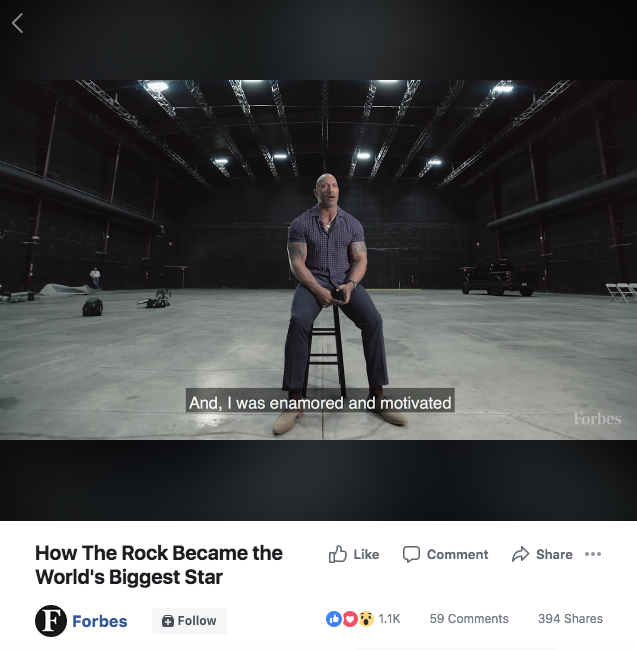
Here’s an example of how Forbes Magazine used subtitles on this Facebook video:

forbes1 1

Dwayne “The Rock” Johnson is speaking throughout this entire video. But even those watching with the sound off will receive his message.

Here are the detailed instructions for how to add closed captions on Facebook.

You can also do this manually with editing software such as:

  • Adobe
  • Final Cut Pro
  • Animoto

Knowing that most people watch videos on silent on Facebook will change the way you produce content.

If you have videos that require audio, you could always add captions asking viewers to turn the sound on to experience the video in a better way.

Here’s an example from Tasty:

tasty

You don’t need to completely abandon audio. I’m not saying you should start creating videos without sound.

Just make sure they are optimized for silent viewing. Adding subtitles or captions is the easiest way to do that.

Publish a square format

Square videos have a 1:1 ratio. This format is much better for mobile users.

Why is this important?

Well, 92% of Facebook users access it on their mobile devices daily.

When square videos are played on these devices, they take up more real estate on the screen.

But engagement rates are higher on square videos on both mobile and desktop devices.

square

Furthermore, square videos have an average higher reach on mobile and desktop devices compared to landscape and letterbox formats.

The only time when a landscape video outperforms a square video is when it comes to the average completion rate on desktop devices.

Do you want people to watch your videos in full? Absolutely.

But remember, we’re trying to drive engagement.

Square videos still have a higher completion rate on mobile devices. If your desktop completion rate is the only metric that might suffer here, it’s still worth it to publish square videos.

It’s also worth noting that square videos get more average views per post on Facebook than landscape and letterbox videos combined.

Grab attention early

If people aren’t intrigued by your content within the first few seconds of your video, they won’t watch the whole thing and engage with it.

Avoid slow starts. Put your most interesting shots right in the beginning to pique viewers’ interest from the get go.

Here’s a great example of a video that Thrillist shared via the Matador Network:

attention early

As you can see, this video has more than 75 million views.

This perspective is amazing. It’s the type of shot that nearly makes you gasp when you see it.

Notice the progress bar. This is shown in the opening seconds of the video.

As a result, viewers will stick with the video because their attention has been grabbed early on.

This video also illustrates one of my previous points about subtitles.

If you look at the bottom right corner of the screenshot above, you can see that by default, the volume is muted. But you can still understand what’s happening from the captions on the screen.

I also like this example because it’s a shared post.

Not everything you publish needs to be your own. You can share someone else’s video on your page as Thrillist did here.

On the flip side, Matador Network benefits as well since its content is being shared.

The reason why you want people to share your content is it drives even more engagement when it’s viewed by more users. That’s what helped this video reach 75 million views.

Upload native videos

Native videos play in the feed, like in the examples you’ve seen so far. A native video will start playing automatically when a user scrolls to it on Facebook.

This is different from a video uploaded somewhere else and then shared on Facebook as a link, such as a link to a YouTube video.

If you’re not publishing native videos, it could be why you’re not satisfied with your current engagement rates.

Native videos have more comments than links to videos:

native 1

On average, native Facebook videos have a 110% higher interaction rate than YouTube videos.

They are also shared at a rate that’s 478% higher than links to YouTube videos.

As I said before, Facebook will automatically play videos on a user’s feed when they scroll on both desktop and mobile devices. But this happens only if the video is native.

Otherwise, you need to rely on the user clicking on the link you shared, getting redirected to another platform, and watching the content, and hope they engage with it.

That’s too many extra steps, decreasing your video  engagement rates.

Target your preferred audience

Who is watching your videos on Facebook?

The engagement of your videos will depend on who sees them. You want to make sure your video content is relevant.

You’ll need to identify your target audience. Once you determine who they are, use that information to define the audience for your videos.

Before you publish anything, look for this option in the bottom left corner of the screen. Here’s what it looks like:

bottom left

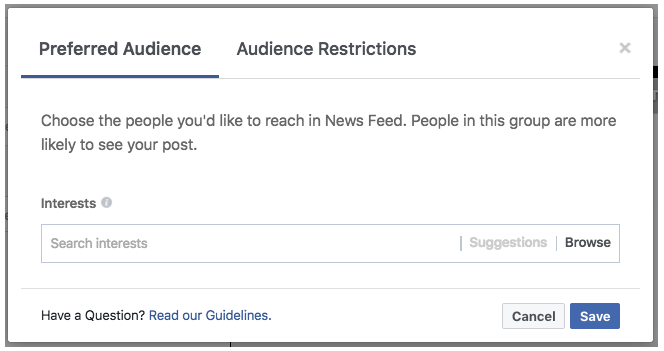
Once you click on this button, you’ll see a popup with the option to select your preferred audience and restrictions for the video.

audience

With the preferred audience, you’ll be able to reach users based on factors such as the pages they’ve liked and their interests.

For example, you could choose interests like “swimming” or “baseball” depending on what type of business or industry you’re in.

The audience restrictions tab gives you the chance to narrow down users based on demographics such as:

  • age
  • gender
  • location
  • language

Making sure the audience is relevant will increase your engagement rates.

You can take this strategy one step further by publishing Facebook video ads. 71% of people say that the video ads they see on Facebook are relevant to them.

That’s because Facebook does a good job of giving businesses ways to target the right people with ad settings.

For example, you can use lifetime value to create a Facebook audience that converts.

Craft a striking title and description

You spent much time filming and editing the video. Time to publish it on Facebook, right? Not so fast.

You need to put the same effort into your title and description.

Learn how to increase clicks by mastering your headlines. The idea is to grab the attention of viewers and get them interested right away, before they even watch anything.

Descriptive videos will also increase your chances of being seen through organic searches on the platform.

There are more than 2 billion searches on Facebook each day. You definitely want your videos to be optimized for these searches.

I assume you’ll be using your Facebook videos on other distribution channels as well, which you should be. It’s a great idea to repurpose your content across multiple marketing platforms.

But your copy for these videos needs to be Facebook-specific.

Look at this data from Sprout Social about Facebook copy:

words

Furthermore, Facebook posts with 80 characters or fewer have 88% more engagement.

Facebook gives you a limit of 63,206 characters per post. You can experiment with a longer copy if you want.

But as you can see from the statistics above, fewer words and characters drive higher engagement rates.

Include a CTA

What should viewers do when they finish watching your videos?

If you don’t know the answer to this question, they certainly won’t have a clue.

Your Facebook videos need to have a CTA. That’s what’s going to drive engagement.

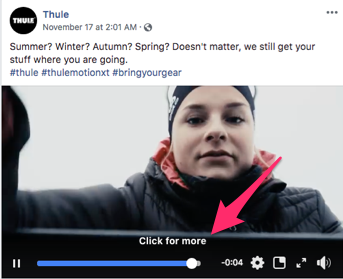
Here’s an example from Thule:

Thule

The CTA is a link to its website, trying to drive sales of the products showcased in the video.

That’s one approach.

But you can drive engagement by other means. It all depends on the goals of each campaign.

If you want to expand your reach and create brand awareness, you’ll want your videos to be shared on Facebook.

A potential CTA could be as simple as “share this video with your friends.”

Ask viewers to comment on it as well by ending the video with a question to spark a debate. All of these strategies will increase your engagement metrics.

Broadcast live

While you may not want to do it every day, live video streaming is a great way to boost engagement on Facebook.

With Facebook Live, you can have a more authentic interaction with your audience.

As you broadcast, they’ll be able to add comments and questions. This gives you the opportunity to respond to those users in real time.

When should you go live?

live

Late at night and late in the evening are the two best times to go live if you’re trying to drive engagement.

I’d say you can use this strategy about once a week.

Try to stick to a schedule, similarly to a TV show. If your audience knows you’re going live every Wednesday night at 9:00 PM, you’ll have more viewers.

Showcase your best videos

Not all your content is the same.

As someone who produces tons of blog posts, videos, and podcasts, I know this reality firsthand.

It would be amazing if everything you produced and published was perfect, but that’s unrealistic.

Some of your videos will be better than others. You know it, and your audience knows it too.

That’s why those videos have more views, likes, shares, and comments.

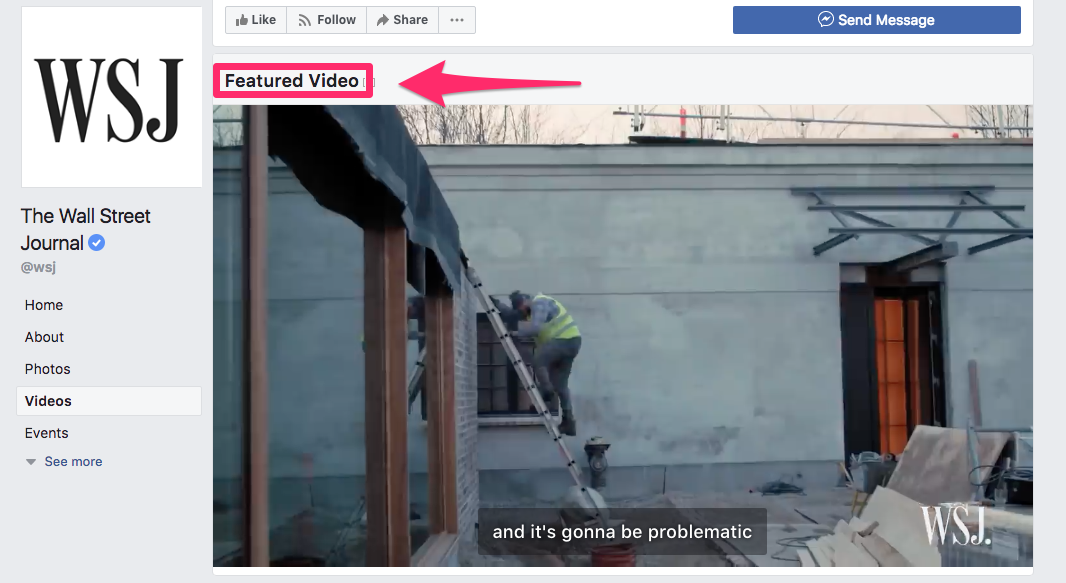
Feature those videos on your Facebook page. Here’s an example from The Wall Street Journal:

WSJ

Usually, the most recent videos are displayed first.

But if a user navigates to your videos page on the left menu, you have the option to have your best videos shown ahead of your newest ones.

The idea behind this strategy is that you can hook people with your best videos.

Once they engage with that content, they’ll be more likely to watch your other videos and keep coming back for more in the future.

Conclusion

Your video content might be great, but it’s useless if nobody is engaging with it.

Since the vast majority of Facebook videos are played without sound, you need to add subtitles to optimize them for silent viewing.

Publish square videos. Your content should be native to be played automatically in everyone’s feed.

Start with your best content to grab your viewers’ attention early. Don’t slack when you’re writing a title and description.

Take advantage of the preferred audiences feature to make sure your videos are shown to relevant viewers. All of your videos should end with a CTA.

Go live. Highlight your best content as a featured video.

If you follow the advice I’ve outlined in this guide, you’ll see a major boost in engagement metrics for your Facebook videos moving forward.

What strategies is your company using to drive engagement on Facebook videos?


from Quick Sprout https://ift.tt/2UZFoJR
via IFTTT