Thursday, September 26, 2019

The Best Virtual Private Servers (VPS Hosting)

When most people launch a new website, they use a shared hosting service to meet their web hosting needs. That’s because shared hosting is the most basic and cost-effective way to host a beginner website.

But as your site scales, its hosting needs are going to change. That’s when it’s time to start looking for a virtual private server—better known as VPS hosting.

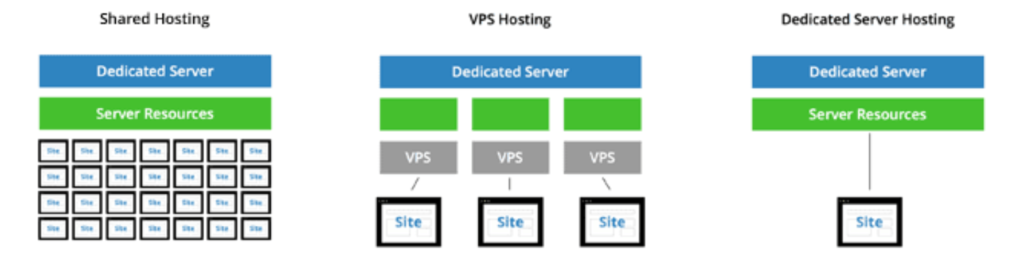
VPS hosting is a step above shared web hosting. With a virtual private server, you’ll still be sharing a single server, but you’ll be sharing it with fewer websites.

Here’s how it works.

Basically, a virtual private server is one server that’s divided into separate virtual machines. Each virtual server can be run with custom configurations and separate operating systems.

VPS hosting comes with dedicated server resources as well. So even though you’re sharing a single server with other websites, your RAM and CPU are independent of those sites.

A virtual private server is best for those of you who want the benefits of a dedicated server, but don’t want to pay the high costs associated with dedicated hosting.

Here’s a visual representation that shows the difference between shared hosting, VPS hosting, and dedicated servers.

Hosting Compared

Most of you probably don’t need a dedicated server. But you’ll eventually outgrow your shared hosting plan.

Upgrading from a shared plan to a virtual private server will improve the speed and performance of your website. Since you won’t be sharing resources, your site will be more responsive on the user-end. VPS hosting is more equipped to handle traffic spikes as well.

For more information on how VPS stacks up against other hosting options, check out my guide on the best web hosting providers.

Virtual Private Server Reviews

Finding a VPS hosting plan can be intimidating. There are so many hosting providers out there offering VPS options. Taking the time to research all of them would take days.

Fortunately for you, I’ve already taken the time to do all of the research. I’ve gone through dozens of VPS hosting plans and narrowed down the top options for you to consider.

These are the top 7 VPS hosting providers:

I’ve included a detailed review for each one of these services below. I highlighted their plans and pricing while explaining what makes each one a top VPS hosting option. You’ll also learn about some of the potential downsides or weaknesses of these providers as well.

Bluehost

bluehost

Bluehost is an industry leader in the web hosting space. Their VPS plans offer a wide range of hosting options, to accommodate the needs of nearly every website.

The reason why Bluehost stands out as a top choice to consider is because their virtual private servers offer both power and flexibility. They allow multi-server management, meaning you can add more space to your plan at any given time.

This is ideal for websites that need the ability to scale at a moment’s notice, without any delays or downtime. You’ll be able to accomplish this without any assistance from a Bluehost administrator, directly from your advanced cPanel.

Here’s an overview of Bluehost’s plans and pricing:

Standard VPS

  • Starting at $19.99 per month
  • 2 CPU cores
  • 30 GB of SSD
  • 2 GB of RAM
  • 1 TB of bandwidth

Enhanced VPS

  • Starting at $29.99 per month
  • 2 CPU cores
  • 60 GB of SSD
  • 4 GB of RAM
  • 2 TB of bandwidth

Premium VPS

  • Starting at $49.99 per month
  • 3 CPU cores
  • 90 GB of SSD
  • 6 GB of RAM
  • 2 TB of bandwidth

Ultimate VPS

  • Starting at $59.99 per month
  • 4 CPU cores
  • 120 GB of SDD
  • 8 GB of RAM
  • 3 TB of bandwidth

As you can see, Bluehost offers pricing and resources for websites of all shapes and sizes.

Even if you’re looking for an entry-level VPS plan, I’d still recommend starting with the Enhanced VPS as opposed to the Standard. For just $10 more per month, you’ll get double the SSD, RAM, and bandwidth.

Although it’s worth noting that the prices listed above are promotional rates only. You’ll end up paying $29.99, $59.99, $89.99, and $119.99, respectively, when your plan renews.

All Bluehost virtual private server plans include 24/7 support and a 30-day money-back guarantee. For a fair price, you’ll benefit from plenty of resources, support, and uptime compared to other options on the market.

InMotion

inmotion

Unlike other web hosting providers that are best-known for shared hosting or dedicated servers, InMotion specializes in VPS hosting.

It’s a top choice to consider whether you’re upgrading from an existing plan or looking to host a brand new website.

One of the biggest differentiators of InMotion is that they offer traditional managed VPS hosting as well as Cloud VPS hosting. Altogether, they have six VPS plans (three for each category).

Let’s take a look at each one to see what’s best for your website.

InMotion Managed VPS Hosting

The managed plans are ideal for business owners, agencies, and resellers. Each plan offers free server management, updates, and free site migrations.

You’ll also benefit from a resource monitoring dashboard, unlimited domains, unlimited email accounts, and unlimited MySQL databases.

  • VPS-1000HA-S — Starting at $29.19 per month
  • VPS-2000HA-S — Starting at $47.39 per month
  • VPS-3000HA-S — Starting at $69.34 per month

To get these low introductory rates, you’ll need to sign up for a 2-year plan.

All plans are ecommerce optimized and come with optional root access for those of you who want more advanced control over your settings.

InMotion Cloud VPS

The cloud plans offered by InMotion are best for developers and system administrators. That’s because each plan comes with full root access, including SSH keys, which gives you total control over customization.

As a developer, you’ll essentially get a blank-slate to customize a VPS to meet the exact needs for your website. You can also code in the language of your preference, like Java, Ruby, and other population choices.

InMotion Cloud VPS provides enterprise-level hardware, with SSD servers that are 20x faster than the competition.

  • Cloud VPS-1000 — Starting at $21.04 per month
  • Cloud VPS-2000 — Starting at $42.24 per month
  • Cloud VPS-3000 — Starting at $69.34 per month

To get the best introductory rates for cloud VPS, you need to commit for one year, as opposed to two years with the managed plans.

As you can see, the pricing for the managed plans and cloud hosting plans are very similar. So the biggest difference between the two is basically how much control you want over the server.

Unless you’re a developer, I think that the majority of you should lean toward the managed plans, just based on the simplicity.

LiquidWeb

liquidweb

LiquidWeb isn’t one of the most well-known hosting providers on the market, but they still offer excellent hosting solutions.

All LiquidWeb VPS plans are fully managed. They manage your hardware and the network. Their administrators also handle all security updates and patches as well as support for the operating system and all software.

Unlike some of the other hosting providers we’ve seen so far, LiquidWeb doesn’t have any special or fancy names for their plans. You’re essentially paying for your resources, starting with RAM.

  • 2 GB RAM — $29 per month
  • 4 GB RAM — $49 per month
  • 8 GB RAM — $69 per month
  • 16 GB RAM — $129 per month

All of these prices are based on annual contracts. You’ll pay significantly more if you choose to go month-to-month.

LiquidWeb has 2-year plans available upon request. But you’ll need to talk to their customer service team to find out those special rates for your website.

Speaking of customer service, the support offered by the LiquidWeb team is exceptional. They are available 24/7 via phone, email, and live chat.

All LiquidWeb virtual private servers have 10 TB of bandwidth, which is the most we’ve seen so far. The 16 GB of RAM plan has up to 200 GB of SSD disk space, which is also the highest we’ve seen so far.

Most VPS providers don’t offer a 16 GB plan. I can’t imagine most of you will need it, but for those of you who do, this is where I recommend getting it.

To put that into perspective for you, 16 GB of RAM is double the amount of the highest plans offered by both Bluehost and InMotion.

HostGator

hostgator

HostGator is another popular name in the world of web hosting. While they are best known for their low-cost shared hosting plans, they also have virtual private servers that are worth considering.

HostGator offers competitive VPS pricing, although their plans aren’t the lowest that we’ve seen.

Snappy 2000

  • Starting at $29.95 per month
  • 2 GB of RAM
  • 2 CPU cores
  • 120 GB of disk space
  • 1.5 TB of bandwidth

Snappy 4000

  • Starting at $39.95 per month
  • 4 GB of RAM
  • 2 CPU cores
  • 165 GB of disk space
  • 2 TB of bandwidth

Snappy 8000

  • Starting at $49.95 per month
  • 8 GB of RAM
  • 4 CPU cores
  • 240 GB of disk space
  • 3 TB of bandwidth

The prices are fair for the resources. But like most hosting providers, these introductory rates will increase when your plan renews.

However, HostGator gives you the option to lock in these low rates for the longest time compared to other options we’ve seen so far. You can pay these intro rates for 36 months.

But with that said, the price increases are the most significant compared to other providers as well. The introductory rates are all roughly 75% cheaper than the actual rates.

HostGator stands out with its reliable and multi-layer security network. This enhanced protection paired with the ability to easily scale your resources is what makes HostGator a top VPS choice on our list.

Just keep in mind that their customer service and support falls a bit short compared to other providers.

HostPapa

If you’re looking for an enterprise-grade virtual private server, HostPapa needs to be toward the top of your list.

With up to 12 CPU cores, 24 GB of RAM, and 1 TB of SDD, HostPapa’s capacity is unmatched.

Here’s a closer look at all of their plans and pricing.

hostpapa

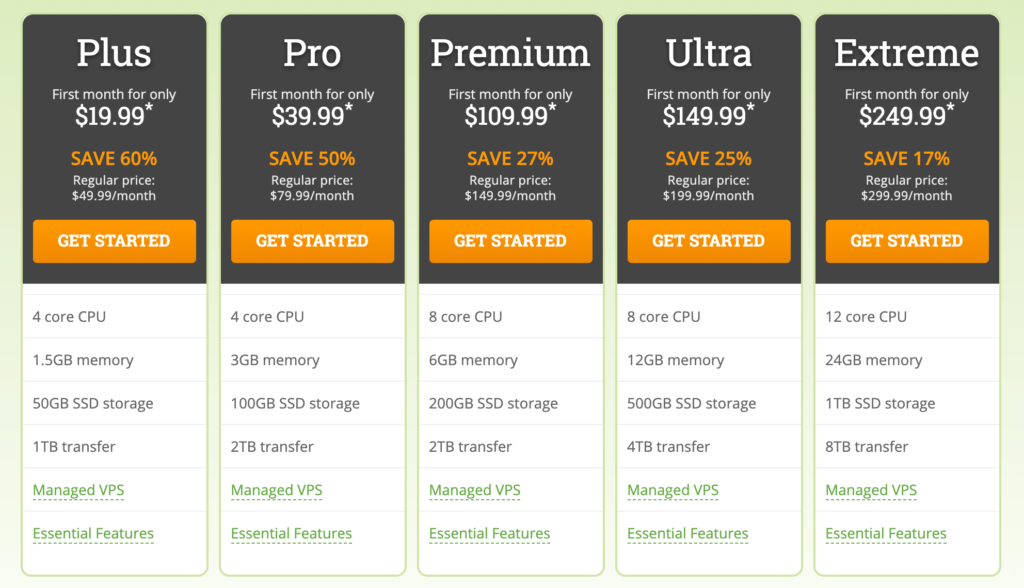
So for those of you who want as many resources as possible, you’ll have to pay top dollar to get it. The Extreme VPS plan starts at $249.99 per month and renews at $299.999 per month.

It’s safe to say that’s a huge jump from their lowest price-point, starting at just $19.99 per month.

For those of you who are developers or more advanced, you’ll have root access to make customized changes.

Another top benefit of HostPapa is that you can increase your power and resources at any time. They also give you the option to manage multiple servers simultaneously. Regardless of your plan, you can always add an extra server directly from the HostPapa dashboard.

So for those of you who are planning to scale significantly, you won’t have to worry about outgrowing your VPS.

All HostPapa VPS plans are ecommerce optimized and provide enhanced security for online stores.

HostPapa is a top choice for companies who want to build a web-based app as well.

For technology and features that are so advanced, the cPanel interface offered by HostPapa is extremely easy to use. You can monitor all of your resources, and make any adjustments in real-time with just one click.

If you’re currently using another hosting provider, HostPapa offers a free domain transfer and free VPS migration. They also have outstanding 24/7 support.

With all of this in mind, I’d only consider using HostPapa if you need a plan with the most possible resources. Otherwise, you can get comparable plans at a better rate elsewhere.

iPage

ipage

If you’re looking for a low-cost VPS plan, look no further than iPage. With plans starting as low as $19.99 per month, iPage offers a quality service at an affordable rate.

iPage has been around for more than 20 years. Over 1 million sites are using this platform for web hosting. So if you decide to go with one of their VPS plans, you know that you’re getting it from a reputable provider.

Let’s take a closer look at their plans.

Basic VPS

  • Starting at $19.99 per month (renews at $24.99)
  • 1 CPU core
  • 1 GB of RAM
  • 40 GB of disk space
  • 1 TB of bandwidth

Business VPS

  • Starting at $47.99 per month (renews at $59.49)
  • 2 CPU cores
  • 4 GB of RAM
  • 90 GB of disk space
  • 3 TB of bandwidth

Optimum VPS

  • Starting at $79.99 per month (renews at $99.99)
  • 4 CPU cores
  • 8 GB of RAM
  • 120 GB of disk space
  • 4 TB of bandwidth

As you can see, these are the lowest prices that we’ve seen so far, even after the full-price renewal rates kick in.

iPage also specializes in web design. So for those of you who are building a new website from scratch and want to start with a cheap VPS hosting plan, iPage is a top choice.

Even with these low rates, you’ll still benefit from quality 24/7 support. You just won’t get the capacity and resources offered by some higher-tier providers.

A2 Hosting

A2 Hosting

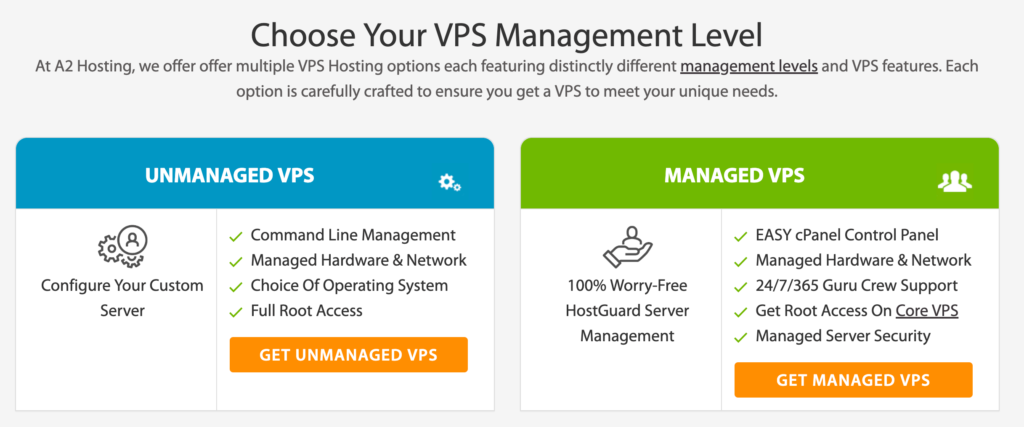
A2 Hosting stands out because they offer both managed and unmanaged VPS plans.

Typically, unmanaged VPS plans with root access and custom features come at a higher price point. But not with A2 Hosting.

Experienced developers can get an unmanaged virtual private server for as low as $5 per month. Although with just 20 GB of storage and 512 MB of RAM, this entry-level plan likely won’t meet your needs.

Here’s a closer look at A2’s VPS plans:

Unmanaged VPS Plans

  • Entry — Starting at $5 per month
  • Mid — Starting at $10 per month
  • Elite — Starting at $15 per month

With the unmanaged plans, you can configure your server preferences for disk space, CPU, memory, and bandwidth. Obviously, any adjustments will impact the price.

Managed VPS Plans and Core VPS Plans

  • Power — Starting at $25 per month
  • Prestige — Starting at $35 per month
  • Pinnacle — Starting at $50 per month

The only difference between the Managed plans and Core plans is that the core plans come with root access. However, you won’t be able to configure your server the same way you would if you select an unmanaged plan.

Overall, A2 is a great choice for developers who want complete control and customization over their VPS at an affordable rate. For traditional managed hosting, I’d probably look elsewhere.

With that said, A2 Hosting has one of the best customer support teams on the market. So if that’s something that you prioritize, it’s worth taking a closer look at their plans.

How to Find the Best VPS Host For You

Now that you’ve had a chance to look at some specific VPS plans, it’s time to determine the best possible choice for you and your website.

To make things easier, your decision should be based on two main factors.

  1. What resources do you need?
  2. How much are you willing to spend?

In most cases, price and features will go hand-in-hand. If you need the highest possible RAM, disk space, and storage, then you should expect to pay higher prices.

Aside from that, you could lean toward one provider or plan over another based on other features like customer support, security, and the ability to scale.

With all of that in mind, I’ve put each VPS provider above into a “best for” category. Use can use list this as guidance to steer you in the right direction.

  • Bluehost — Best for power and flexibility at a reasonable price.
  • InMotion — Best cloud VPS plans.
  • LiquidWeb — Best fully managed VPS with high memory and storage plans.
  • HostGator — Best for locking in low introductory pricing rates.
  • HostPapa — Best enterprise-level VPS plans with the highest available resources.
  • iPage — Best cheap VPS plans.
  • A2 Hosting — Best low-cost unmanaged plans for developers.

As you can see, each review on our list stands out for a different reason. So I’m sure the needs of you and your website will fit somewhere into the categories above.

Virtual Servers Compared to Other Hosting Options

Before you finalize your decision on a VPS hosting plan, you need to make sure that a virtual private server is your best option.

If you’re creating a new website from scratch and don’t plan on having too much traffic for a long time, then shared hosting will be your best bet.

For those of you who want complete customization over your server and expect 100,000+ visitors each month, then you might want to consider a dedicated server. You can refer to my guide on the best dedicated hosting plans for more information on this.

VPS hosting is for everyone else who falls in the middle.

So if you’ve outgrown your shared plan but don’t need the resources offered on a dedicated server, then a virtual private server will be perfect for your website.

As a reminder here are my top picks for the best VPS hosting.


from Quick Sprout https://ift.tt/2nvCYq9
via IFTTT

Thursday, September 19, 2019

The Best SEO Courses and Guides on the Internet

By now, marketers are business owners all over the world have recognized the importance of SEO. It’s no secret that your website needs to improve its search engine ranking.

What is SEO?

The acronym stands for “search engine optimization.” Essentially, it’s the practice of driving organic search traffic to a website. The keyword here is organic, meaning you’re not paying for a top position through PPC campaigns.

More traffic, more conversions, more dollars. That’s why SEO is a crucial component of every website on the planet.

In my experience, so many marketers and entrepreneurs out there have this false sense of belief that they understand the ins and outs of SEO and how it works. In reality, this is usually not the case.

SEO is like anything else. Unless you’ve gone through practice, training, or some type of education, it’s going to be difficult to master.

Fortunately, the digital era has made it possible for you to learn SEO on your own with the help of online courses and guides. But which ones are the best? I’ve narrowed it down for you.

Who needs SEO certification?

SEO courses and guides are great for anyone, regardless of their experience with the subject.

It doesn’t matter if you’re an SEO beginner, have years of experience dabbling with SEO, or fall somewhere in-between; SEO certifications are for everyone.

SEO courses are well worth the investment. In some cases, the only investment will be your time. There are plenty of free SEO courses out there, and I’ll cover some of the best ones in this guide.

Some courses you’ll need to pay for. But again, it’s still worth the investment. The cost is marginal compared to the benefits of watching your SERPs skyrocket toward the top position.

Plus, SEO is a high-demand skill. Even if you don’t have your own website, any marketer, entrepreneur, or freelancer can make money by charging websites for SEO services.

The Best SEO Courses

Now that you understand the importance of proper SEO training, it’s time to see where you can get it from. I’ve identified the best SEO courses on the Internet today.

As I mentioned before, there’s a mix of some free and some paid options. Some courses are made for beginners, while others focus on more complex SEO components.

Regardless of what you’re looking for, I know there’s an option for you on this list.

SEMrush Academy

SEMrush

SEMrush is a big player in the world of SEO. This SaaS company sells software for online visibility and digital marketing. SEO is a huge component of this.

SEMrush has been around since 2008, before the surge and popularity of SEO as we know it today. The company started as an SEO tool and browser extension before diving into the SaaS model.

With such a strong history in SEO, it’s no surprise that the SEMrush Academy offers some of the best SEO courses out there.

Right now, they have just under 20 courses specifically focusing on SEO. These courses cover things like:

  • SEO toolkits
  • Site audits
  • Keyword research
  • Competitive analysis
  • On-page and technical SEO
  • Link building
  • SEO fundamentals

The courses and exams range anywhere from 10 minutes to 5 hours. So there’s definitely plenty of variety here.

SEMrush Academy teaches SEO with a series of video tutorials and lessons.

In addition to the lessons, they also offer several different SEO certifications. You can take an exam, and get a certification if you pass. This is a great option for marketers, agencies, and aspiring SEOs. You can use these certifications to show prospective clients that you’re an expert in different areas of SEO.

SEMrush Academy also has courses and exams on social media marketing, content marketing, affiliate programs, and PPC. So check these out while you’re on the site as well.

The best part? All courses and exams offered by SEMrush are 100% free, including the certifications.

Udemy

udemy

With more than 100,000 online courses, Udemy is one of the most popular platforms for learning something new. Online training is their specialty.

One of the reasons why I like Udemy so much is the way that they present courses on their website. Each course has ratings and reviews, so you can see what others have to say about their experience. It also tells you exactly how many other people have enrolled to date.

Some of Udemy’s most popular SEO courses include:

  • SEO for WordPress
  • SEO for local businesses
  • Keyword research
  • Site audits
  • Link building

The more advanced courses will tell you if you need to have any prior experience with certain components of SEO before you get started. So make sure you’re taking courses that align with your skill level.

Courses start at $10.99 and can be accessed on your mobile device as well.

When you buy a course from Udemy, you have full lifetime access to it, and you’ll also receive a certificate of completion.

Udemy also specializes in courses for teams. If you want training for five or more people, check out Udemy for Business. This is a great choice for those of you who run an agency. You can get your entire team certified at the same time.

Yoast Academy

Yoast Academy

Yoast is a name that many of you may already be familiar with. If you’ve read my guide on the best WordPress plugins, you know that the Yoast SEO plugin was ranked as the best overall SEO plugin for WordPress.

Yoast Academy offers SEO training courses for beginners, content SEO, technical SEO, and bundles as well.

Here are some of their most popular SEO courses:

  • SEO copywriting
  • Keyword research
  • Site structure
  • Content SEO
  • Structured data
  • Multilingual SEO

The vast majority of the courses are paid, but they do offer a free beginner training course as well.

Prices range from $39 to $349. Most courses fall in the $150 – $250 range. So if you’re interested in taking multiple courses from the Yoast Academy, your best bet is the bundle deal.

For $41.58 per month (billed annually), you’ll have access to all of the SEO courses. If they come out with new SEO courses while you’re subscribed, you’ll have access to those as well.

HubSpot Academy

Hubspot Academy

HubSpot is another well-known name in the digital marketing industry. They offer marketing and sales CRM software to businesses.

In addition to their great products, services, reputation, and blogs, HubSpot also has an academy offering educational tools for various subjects.

While HubSpot doesn’t have a large variety of SEO courses like some of the other options on our list, they have one course that covers several components of SEO.

In total, the course contains 21 videos, four lessons, and three quizzes. The total completion time is less than two hours. The lessons are broken down into the following categories:

  • Finding the SEO strategy that fits your business
  • Scaling your backlink strategy
  • SEO for blogging
  • Guest blogging

By completing the lessons, you’ll be able to evaluate and improve your website’s SEO with a new perspective from experts who know how to rank on Google.

Another reason why I love this HubSpot course is because they focus on how to build backlinks, which is something I’ve covered extensively here at QuickSprout.

Overall, it’s a free course from an industry leader that will take less than two hours of your time. I can’t find any reason why you wouldn’t want to take advantage of this.

The Blueprint Training

Blueprint Training

The Blueprint SEO Training has 13 SEO courses; four of which are free. These courses are designed for agencies, so the paid ones are a little bit pricier compared to some of the other sites we’ve seen.

Courses range anywhere from $99 to $999, with average price point right in the middle of those two numbers.

They offer SEO training for things like:

  • Agency sales
  • Content audit
  • On-page SEO
  • Competitive analysis
  • Link acquisition
  • Keyword research
  • Technical SEO

Since the course is made for agencies, it also includes helpful educational guides on agency staffing, client onboarding, and project management.

Rather than purchasing each one individually, you can save by buying in bulk. It’s $2,999 for full access to all of their courses.

The Best SEO Guides

If you don’t want to take a course on SEO, there are plenty of outstanding free guides on the Internet as well. While the courses are definitely better for actionable training and certifications, the guides are a great way to get your feet wet with SEO.

Check these out if you want to learn the SEO basics from different experts in the industry.

MOZ – The Beginner’s Guide to SEO

MOZ is one of the most well-known and reputable names in the SEO industry. They specialize in SEO software and data tools for websites of all shapes and sizes.

So it’s no surprise that their Beginner’s Guide to SEO is one of the best on the web.

The guide is broken down into eight chapters, making it easy for you to skip and scan based on what you’re looking for. It covers the following SEO components:

  • How search engines work
  • Keyword research
  • On-page SEO
  • Technical SEO
  • Link building
  • Measuring and Tracking SEO

MOZ also includes a helpful SEO glossary, which is a great way to get familiar with terms you’ll come across as you’re studying, learning, and applying SEO.

Google – Search Optimization Starter Guide

I’m sure you’re familiar with the term, “straight from the horse’s mouth.” Well, in the world of SEO, Google is the horse.

Your entire SEO strategy needs to revolve around Google’s algorithm. So reading the Search Optimization Starter Guide published by Google should be a top priority for everyone.

The guide details things like:

  • How to help Google find your content
  • Tell Google which pages should NOT be crawled
  • Help Google understand your content
  • Manage your SERPs
  • Website hierarchy
  • Optimize content
  • Mobile optimization
  • Analytics

It’s extensive, to say the least. The format of each section takes you through SEO best practices and things to avoid. So if Google is telling you to avoid it, then you better listen to them.

Shopify – The Beginner’s Guide to Ecommerce SEO

It’s tough to talk about ecommerce without mentioning Shopify. Their ecommerce platform is an industry leader. Shopify also does a great job of setting merchants up for success.

The Beginner’s Guide to Ecommerce SEO is worth the read.

As the name implies, it’s niche-specific. So if you’re running a blog, small business site, or something other than ecommerce, then you don’t need to read it unless you want to further your personal education on the subject.

The post outlines and explains how ecommerce sites can approach SEO differently. It’s a great angle and includes a free SEO checklist as well.

Search Engine Land – Guide to SEO

Search Engine Land is a popular blog on, you guessed it—search engines. They’re constantly posting updates about search engine news, and have detailed guides on Google algorithm updates.

As experts in this space, it’s no surprise that their Guide to SEO is nothing short of spectacular. The guide includes SEO success factors for:

  • Content
  • Site architecture
  • HTML code
  • Trust and authority
  • Link building
  • Penalties and violations
  • Social media

I like the guide because it falls somewhere between a beginner’s guide and an expert guide. It has some SEO basics but takes an easy approach to some more advanced SEO strategies as well.

Quick Sprout – Everything You Need to Know About SEO

I couldn’t write a post on the best SEO guides without including my own. I’m obviously biased, but Quick Sprout’s guide on Everything You Need to Know About SEO covers exactly what the title says.

The page is set up slightly different from the others we’ve seen so far. I have so much content published about SEO, that I use this guide to link to more specific and in-depth guides on certain subjects.

There are more than 70 different SEO guides on this page. It includes SEO topics like:

  • Site audits
  • SEO vs. PPC
  • Keywords
  • Content creation
  • Augmented reality SEO
  • Common SEO mistakes
  • WordPress SEO
  • Link building
  • Guest posts
  • Technical SEO

The list goes on and on, and I’m constantly updating it and adding more. So if you want a wide range of both beginner, intermediate, and advanced SEO strategies, this is a great place to look.

Conclusion

We live in a world where you can find nearly anything you want online. So why not take advantage of the SEO courses, guides, and learning tools at your disposal?

The problem is there is too much saturation in this space. Everyone seems to have an “expert guide” or “best course” on SEO. It can be overwhelming for you to find the best one.

So rather than spending hours searching on your own, just use this list instead. I’ve narrowed down the best SEO courses and guides on the Internet today.

Be sure to check back on this page soon. I’m always updating it with suggestions when I find something new or better.


from Quick Sprout https://ift.tt/2OatH21
via IFTTT

How to Create an Ecommerce Website in 9 Easy Steps

We’ve covered the high-level strategy of building an online store that makes real money here.

But how do you create the ecommerce website itself?

In this guide, I’ll cover the 9 steps you need to take to create an ecommerce site in this guide. I’ve broken this guide into four sections:

  1. The Prep Work — These are the things you’ll need to do before you start customizing your actual shop
  2. The Framework — In this section I’ll help you pick the right theme for your online store
  3. The Build — You’ll actually customize and create the ecommerce website in this phase
  4. Get Paid — Connect a payments processor to your store and set the right prices

More specifically, this guide includes:

  • The one and only ecommerce tool we use to build our sites
  • The payment setting that can accidentally reduce your revenue by increasing refunds and chargebacks
  • The biggest myth of pricing and how real ecommerce website owners set their prices
  • What to put on your homepage to convert more customers
  • What an SSL certificate is and why you need one (also how to get one for free)
  • How to create an ecommerce website that’s profitable

You don’t need to finish all four phases in a day, though you could take a rough first draft approach and whip through them in a day, then iterate from there. Your choice! Let’s get building.

The Prep Work: Before You Build Your Ecommerce Website

Before we get into the actual work, I need to make a quick note: I’m going to assume that you’re creating an ecommerce website from scratch.

If you already have an ecommerce store and want to transfer that store to Shopify, we have a detailed guide for that here.

There’s a bit of prep work to do before you start building your Shopify store (or whatever ecommerce software you decide to go with). Don’t skip this stuff — it’s the foundation of your online business and if you get it wrong, your ecommerce business will not succeed.

Step 1: Search for Your Domain

Before going any further, make sure your company name has a good domain you can grab.

I’ve started several stores in the past, had a company name picked out, and then had a terrible time trying to find my domain. Eventually, I went with a completely different name so I had to backtrack and change a bunch of settings, or even recreate my store from scratch.

The whole process goes much smoother if you make sure the domain you want is available from the beginning. Then you won’t have to redo anything.

My go-to resource for checking which domains are available is Namecheap, which is our pick for best domain registrar. A domain registrar is just a fancy name for a company that registers domains on your behalf.

Not only is Namecheap our favorite domain registrar, they also have a wicked fast domain search. Even when I’m not planning on buying a domain, I always use them to search for available domains.

Ecommerce Site - Namecheap Domain Search

Don’t Buy Your Domain Name Yet

Why? Shopify has the option of buying your domain for you. If you use Shopify to buy your domain, they’ll also configure the entire domain. There’s nothing you need to configure or set up, it’s super easy.

I use Namecheap as our domain registrar and to manage all our domains. I believe it’s the best out there. It makes sense for us because we have a ton of sites and domains that we manage. Once you’re managing dozens of domains, keeping them all in one location helps a lot. It’s easier to keep them from expiring, update their settings, and sell them if you want.

But if you only plan on having a couple of domains for your ecommerce site, buying them through Shopify is the easiest option. So hold off on buying for now and just check to make sure your domain isn’t taken.

Step 2: Start Your Shopify Free Trial

Now that you’ve made sure that you won’t have any trouble grabbing the domain for your company, head over to Shopify and start your 14-day free trial.

Why Shopify? Aren’t there other ecommerce site builders?

Yes, there are other ecommerce software options. To be honest, none of them compare to Shopify, it’s not even close.

Years ago, ecommerce sites used to be fairly difficult to manage and build. Then Shopify entered the category and completely changed the game. And in the last few years, they’ve added lots of advanced functionality so they’ll easily scale with you no matter how big your site gets.

Shopify completely outshines the competition in ease of use, feature depth, ability to scale, and price.

Whenever I build an ecommerce site these days, I immediately go to Shopify. I don’t give a second thought to any of the other options out there.

There’s no credit card required so you can get a good feel for how Shopify works without any risk on your end. The 14 days are also perfect for getting your site built. I recommend setting a goal to get your store live by the end of the trial period. Then you’ll be making money as soon as you start paying for Shopify.

The trial will ask you a few questions about your company name, your address, and other standard details.

Step 3: Get Your Domain

With your Shopify store created, it’s time to grab that domain you spotted earlier. The easiest option is to buy your domain within Shopify.

In Shopify, you’ll find a domains section that allows you to search for a domain.

Ecommerce Site - Shopify Buy Domain

Shopify sells .com domains for $14 per year. This is slightly higher than average. Most domain registrars will sell an available domain for $10 per year. If you’re creating your store from scratch and haven’t purchased your domain yet, I wouldn’t worry about trying to save $4 per year. Purchasing your domain directly from Shopify will save you the several extra steps you’d have to take to point your domain from your registrar to Shopify.

I also recommend that you purchase the .org and .net versions of your company name. So you should have three domains in total:

  1. company.com
  2. company.net
  3. company.org

What if you want to manage your domains outside of Shopify? In that case, choose a domain registrar like Namecheap and buy the domain there.

Once you have your domain, you’ll need to configure a few domain settings to point the domain to Shopify. You’ll find detailed instructions on how to do this here.

If you’re pointing your domain to Shopify, do this as soon as possible. It can take a few hours for domain settings to go into effect so you’ll want to make the changes and confirm everything is working before you’re ready to launch your store.

The Framework: Use Shopify Themes to Create Your Ecommerce Website

Step 4: Choose Your Theme

Your Shopify theme determines how your store will look. It’s also how ecommerce stores are able to brand themselves using their site. You can also change the look and feel of your site without having to transfer off Shopify itself, simply by changing the theme.

There are three ways to get your theme in place:

Free Shopify Theme

Shopify has plenty of great-looking themes that are also completely free. They’ve gotten so good over the years that it’s often difficult to tell what’s a free theme and what’s paid.

Paid Shopify Theme

Shopify also has plenty of paid themes in its marketplace. Most of them sell for $180. They offer a more polished site and extra features than the free themes.

Custom Shopify Theme

Yes, it is possible to get a theme built from scratch. If you go this route, an ecommerce marketing agency can build your site however you want. It can be completely customized to match your brand.

The costs for a custom theme will vary widely. It depends a lot on how big of a business you have and your requirements. Pricing will range anywhere from a few thousand dollars to over a hundred thousand dollars for an enterprise ecommerce site.

My Recommendation: Create Your Ecommerce Website with a Standard Shopify Theme

Unless you already have a thriving business, it’s best to use one of the standard Shopify themes. This gives you the ability to get started without having to spend much money. Then once your business has taken off and you have a good idea for how to evolve your site and brand, you can consider a customer Shopify theme.

When we look for themes, we go to the Shopify theme store and rank all themes by popularity.

Then we start at the top and scroll down until we find a few that could work.

Ideally, you’ll find one that has a good “feel” for the type of customers your store will target. If you’re targeting men that spend time outdoors, a more rugged feel is ideal. If you’re selling luxury products, a polished and refined feel would be better. Don’t worry about getting this perfect — you only need a theme that’s “good enough” at this stage.

We typically don’t worry about the free versus paid Shopify themes. We’re more focused on finding the theme that’s a good fit. If it happens to be free, even better. If it costs us $180, we consider that a small cost and don’t hesitate to purchase the theme. If you’re watching every dollar and would prefer to stick to a free theme, you’ll still find plenty to choose from.

Once you’ve found the theme you want, get it installed on your Shopify store. That’ll make the next few steps a lot easier.

The Build: How to Create an Ecommmerce Site that’s Unique

Step 5: Create Product Pages

This is where you’ll want to spend the most time.

Product pages have a huge impact on how many of your website visitors end up converting to customers. And it’s one of the key parts of the business that you control. You can’t always control traffic. You can’t always control your suppliers. But you can control how much effort you put into making your product pages really high quality.

Let’s go through the key parts of a product page and how to make them amazing.

How to Pick the Right Product Name

Great product names have a huge impact on product sales. Just think of the legendary infomercial products like the Shamwow, Thighmaster, or OxiClean. Legendary product names are distinctive, instantly communicate the product benefit, and are easy to remember.

I’ve named my share of products and all I have to say is that this is a lot harder than it looks.

When I tried to name my first few products, it was really easy to fall into the trap of making the name too cute. There’s a fine line between a legendary name that resonates with your market and a cute name that everyone ignores.

This is why it’s generally better to focus on names that are clear instead of trying to be too creative. Until you have a lot of naming experience, it’s really easy to pick a name that falls flat.

A clear and boring name for a great product will still generate tons of revenue. A cute name will destroy it. So focus on clear names that your market will instantly understand.

How to Write a Product Description that Sells

This is your one to two paragraph pitch for the product. Really spend time on this copy.

Here’s a good structure to use in a standard product description:

  1. One or two sentences describing the problem that your product solves
  2. One or two sentences painting the dream of what it will be like when the product is solved
  3. Two to three sentences explaining how your product achieves that dream and the specific features that help accomplish that goal

This is a very common copywriting script that’s used for a lot of products, particularly any product that solves a distinct problem.

That said, not all products solve problems. Apparel is a great example. If I buy a trendy shirt, what problem am I trying to solve? None really. Instead, my purchase is aspirational. I’m aspiring to feel more confident, refine my identity, and change my look. In this case, it’s less about the product description itself and more about how the shirt looks and makes me feel. The product photos end up carrying more weight than the product description itself.

In other words, if the product description template above doesn’t work for your product because it doesn’t solve a distinct problem, don’t try to force it. Instead, use the photos to paint the dream your customers have the best you can.

How to Shoot Professional Product Photos

Photography standards have gotten super high these days. Everyone has an amazing camera on their smartphone and great photography has become super prevalent with Instagram, so ecommerce websites have to take their product photos really seriously.

Don’t skimp here.

Set up a small area to take high quality photos for your products and use the highest quality camera that you can get your hands on. Also make sure to take photos from multiple angles. If possible, you should also take a few photos of the product in action. If you’re selling bed sheets, take a photo of the sheets on a real bed. If you’re selling hiking shoes, take a photo of somewhere wearing them on a hiking trail.

Use your photos to paint the dream as best you can.

Step 6: Create Your Company Pages

After your product pages are done, there are a few more pages you’ll need to create.

Build a Simple Homepage with a Few Popular Products

The simplest and most effective way to approach your homepage on an ecommerce website is to feature your most popular products.

Take your most popular product of all time and include a giant photo of it along with a call to action to its product page above the fold. Then include the next 3–5 most popular products on the rest of the homepage. This ensures that new site visitors are exposed to your best products immediately, increasing the percentage of people who purchase.

Every six months or so, check your product popularity and rotate products as necessary.

Large ecommerce websites rotate their featured products at a much faster pace. As they should! They have a lot more customers and a product catalog that’s constantly changing. As you get larger yourself, you’ll also want to increase the pace that you change your homepage. Start doing quarterly changes, then monthly, then weekly, and so on.

Write a Compelling About Us Page

A lot of visitors will go to your about page to figure out who you are and what you’re doing. This is a perfect opportunity to tell your story and inspire your customers to join you on your mission.

Here are some questions and topics that you’ll want to cover on your about page:

  1. If there was a particular moment that changed your life and set you on your path to create this business, tell that story.
  2. Include any values or principles you use to build or select your products.
  3. If there’s a goal or milestone that you’re trying to achieve, share it.
  4. If you’re committed to living a certain lifestyle, paint that dream.
  5. Clearly define the type of person you’re offering products for.

Be authentic and write your copy as clearly as possible. The more that you can make this page resonate with your target market, the better.

Add a Contact Page

This page is nice and easy. Keep it simple: include your phone number, address, and a contact form for people to reach out.

The most important thing is to make sure that the contact form goes to an email address that’s actively being monitored. If you’re the only person working on your website, have it go to your email at that domain. For example, if I had a site called Sprout Candles, I’d create an email for lars@sproutcandles.com and have my contact form send messages there. That way I can respond to any customer requests really fast.

Once you gain traction, one of the first areas of the business that you’ll want help on will be customer support. Lots of ecommerce websites hire folks part-time or for a few hours each day to go through all the customer messages for the day. At that point, send your contact form to a generic support email that can easily be managed by anyone on your team. If I reached that point with my hypothetical business, I’d change the email to support@sproutcandles.com.

An easy and low-cost way to get a phone set up for your business is Grasshopper. They give you a public phone number that can route to any phone number of your choosing. In the early days, you’ll have it redirect straight to your cell phone. That lets you respond to any phone calls directly without having to post your personal phone number publicly.

Get Paid: Connect Payments and Set Prices in Your Ecommerce Site

Selling stuff — and getting paid — is the whole point of creating an ecommerce website. Otherwise it’d be a blog or a personal webpage, or even a hobby site. No matter how many hours of work you’re pouring into your website, if you’re not making sales and getting paid, your store isn’t a business; it’s an expensive hobby. This section is all about linking your payment processor and setting prices.

Step 7: Set Up Your Payments

One of the best parts of building your site on Shopify is how easy it is to set up payments. Shopify does just about everything for you — all you need to do is configure a few settings and tell Shopify when to send your money. It’s really that easy.

Those payment settings are under the Settings section in your Shopify account.

Go ahead and set up Shopify Payments:

Ecommcer Website - Payment Providers

Most of the info that’s required is pretty standard. It includes basic business info, some personal info, and your bank account so Shopify can transfer money to you.

There is one setting that you should pay close attention to for your payments: your customer billing statement.

Ecommerce Site - Billing Statement

Have you ever looked through your credit card statement, seen a charge, and thought to yourself, “What was that for? Did I get charged for something I didn’t buy?”

It happens to us all. With the number of online purchases we make these days, it’s easy to forget what we bought.

As an ecommerce store owner, the last thing you want is for your customers to get confused when they see your billing info on their card statements. If there’s any doubt or confusion, your refund and chargebacks will go up. The best way to avoid this is to make it as clear as possible which store the charge came from. Use the primary name your customers will recognize from your site. This will save you money and frustration later.

Also, we do recommend setting up PayPal on your site as well. Some customers prefer using PayPal since they don’t have to enter their credit card info all the time. Especially on mobile, it’s a lot easier to pay.

If you don’t have a PayPal account for your business already, they’re super easy to create. The only charge is the small percentage of each sale that PayPal will keep, which is standard across the industry. Go through the PayPal settings in Shopify and get it connected to your store and a PayPal option will appear in your checkout.

Now that you can accept payments — how do you know you’re charging the right amounts?

How to Set the Right Product Prices

The biggest myth about pricing is how businesses set prices.

As consumers, we always assume that a business figures out how much something costs, adds a fair percentage to make some profit, and that’s how we get the final price.

In reality, it never works like that.

Consumers are willing to pay certain prices and if that price has a good margin, there’s a business. If there isn’t a good margin, the business model changes or there aren’t any good businesses in that category.

Mobile apps are the best example of this. Regardless of what it costs to develop an app, people are only willing to pay about $5 for it. The app could do incredible things and literally change lives but it doesn’t matter, the ceiling is about $5.

So how do consumers figure out what they’re willing to pay?

Price comparisons. As consumers, we only understand relative pricing. When we try to evaluate if a price is fair, we find the nearest comparison and judge based on that.

“After all, as bargain hunters know, comparison shopping is a cinch online. The result is that merchants are leery of raising prices. The ease of entering the marketplace, regardless of location, further ratchets up the competition. At the same time, internet retailers can often operate at a lower cost than their brick-and-mortar competitors.” — E-Commerce Might Help Solve the Mystery of Low Inflation, The New York Times

Why is it possible to only charge $5 for a mobile app? All the other apps are about $5.

Why is it okay to charge $5 for a latte? Starbucks charges about $5.

If you try to sell me a t-shirt, I’ll instantly compare your price to the standards I’ve come to know. Cheap, plain t-shirts are about $5, nicer t-shirts about $20, and luxury fashion brand t-shirts $70–100. Depending on what kind of apparel company you have, I’ll compare to those benchmarks.

But if there’s a felt-need and reasonable price point, I’ll buy. This is one of the key factors to ecommerce success.

The bottom line is that every business needs to factor in the comparative pricing. Yes, you can stretch it a bit if you’re delivering more value. For example, some mobile apps charge $10 and make it work. But there are limits.

Find the best comparison price to your product, nudge the price up or down depending on your value, then set your price.

And as a ecommerce website owner, it’ll be up to you to decide if your business works at that price.

Step 8: Get Your SSL Certificate

SSL Certificates allow you to say that your site is extra secure. They’ve been around awhile and have become standard for any site that handles private information like email addresses and payment information.

In the last few years, Google has made SSL certificates more prominent in its Chrome Browser. Here’s what a site looks like with an SSL certificate:

HTTPS URL

Here’s what one looks like without it:

HTTP URL

There’s a very clear trend that sites with SSL certificates are being highlighted while sites without them are getting subtle warnings. While SSL certificates used to a “nice-to-have” feature, these days they’re considered a requirement for any ecommerce site.

The last thing any ecommerce site owner wants is to make a customer hesitate because there isn’t an SSL certificate on the site.

We strongly recommend that you set up your SSL certificate when you create your site.

The best part?

Shopify gives you a free SSL certificate for your store. That’s right, it’s 100% included with your store.

Something to keep in mind for later on: there are different levels and types of SSL certificates. When getting a free SSL certificate, you’ll only get the basic options. More advanced SSL certificates come with extra monitoring, insurance, and extra security. Prices range from $150 to $2,000 per year depending on the exact package.

The only folks that should worry about the more advanced SSL certificate options are those that handle credit cards themselves (you’re not; Shopify is doing it for you) or run very large enterprise sites.

In other words, the free SSL certificate from Shopify is more than enough right now. If your ecommerce site gets super large, you can look at the other SSL certificate options later.

After you get your domain purchased or connected in Shopify, you’ll find an option to add an SSL certificate in your Domains area.

Step 9: Launch Your Store

The big day has arrived!

Everything is in place and now it’s time to launch your store.

Shopify stores are password protected by default, so no one has been able to see your store until now. If anyone tried to visit your store until this point, this is what they saw:

Ecommerce Website - Shopify Password Page

As soon as you remove the password protection, people will go straight to your real store without needing to enter a password.

Before Shopify will let you launch your store, they require you start one of its paid plans. You’ll still get full credit for your trial; the billing period won’t begin until after the trial ends. But you do need to get your paid account set up before you can open your store.

If you haven’t picked a paid plan yet, go ahead and do that now.

Then go into your store settings and look for the password section:

Ecommerce Website - Shopify Password

All you have to do is uncheck the “Enable password” box, save the settings, and your store will launch.

Congrats!

From here, it’s all about growing traffic to your ecommerce website, improving your products, and finding new products to offer. The better you get, the larger your business will become.

Bonus Step: Add A Custom Search

A custom search helps your users find the product they want as quickly as possible. WordPress comes with its own search but the problem is it is very limited – especially if you have a large, complex e-commerce website.

A good custom search will provide multiple filters so your users can narrow down the search until they find what they are looking for. For example, if you are selling homes you might have filters for the number of bedrooms, the price, the location, size and many other features. 

There are other search add-ons you might need such as AJAX updates so you can get new results on-the-fly and pagination which splits your results into pages.

Not only is the search itself important but also the way you display your results as well. You might want to present your results as a list, a grid or even on a map.

Toolset Search is a great option to build your search and customize your results as you do not need PHP coding. Experienced developers will save time building a search while novices will be able to add an important e-commerce feature they didn’t think they were capable of creating. Toolset also offers a Custom Types Training Course which will teach you how to create your search as well as other important features for e-commerce websites.


from Quick Sprout https://ift.tt/2AylzAx
via IFTTT

The Best Blogging Platforms and Blog Sites of 2019

When it comes to creating your own blog, you have two options: build a website to blog on or use one of the best blogging platforms as your website. Building your own website and blogging on it — this is probably the “traditional” way to build a blog. To do this, you’ll need to use blog software, like WordPress.org, or a website builder, like Wix.

There are pros and cons to these: you’ll need to do a little more work at the outset and you’ll build your own audience from scratch, but you’ll own and control your site completely.

The other option is to use a pre-existing blogging platform, like Medium, LinkedIn, Facebook, Instagram, etc. With a blog platform, you’ll be beholden to the platform’s choices, settings, changes, and algorithms, but you’ll also have access to a built-in audience and you can launch your blog in literal minutes. I’ll refer to these platforms as blog sites, as well.

In this guide, I’ll break down both ways to set up your blog and help you pick which blog site, software, or platform is best for you. Let’s get to it.

How to Choose the Best Blogging Platform for You

To point you in the right direction, I need to ask you two questions: one about money, the other about your blog niche.

Do you plan to make money blogging?

If so, go with WordPress or Wix.

If you’re not trying to make money blogging, use one of the best blog sites instead.

These blog sites are great if you aren’t trying to create an income: They have built-in audiences and you won’t have to pay anything. My recommendation of which one to choose is based on the outcome that you’re trying to achieve — what is your blog like and who do you hope will read it? In other words, what is your blog niche?

  • If you’re in business, blog on LinkedIn.
  • If you’re creative, start your “blog” on Instagram.
  • The best classic blogging site is Medium, which can also serve as a syndication platform.
  • The biggest audience, of course, still lives on Facebook.

If you hadn’t thought about creating your blog on anything other than WordPress or with a website builder, it might be kind of hard to wrap your mind around these blog sites. I’m not saying they’re best for every blog — they’re really not directly monetizable with SEO, for example — but if your audience is already there, why try to get them to move to a website or blog they’ve never heard of. It’s easier for both you and your audience for you to blog on one of those sites.

Pros and Cons of Blogging with WordPress

If you want to make money blogging, go with WordPress. There’s no better option. You’ll own your blog and website and you’ll have true flexibility. There is no argument here. It’s the default content option and runs 30% of the internet for a reason.

There is more set-up that you’ll need to do on your own, like buy a hosting plan, for example. This is the only downside in my mind, but you don’t have to be an expert — we have step-by-step guides on How to Start a Blog and How to Make Money Blogging. (And an entire blogging section with ideas for keeping the momentum going, gaining readers, coming up with blogging ideas and other pro tips.)

Pros and Cons of Creating a Wix Blog

You can also build your blog using Wix. It’s an all-in-one drag-and-drop website builder. It’s an easy option if you’re looking to have your blog on your own site, rather than on a blog platform or service like Medium or another form of social media.

The downside is you’ll be paying a subscription fee and you’ll be locked into Wix’s themes and tools. So, you’ll trade some convenience for some flexibility.

Pros and Cons of a Medium Blog

Medium is the best all-around traditional blogging platform. It’s where the majority of readers who’re looking to read classic blog-style posts are right now.

The downside is built into the choice of picking to create your own blog or build one an a platform — you won’t own the traffic and you won’t be able to do things like sell ad placements, for example.

Deciding to blog on WordPress vs Medium isn’t an either-or choice. You can also publish your site and re-publish some posts on Medium to take advantage of its benefits, just like you would any syndication deal. You can thoughtfully approach this, but there are some technical how-tos we’ll get into below. You’ll need to import your posts to Medium properly and set the canonical tag, so you’re not penalized by Google (at worst) or simply out-ranked by the Medium version of the post (at best). Overall, though, I prefer to see each channel as a separate channel and create and publish unique content for that channel.

Pros and Cons of Blogging on LinkedIn

If you’re blogging about business, or something related, like management, then I’d say to build your blog on LinkedIn. There’s a pre-existing community of people there talking about those topics and ready to read your posts too. You’ll be able to build business followers, which is different than a “connection.”

The audience on LinkedIn is premium: 45% of LinkedIn article readers are in upper-level positions: managers, VPs, Directors, and C-level. If you’re building thought leadership, brand value, or community, rather than trying to make money, I recommend going to where your audience is rather than trying to woo them over to where you are. Build content for them where they already are and they’ll love you for it.

You’ll be able to build your network and your business opportunities, but like all blog platforms, the cons here are that you’re beholden to the algorithm and don’t own the site or the traffic.

Pros and Cons of an Instagram “Blog”

If you’re a creative — especially in a visual field, then your blog should really be an Instagram account. You can post images of your work and use the caption field for your written post. If you’re not used to this idea, it might seem kind of zany: That’s not a real blog. But it is. People read Instagram captions of the accounts they follow like they’d read a blog — and your visual work will be well highlighted in your feed and the general feed. The cons are self-explanatory: you’ll have to follow the Instagram format, and are subjected to the feed’s algorithm. It’s not impossible to monetize your Instagram feed, but you’ll be limited to those that you can feature in an image or caption. All of the monetization opportunities will need to be natively integrated

Pros and Cons of Blogging on Facebook

Of course, Facebook is the juggernaut in the room. It has the largest audience of any of these platforms. Creating a Facebook page might be all you need to build a blog — post on Facebook like you would on your blog and build your audience right there on your page. The comments and interaction on Facebook are even better than a traditional blog. You can really focus on building true fans on Facebook.

The cons of Facebook have really been blasted through the media lately. There are privacy concerns, there’s the issue of an ever-changing and pretty secretive algorithm, and all of that. You probably already have an opinion of Facebook — let that inform your decision here.

There’s another warning due here. If you build your blog on a single platform that you do not own, well, then you’ve built your blog on a single platform you do not own. That means you’re beholden to another person’s business and their algorithm for your business. What’s good for their business and algorithm may not be what’s good for yours. That’s why I say if you’re here to make money, you should own your site. You’ll have more control.

In-Depth Reviews of the Best Blog Sites and Platforms

First, I’ll cover the best ways to build a blog on your own website. I’ll cover WordPress and Wix. If you’re going to use one of the top blog sites and you already know it, you can skip these first two reviews.

Best Blogging Software and Best CMS — WordPress

WordPress is the hands-down king of websites with content. It’s the default choice here for the best blogging platform overall. If you’re building a blog on your own site, that means you’re building with WordPress. (Quick Sprout is on WordPress.)

To build your own site, you’ll need to buy a domain name, get web hosting, and set up your WordPress account. It’s all pretty simple. There’s more information on our post The Best Web Hosting for Small Business and on The Best Web Hosting for WordPress, which is about selecting a managed host that’s designed for WordPress. It’s more expensive but also super premium. If you have the coin, go for it. If you’re budget minded, you can skip it.

Backend of WordPress blog post

You’ll pick a theme, apply it, and honestly you’ll be just about done. We have some recommendations on SEO WordPress plugins you’ll want to add. The backend of WordPress is pretty intuitive, and if you get lost there are so many tutorials out there to help.

Like I said before, the choice between WordPress and Medium isn’t either/or. You can build your own blog and then use Medium selectively as a syndication tool. It’s worth thinking about if you want to grow your audience, but ultimately build your own site.

Ready to build your own site with WordPress? We walk you through how in our posts How to Start a Blog and How to Make Money Blogging.

How to Repost Your Blog on Medium

  1. Make sure your content has a long enough life on your own blog so it is solidified as the primary source in Google’s eyes. Two weeks is enough time.
  2. Use Medium’s Import tool to publish the content. It’s as simple as plugging in your original URL, updating any wonky formatting, and clicking publish. The import tool will automatically set the canonical URL to your original post on your website. It’s very important to have the canonical in there. This applies to any type of syndication: you want to have a canonical in place so Google knows where the original article is located. Otherwise, at worst, you could get penalized; at best, the bigger site will outrank you.

Pro Tips for Syndicating Your Blog on Medium

  • I wouldn’t auto-post all of your content to Medium. It’s weird. Why have a duplicate of your site living on their site? It doesn’t make sense for your readers, or you long term.
  • You should thoughtfully approach each channel. Content on that channel is its own form. What someone wants to read on each platform depends a lot on the platform itself — What is the UX like? Why are they there? What types of interactions does the platform encourage?

Best Website Builder for Blogging — Wix

Wix Blog Templates

I like Wix for blogging because it’s one-and-done. If you want to go the easy route for owning your own blog, this is it. It’s an easy runner up to WordPress for the best blog platform.

The templates are great looking and you can customize them with a drag-and-drop editor. The blog manager is simple and intuitive, and you’ll get analytics and SEO built right in. It’s simple to add the basic features you might want on your blog: social tools, likes, comments, hashtags, categories, and a subscriber forms.

Editing a Wix Blog

All of the SEO features you need are easy to access too: alt tags for your images, internal links, SEO titles and descriptions (that are different from you post title), and nofollow tags for external links. Wix blogs have an automatic email subscribe feature and a social media bar beneath each article for sharing on Facebook, Twitter, and more.

To build a blog on Wix, you’ll sign into your account and pick a template. There’s a Blog template category, which is a great place to start. Once you have your template selected, I suggest updating the font, colors, and logo to personalize your template and help it stand out from the rest.

Create a blog post with Wix

Writing a post is as simple as clicking Create a Post, writing and adding images. You can save drafts, or even give other contributors writing privileges for you site. This is all just as easy from a mobile device as from a desktop — no app required.

Make sure that you update your SEO settings for every post: this is what’s presented in the search results page and is critical for ranking in organic search.

The resulting post will have an automatic read-time count, like a Medium post right next to the author’s name, which I also like a lot. I also like the ability to live-chat with your readers in the Wix app. If you build a real community in your blog or are open to answering reader questions in real time — say about an online course you’re offering or a webinar that’s coming up — then it’s a cool feature.

Best Traditional Blogging Site — Medium

It’s hard to pin down how many users Medium has — they focus on sharing how much time is spent on the platform reading instead. I dig it. The platform, was founded by Twitter co-founder and former CEO Evan Williams as a response to the hyper-short limits of Twitter, hence the name Medium. Medium category pageAt one point, there was some distinction between even longer blog platforms, but that’s dissipated by now.

In 2017, Medium had 60 million unique visitors. From personal experience, I know that when I read on Medium, I read with curiosity and intent. I’m ready to put in some time reading, and the read times on each article get me to commit to sticking it out for the whole thing.

Posting with Medium is super simple. There’s a clean, very white WYSIWYG (what you see is what you get) editor. Basically, as you type, you see what the post will look like when it’s published. There are a lot of tips and tricks to format your post that are a little hidden in the simplicity of the interface.

Don’t stop at this point though. Instead of just a profile, I recommend creating a Medium Publication. This gives you the option to add other writers and editors to your blog. More importantly, it gives you a lot more options for controlling what is essentially your blog homepage.

Take a look below at the difference between Patagonia’s basic Medium profile (top image below) and REI’s Medium publication (bottom image below).


Medium blog profile page

Above, a consecutive stream of your posts. This is all you’ll get with a Medium profile.
Below, the more magazine-style layout you’ll get with a Medium publication. 

Medium blog publication page
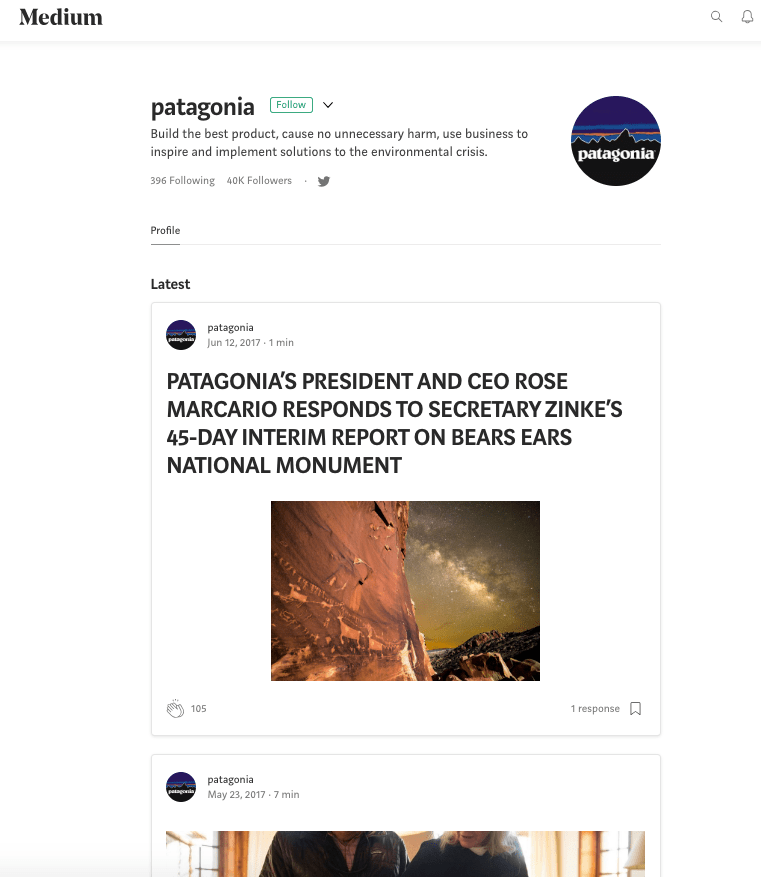
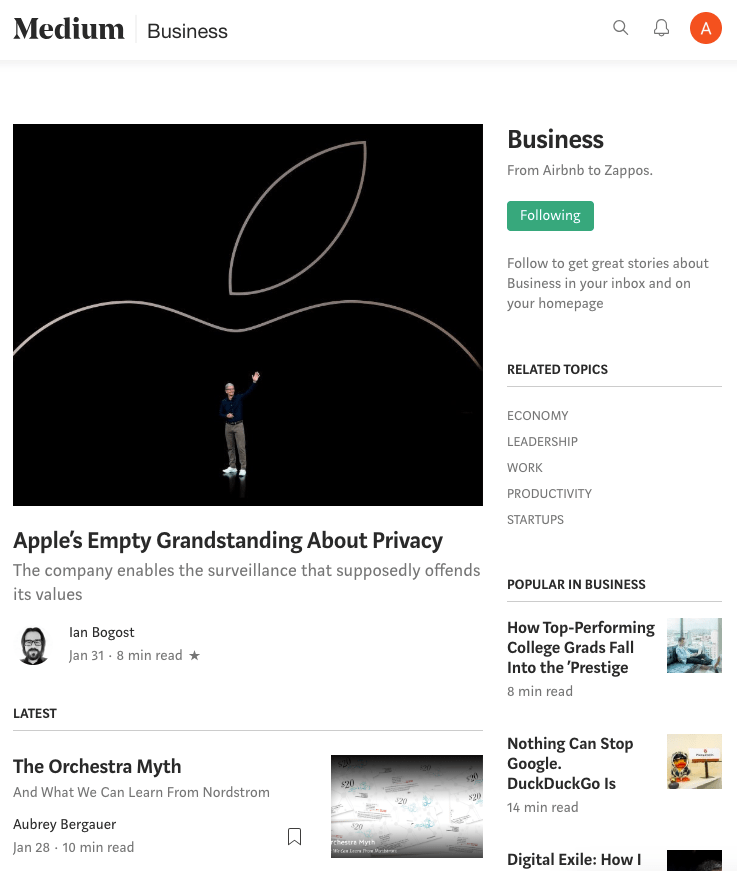
One is a simple chronological feed and the other is a designed page with useful menu options. When you create a publication like REI has you also unlock the ability to send a newsletter to all of your followers.

Pro Tips for Blogging on Medium

  • If you are syndicating your actual blog, use the Import feature. This is essential for SEO.
  • To start a bulleted list, simply type an asterisk or a dash.
  • There are two types of quotes. Use a block quote by clicking the quote icon once. Click it again for a pull quote.
  • Drop caps add a little editorial weight. To make the first letter of your paragraph larger, and give it that designed look, highlight the letter. The option will appear.
  • Use TK to leave yourself notes. This is an old journalism trick — there are no words with TK in them in the English language. If you’re writing something that needs a placeholder, use TK and Medium will alert you if you try to publish with one still in place.

Publishing on Medium is so effortless. Formatting content and uploading images takes basically zero time. It’s really the best web-based publishing experience I’ve had to date.

— Josh Pigford of Baremetrics

Best Blog Site for Business — LinkedIn

There are 590 million LinkedIn users, 154 million of them in the US. And a lot of them are active: 44% are monthly active users. LinkedIn used to be basically a resume hosting platform. In a lot of ways it was like a job-hunting dating app: you’d go on if you were looking to hire or looking to get hired but not much else. In the last few years that has changed dramatically.

Publishing blog on LinkedIn

If you’re building a business blog, the audience on LinkedIn is premium: 45% of LinkedIn article readers are in upper-level positions (managers, VPs, Directors, C-level).

In an article for Forbes, “Is LinkedIn Poised To Be The Next Big Social Network … For Brands?”, Ryan Holmes nailed what’s great about the platform, “Hardcore LinkedIn users know that there’s a certain warm professionalism that underlies many exchanges on the platform. In short, LinkedIn offers a kind of stability, civility and real value that’s sorely needed on some social platforms.” I completely concur. The platform has a ready made culture and set of expectations that a business blogger would dream of creating on their own site. Why build it when it already exists?

LinkedIn is a social network. Your influence grows in proportion to the size of your network. The more posts you publish, the more connection requests and followers you’ll attract. Writing consistently not only expands your network, it also reinforces the message about the depth and breadth of your knowledge of the subjects that you write about.

— Glenn Leibowitz, “10 Tips for Writing LinkedIn Blog Posts That Expand Your Influence” for Inc.

Publishing doesn’t make you a LinkedIn Influencer, unfortunately. That’s a hand-selected group of people that rotates throughout the year “to include only the most engaged, prolific, and thoughtful contributors and to ensure that their expertise matches our members’ interests,” according to LinkedIn.

An article isn’t a post and vice versa. A post is a smaller update you’d share with your feed and connections. Think quick anecdote or pro tip. They’re limited to 1,300 characters, which is about 5 lines. Articles are longer and more in-depth. They’re something that the broader LinkedIn audience would be interested in reading. A person who reads your article can also follow you from there, so they’ll be alerted when you publish your next article. Any articles you publish will appear in the Articles section of your LinkedIn profile.

Pro Tips for Blogging on LinkedIn

  • Be clear about who you are and what you’ll be talking about it. Stick to that topic and don’t stray. And post regularly. Even posting once or twice a month — consistently over time — will add up. Twice a month is 48 times a year. In five years, you’ll have nearly 250 posts. That’s huge.
  • You can share a draft with a colleague or friend for feedback.
  • Use the stats related to your posts as a tool: create more of what’s working, less of what’s not.

Want to improve? Check out LinkedIn’s own course on getting better at blogging on the platform, Writing to be Heard on LinkedIn. Because when they own the platform, what’s good for them is successful content that people want to read and engage with!

Best Blog Site for Creatives — Instagram

Instagram is primarily visual — the feed is all the images or videos, and very little of the captions. You can use the caption field for your text, and users like a long caption. You’ll be capped at 2,200 characters or about 300 words.

Instagram is perfect if what you’re sharing is visual: a lifestyle, art, dance. Or if there’s some way to share it visually like in a how to mini-video.

In fact, in a lot of ways, Instagram has killed the entire genre of lifestyle blogging.

It’s become a lot harder for upstart “bloggers” in the crowded yet lucrative fashion, beauty, wellness, and lifestyle spaces to build a following centered around their own blog. At the same time, social media platforms have given influencers more and more tools—including e-commerce, groups, and direct messaging—to keep them (and their followers) from going elsewhere online.

— Rosie Spinks, “Instagram Has Killed the Art of Lifestyle Blogging” on Quartzy

Instagram is so good now that it’s hard to want to go anywhere else. The downside is definitely that you’re beholden to the algorithm and the feed, and the changes the platform makes. On the flip side, you also don’t have to be the product manager, hire a developer, or build an audience from scratch. You’ll have to weigh the pros and cons yourself!

You can also host vlogs on Instagram Live — simply tap the camera icon (top left of the screen, or by swiping right from the Feed) and tap Live at the bottom. When you’re ready to actually go live, it’s as simple as tapping Go Live. You’ll be able to see the number of viewers you have at the top of the screen and comments will pop in at the bottom. When you’re done, tap End. From here, I recommend tapping Save to save it to your camera roll, and tapping Share to add it to your story. It’ll live there for 24 hours to be replayed by anyone who wasn’t around when it was actually live.

Pro Tips for Instagram Blogs

  • Pick a good name that’s catchy and easy to type — your name should make it clear what your whole feed is about.
  • Stick to a niche.
  • Have a visual point of view.
  • Don’t stray. If you’re an artist, don’t post pictures of your salad for lunch. If you’re a food blogger, think twice before you post photos of your doodles.
  • Post regularly! And engage.

You can only have one link in your profile, but with something like Linktree, you can add more links. I don’t think it’s a great idea to build a blog somewhere hoping to get your readers or followers to move from there to somewhere else on the regular. It’s feasible to get your Instagram followers to also subscribe to your newsletter, but it’s not really logical to hope they’ll leave Instagram after ever post and go read your blog. They’re scrolling through Instagram, not trying to read your website.

Think about your own behavior here — how much momentum does it take to get you to follow a link that leads away from the platform you’re in? For me, it takes a lot of work. There has to be something I really want to buy, or really, really want to read.

It’s more likely that I’ll follow someone on Instagram for a while and then one day I’ll buy something from that person, or follow them somewhere else. Instagram, and all blogging really, is about creating a relationship with the people who’re reading your posts. Once that relationship is strong enough, then people will be interested in going wherever you’re taking them. Until then, you’ll need to deliver on that relationship within the platform itself.

Biggest Blog Audience — Facebook

I mean, what’s 1.49 billion daily active users to you? It’s a huge number, and one that’s worth noting. How many of those active users will make it to your page or your post, now that’s another question.

Organic reach on Facebook was once not such a wild aspiration, but in 2016 there was a huge decrease in organic reach. SocialFlow found that brands saw a 42% decline in organic reach over Q1 and Q2 2016.

The easiest way to build a blog on Facebook is to create a group or a page for your business or brand. From there, your posts will literally be Facebook posts.

To make it easier to post and handle all your interactions in one spot, I recommend using the Facebook Creator Studio. It’s an all-in-one dashboard for publishing and analyzing your content. If you’re new to Facebook and are really using it as a classic blog platform, you’ll want to create Notes. These are the closest things to blogs: a header image, a title, and text down the middle.

From here you can also go live, post videos, gifs, polls, recommendations — any type of Facebook post you’ve seen you can create from this dashboard. You can even save, schedule, and backdate posts.

Recap of the Best Blog Sites and Blog Platforms for 2019

Best Blog Software and Best CMS — WordPress
I’d recommend going this route to anyone serious about building a blog that makes money. You’ll build and own your own site with complete control. (If you’re a beginner, this is still very doable for you.)

Best Website Builder for Blogging — Wix
If you want to have to your own site, but don’t want to build it, then I’d recommend you go with a website builder. It’s a drag-and-drop editor that’ll get you up and running quickly, and you’ll still be building your blog on your own website, not on someone else’s platform.

Best Traditional Blogging Platform — Medium
If you’re not creating your own site and your blog is a classic blog — long form posts about a topic that’s meaningful to you — I like Medium. It has a built-in audience that’s interested in reading and an interface that’s seamless.

Best Blog Site for Business — LinkedIn
Blogging about business or hoping to be a thought-leader in a certain industry? You could go with Medium, but a more rabid and useful audience might be waiting for you on LinkedIn. I know, it might not seem like a blogging platform, but LinkedIn users are really engaged and content hungry.

Best Blogging Site for Creatives — Instagram
If you’re doing anything with images, art, creativity, or lifestyle, you’ll probably find your audience on Instagram. There are already so many people there and it’s easy for new followers to discover you through hashtags, comments, and the other people you and they are following.

Largest Audience — Facebook
Lastly, the biggest audience is on Facebook. There are millions of people there, and though organic reach on the platform isn’t what it once was, it’s still a massive platform. It’s also a great spot for building a community page element to your blog.


from Quick Sprout https://ift.tt/2AgqjKQ
via IFTTT