Wednesday, August 28, 2019

How to Start a Blog in 12 Easy Steps

I started my first blog to avoid getting a job.

I’m completely serious.

I was coming to the end of my undergraduate degree in international affairs and the thought of getting a job at the state department or in journalism sounded like a horrible idea.

So I learned how to start a blog and built one on international affairs with the hopes of eventually monetizing it and supporting myself.

That didn’t really work out as planned. Hah.

But it did lead to a career in online marketing and now I do work on blogs to avoid having a real job.

Whether you’re trying to avoid a job entirely or trying to quit your current job, starting a blog is a reliable path to supporting yourself and your family. It takes a lot of work and some time but it is a well-traveled path at this point. It’s not nearly as crazy as it was when I started.

I’m going to walk you through the 12 steps to start a blog, which are particularly useful for beginners who have never done this before.

Now, let’s dive into the step-by-step process.

Step 1: Pick a category to focus your blog on

The most important decision to make when starting a blog is which category you’re going to write about.

Why pick a category at all? Why not write about anything that interests you?

When it comes to building an audience, increasing traffic, and monetizing your blog, you’ll get a lot further a lot faster if you stick to a specific category.

Think of it like this: Let’s say you stumble on a blog of mine. You find an amazing post about how to turn email subscribers into fully passive income. You love it and subscribe to my email list. Then I send you an email about how to organize your closet. How would you react? Maybe you’d love it if you also really love organization. But most people would be turned off. They want more content about email lists and making passive income.

Jumping categories can be really jarring for any audience. Google also greatly prefers blogs that are focused on a single topic, which will help you with SEO a lot.

Whatever you do, pick a category and stick to it. If you want to try another category, start a new blog.

Here are a few popular categories that always do well:

  • Personal finance
  • Fitness
  • Online business
  • Investing
  • Productivity
  • Real estate
  • Careers
  • Test prep
  • Freelancing

My recommendation is to pick one of the categories above and niche it down one more time. Personal finance for people making over $100,000 per year is a good example. Or fitness for people over 60 is another.

Categories get tough when they’re super consumer focused and have extremely large audiences. Celebrity blogs are a great example. There’s tons of competition in this space but also very limited money compared to other blogging categories. It’s a brutal combo. All the work without any of the payoff. Recipe blogs are another example of a brutal category. World-class competition and very few ways to monetize. Try to avoid categories like these.

One of my favorite category types is B2B. This includes categories like how to do marketing, build products, HR, customer service, manage a team, or improve your sales skills. The volume in these categories is always lower than the popular categories that I listed above. But the quality of traffic is always incredible. Businesses are always willing to spend more than consumers to solve their problems; they have access to a lot more cash. The downside is that you need to have experience and skills in these areas before being able to blog about them. They’re not nearly as easy to break into.

Hobbies can also do okay, but they’re typically more difficult to monetize. That said, I’ve come across entrepreneurs who have built six and even seven figure businesses in hobby spaces like horse riding or learning the guitar. It’s doable. It’s just more difficult because people aren’t willing to spend as much on their hobbies.

Step 2: Find a domain for your blog

Before we jump into how to find and buy the right domain, I should clarify one assumption I’m making in this post: I’m assuming you’re starting your own blog on a blog platform that you’ll own and run — your own website.

That’s not the only way to start a blog, you can use a blog site like Medium, LinkedIn, Instagram, or Facebook. If you want to make money, you need to build your own site, which I’ll cover in this post. If you’re thinking about launching your blog on a blog site, you should stop here, and go check out The Best Blogging Platforms and Blog Sites of 2019. That post explains the pros and cons of each platform. This step — choosing where to start your blog — is the “one thing gurus always get wrong about blogging” according to Gary Vaynerchuk. I’m not calling myself a guru, but I can proudly say I’m getting this right.

OK, so everyone still reading is going to set up their own blog site — let’s start with a brief discussion of how website technology works. There are a few things you’ll need to sign up for as you set up your blog, so it’s good to see how they all connect before we get too deep.

  • First, there’s the domain. This is the URL of the website. Think of it as the address for your business. You’ll need to buy your domain.
  • Second, the domain registrar. This is the company that you’ll use to buy your domain and hold it for you. They don’t host your site or anything — they just store your domain and point web traffic to your site which will be on your web host.
  • Third, the web host. This is the company that hosts your site. Your site will be on its servers.
  • Fourth, the tool to build your site. Very few sites are built by hand using raw HTML and CSS these days. Almost all of them are built using a tool. The tool handles a lot of heavy lifting and makes building a site substantially easier, especially if you have no idea how to code. This is how you’ll configure your site and publish your blog posts. For blogging, these tools are called content management systems (CMS) and the only real option is WordPress. Once you’ve installed WordPress on your host, you’ll be able to start building your site.

To recap, you’ll buy a domain using a domain registrar, install WordPress on your host, then start building your site. I’ll walk you through how to do each of these things step by step.

Now, how to buy a domain for your blog.

In order to buy a domain, you’ll have to find one first. This domain should be somewhat related to the category you picked and should also be available for purchase.

I highly recommend you keep searching until you find a domain that’s available. While it is possible to buy a domain from someone who already has it, that’s an advanced option and can get expensive fast.

Low quality domains will usually go for a few thousand dollars. Highly quality domains that are two words can easily go for $10,000 to $50,000. I’ve even been in discussions to purchase domains for over $100,000 and the really hot ones can break seven figures. Not to mention all the hassle that comes from finding the person who owns the domain, negotiating with them, and transferring the domain if you can get an agreement.

Your best bet is to keep going until you find a domain that you like and can purchase directly from a domain registrar for about $10.
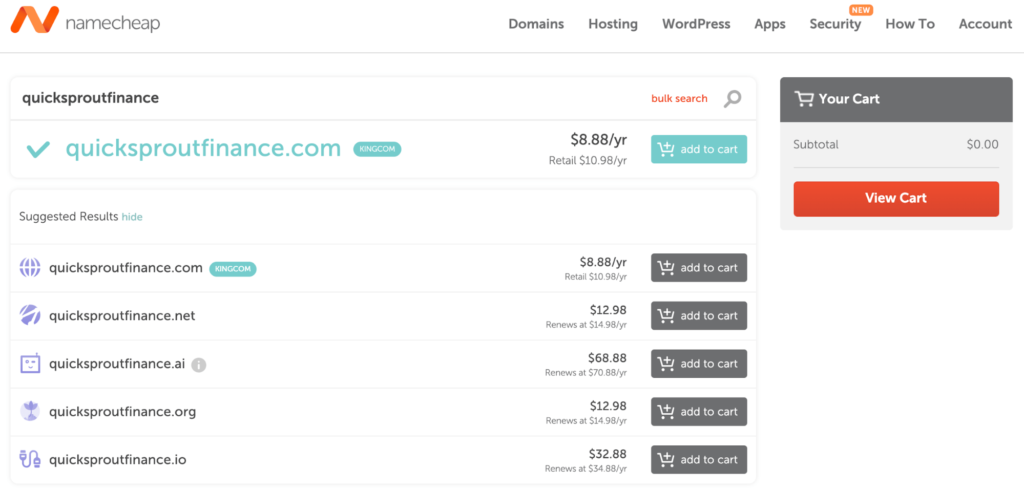
NameCheap

We go into lots of detail on which domain registrar to use here. The short answer: use Namecheap. It’s awesome, it’s the best, it’s what I personally use.

Should you use your personal name as your domain?

If this is your first blog and you’re not completely sure what you want to blog about, I recommend that you use your personal name.

The reason is that changing your domain later will mean that you have to start over from scratch. There are a lot of mistakes in blogging that can be corrected later; having the wrong domain isn’t one of them.

Let’s say you pick a domain like fitnessfordoctors.com. Then after six months, you realize you’d rather be doing personal finance blogging for doctors. You’d need to get a new domain and start over from scratch.

Personal domains are much more flexible — it’s just a name after all. So if you jump categories after a few months, it’s not a big deal. Take down any old content that’s not relevant with your new direction, start posting new content, and you’re good to go.

That said, personal domains have two major downsides:

  1. Scalability – It’s much more difficult to recruit other writers or grow your blog beyond your personal identity later on.
  2. Sellability – Personal blogs, even if they’re generating serious cash, are much harder to sell. Prospective buyers want a site that isn’t dependent on a single person.

These are pretty advanced problems to have though. So if this is your first blog, the benefits of using your name as the domain greatly outweigh the costs that only show up down the road.

Step 3: Choose a hosting provider for your blog

Every site needs a web hosting provider. This is the company that stores your site on its servers and makes it available for anyone who visits your site.

We went through all the main hosts for WordPress sites (by far the best tool for blogging) and put together our recommendations here.

While there are a few other choices it really comes down to two options:

Best WordPress Host for Beginners = SiteGround

For your first blog, you want a host that is popular, trusted, easy to use, reliable, and reasonably priced. No need for anything fancy.

SiteGround fits this need perfectly. The best part is that its plans start at $4/month. That’s a steal considering how many positive reviews it gets.

For the vast majority of folks starting blogs, SiteGround is going to be the best bet for hosting their blog.

Best WordPress Host for Advanced Bloggers = WP Engine

In my last few jobs, I managed blogs with hundreds of thousands or millions of visitors per month. They had thousands of posts on them. We always used WP Engine for sites of that size.

WP Engine comes with a lot of extra hosting features for security and scalability. For sites of that size, you end up having to do a lot more maintenance in order to keep the site healthy. WP Engine handles all that stuff for you. Their support team is also world-class. They do a great job.

But there’s a major downside: it’s more expensive. The lowest plans start at $35/month. This is 7X the price of other hosts.

If this is your first blog, I wouldn’t go with WP Engine.

Step 4: Point your domain name to your host

Now you have a domain and a host for your site.

The next step is to point your domain to your host so that people end up at your site when they go to the URL of your domain.

Every host has slightly different settings you’ll need to configure at your domain registrar. They definitely have a support doc on with the details on what to do.

Here are the details for our recommended hosts:

If you have any trouble with this, contact the support team for your host and they’ll walk you through the exact steps.

Step 5: Install WordPress

You’ll need a content management system (CMS) to build your site and manage your blog posts.

There’s only one option for this: WordPress.

Seriously, it’s not even a decision. Use WordPress.

Years ago, there were a few competitors to WordPress like Joomla, Typepad, or Blogger.

No one uses those anymore.

This is going to sound kind of bad but whenever I hear of someone using one of those old WordPress competitors, I just laugh. It’s hard to take them seriously.

WordPress powers 30% of ALL websites. That’s how popular it is.

Use WordPress for your blog, end of story.

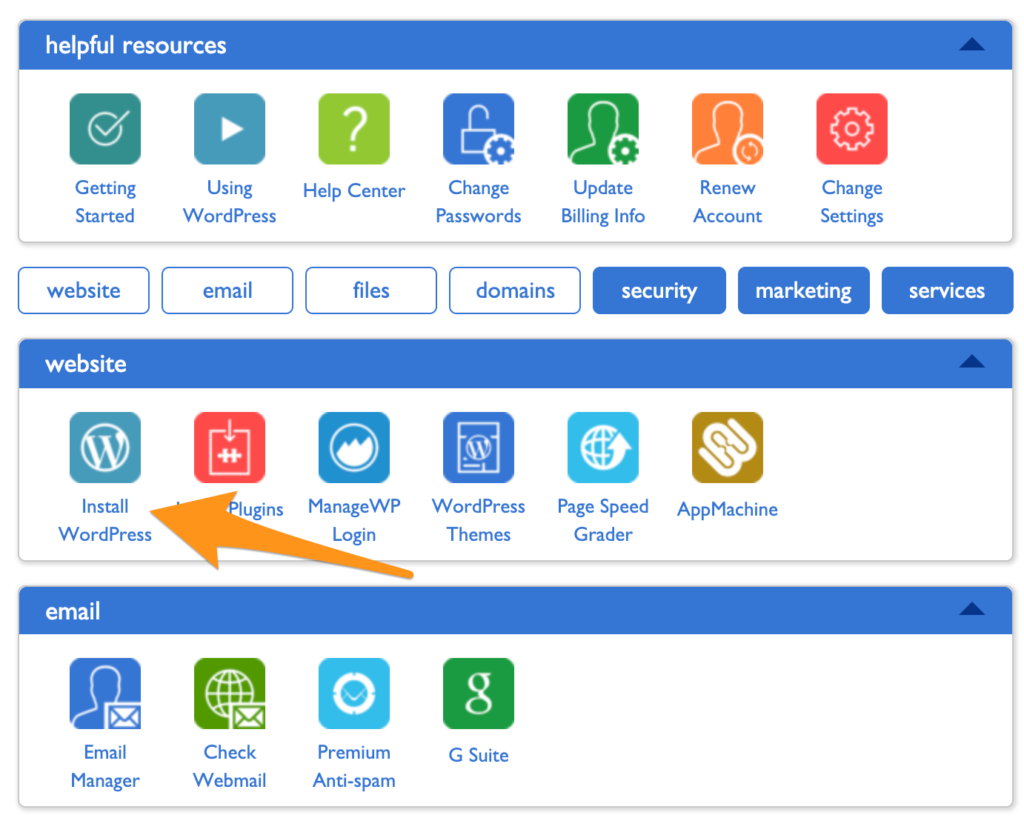
Because of how popular WordPress is, most web hosts offer a one-click install for WordPress. It’s super easy. Log into your web host, find the install WordPress opton, click it, then follow the instructions. This is what you’ll need to do if you signed up for SiteGround.

And if you’ve decided to go with WP Engine, it comes pre-installed since WP Engine is a hosting company for WordPress specifically.

Step 6: Pick a WordPress theme for your blog

WordPress is the foundation of your site. There’s an easy way to change how WordPress looks without having to code anything yourself.

WordPress uses “themes,” little packages of code that can be swapped in and out. Whenever you change your theme, your site will also change. The best part is that your blog post content won’t change. This makes it very easy to evolve your site over time without having to rebuild your entire site from scratch.

For now, you’ll need to pick your first WordPress theme.

The number of themes out there make me dizzy. There are… a lot.

When picking a theme for any of my blogs, I go straight to StudioPress. The themes are a bit more expensive at $130. (Most themes go for $20–50.) In my opinion, the higher price is well worth it. StudioPress was purchased by WP Engine and WP Engine now includes all the StudioPress themes as part of its hosting package. It’s a nice freebie if you are already planning on hosting your site with WP Engine.

If you want a wider selection of WordPress themes at standard prices, Themeforest is the most popular WordPress theme marketplace. You’ll find just about anything you want in its selection.

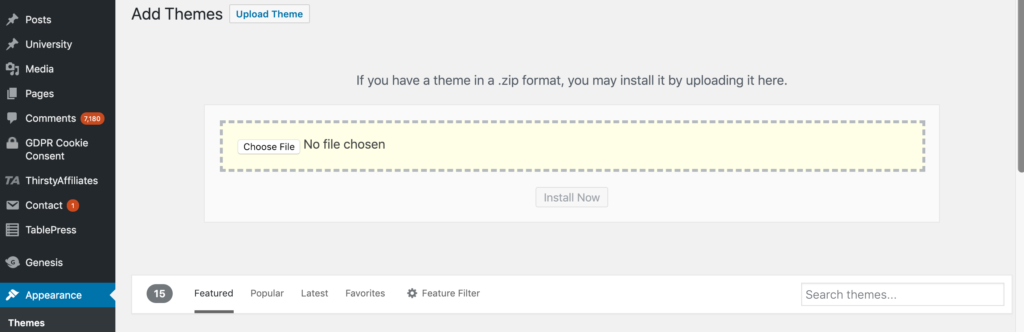
After you purchase your theme, log into your WordPress blog, go to the Theme section which is under Appearance in the WordPress sidebar menu. Then follow the instructions for adding the theme. You’ll have to upload the theme files to WordPress and activate the theme from within WordPress. You can find the upload option by going to Themes > Add New, a button towards the top. Then you’ll see this option to upload:
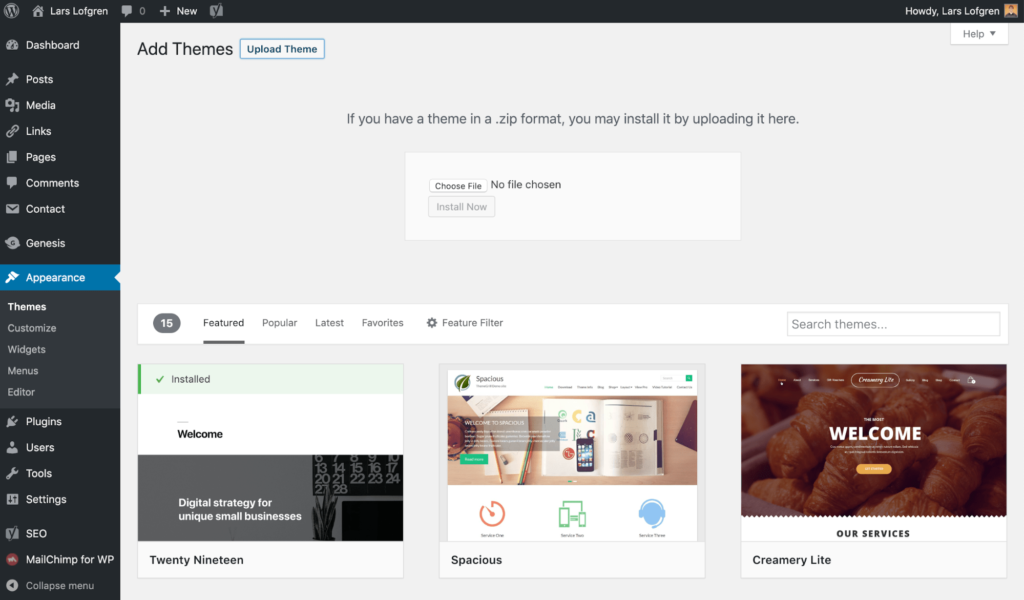
Add WordPress Themes

You’ll be able to manage any themes you’ve uploaded to your WordPress blog from your Themes section:
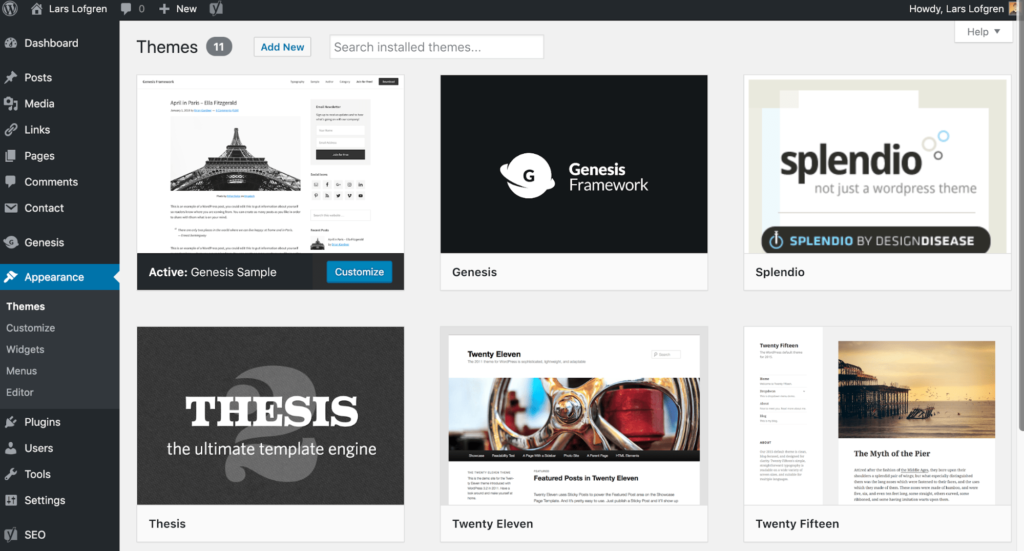
Manage WordPress Themes

Step 7: Install your WordPress plugins

Once of the best parts about WordPress is that it’s infinitely customizable. Since it’s open-source, you can change it to do whatever you want.

WordPress plugins are little batches of software you can install within WordPress to get extra functionality. This is how you’ll add a bunch of extra features to your site without having to code anything yourself.

Be careful here and try not to go overboard.

Some bloggers will install dozens or even hundreds of plugins on their blog. That can cause a bunch of problems later on. Not only can plugins cause unexpected conflicts with each other, they become a security liability since it’s unlikely that every plugin owner will maintain the plugin over time. They also become a huge headache to manage. When you have that many plugins, you’re never sure which plugin is causing a particular problem.

I like to keep my plugins limited to 5–10 amazing plugins. Here are a few of my favorites:

  • Akismet – Required for every blog, it automatically filters a ton of comment spam which is a problem for every blogger. This is one of the few plugins that I happily pay to upgrade.
  • Yoast SEO – The most highly recommended SEO plugin, it handles a bunch of SEO tasks automatically for you and also makes on-page SEO tasks a lot easier.
  • Contact Form 7 – The most popular contact form out there. Set up a contact page on your site and then use this plugin to create a contact form that will email you any time someone fills out the form. Super easy.
  • TinyMCE Advanced – A bunch of improvements to the WordPress editor that makes writing in WordPress a lot easier. These days, I usually skip this one. I write all my posts in Google Docs and then format them in WordPress using its default HTML editor.
  • WP Super Cache – A good plugin to speed up your site.
  • MailChimp for WordPress – More on this below. It’s easiest way to connect your WordPress site to a MailChimp account, create an email sign up form, and start collecting email subscribers.
  • WordPress Popular Posts – Easiest way to add a list of your most popular posts to your blog sidebar. The list will update automatically.

There is a plugin for just about anything you could want to do with your WordPress site. Use the plugin page within your WordPress blog to search for anything that you need.
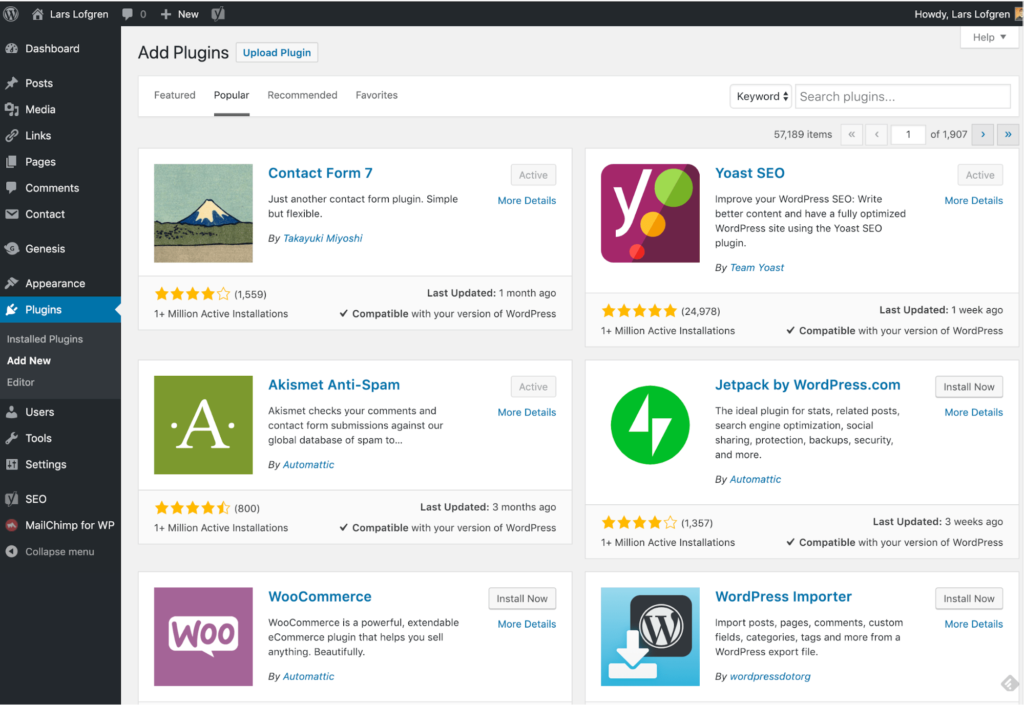
Wordpress Plugins

When you’ve found a plugin you want, install and activate it from within WordPress.

Step 8: Install Google Analytics

Google analytics is a free website analytics tool from Google. Even though it’s free, it’s still the best analytics tool out there.

Analytics is just a fancy word for website data.

Yes, analytics can get pretty complicated and overwhelming.

Which is why we’re going to ignore the majority of what’s in Google Analytics for now.

All you need to do is create a Google Analytics account and install it on your blog. There are two reasons for this.

First, Google Analytics stores your data over time. When you’re ready to dive in later, you’ll be thankful that you’ve been collecting data since the beginning.

Second, it’s exhilarating to watch people visit your site in the beginning. I remember the first time Google Analytics recorded a visitor on my first blog. I thought it was a mistake. “Someone visited my site? Really? Why would they do that? Who are they? Did they like it?”
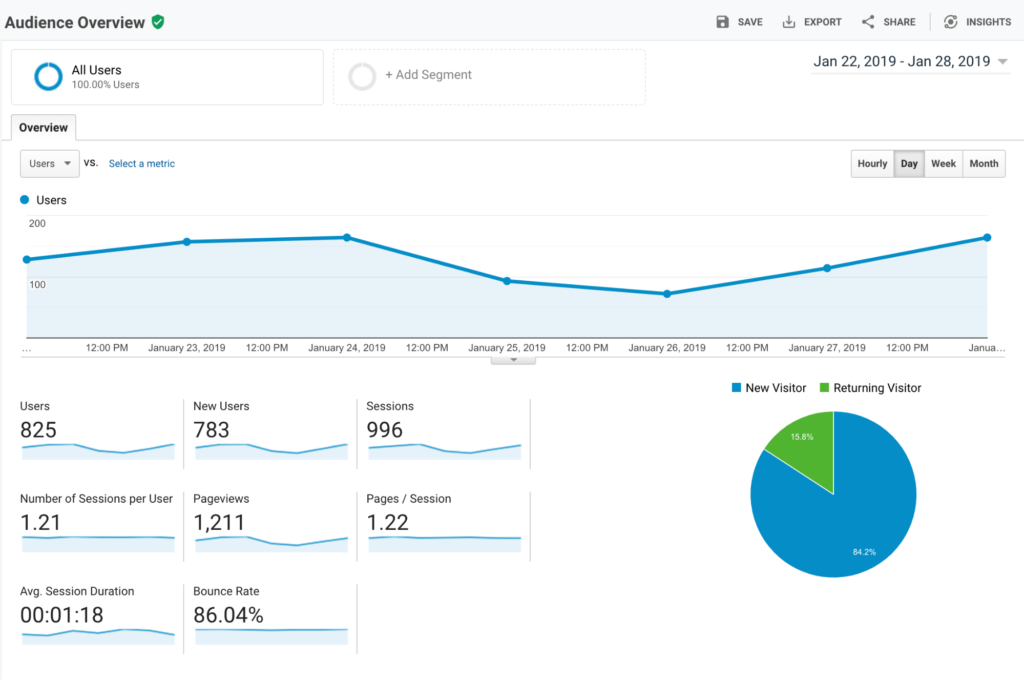
Google Analytics

Seeing those first visitors come in will give you a huge motivation boost. Even if you only check Google Analytics to see your total traffic, it’s well worth the time it takes to set up.

It’s also pretty easy to set up.

Go to Google Analytics and set up your account. Once your account is created, you’ll have a unique JavaScript tracking code for your site. When you copy and paste that snippet of code into your site, Google Analytics will start collecting data for you.

Step 9: Set up your email list for the blog

Sooner or later, you’ll hear a stat like this:

“Email marketing has 22X the ROI of any other marketing channel!”

Technically, this is true.

The response from email will always dominate any other channel that you try pushing a campaign to. But you have to acquire those emails in the first — they’ve already been filtered for the most receptive people. In other words, email by its nature is more responsive, so the comparison ROI stats are kind of dumb. They’re stating the obvious.

It’s kind of like going to a strawberry field, picking the best strawberries in the entire field, putting them in a gift basket, then declaring the the gift basket strawberries are 12 times as delicious as normal strawberries. Of course they’re more delicious — you picked the best ones already!

That’s how email lists work. They’re a gift basket of the best strawberries.

Every marketing engine I’ve built for companies has relied on emails at its core.

Think of your email list as a giant laser ray you can focus on any offer you want. Selling consulting? Pitch your list. Publishing a new blog post? Pitch your list. A podcast just interviewed you? Pitch your list.

Of all the marketing channels that have come and gone over the years, nothing compares to the power of a high quality email list.

Even if you’re not sure what to send your email subscribers, that’s okay!

Using MailChimp, you can start collecting emails on your blog so that the list is ready for you as soon as you need. It takes time to build a decent size list so your future self will be extremely grateful if you set it up now.

You only need two things:

  • A MailChimp account
  • An opt-in to sign up on your sidebar

MailChimp has a free account for up to 2,000 email subscribers, which will cover your blog for awhile.
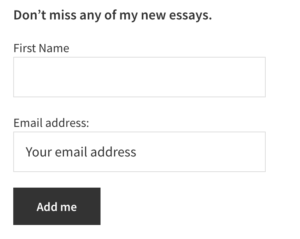
Email Optin Example

There’s also a super easy WordPress plugin for MailChimp. Once you install it on your WordPress blog, it’ll connect to your MailChimp account and give you an easy way to add an email signup form to your blog sidebar.

Even a super basic opt-in in your blog sidebar like this is enough to get you started:

Don’t even worry about sending any emails yet unless you want to. The main thing is that you’re collecting email subscribers from the beginning. Email lists can be a gold mine once you have a few thousand subscribers, and the money really rolls in once you have 10,000 subscribers and above.

Step 10: Get into your blog posting groove

Writing blog posts isn’t a sprint, it’s a marathon. More like a multi-day backpacking trip.

The best bloggers settle into a consistent writing pace they can maintain for a few years. That’s right, years.

Here are a few posting frequency rules of thumb:

  • At the bare minimum, find a way to post once per week. This needs to be a substantial post, too: 2,000 words at least. I recommend you start here.
  • Serious bloggers will post 2–3 times per week.
  • Larger sites quickly get to 5–7 posts per week. This requires multiple authors.
  • The heavy hitters who push things to the limit will do 25–50 posts per week. No joke, this is for large businesses using content marketing as their primary customer acquisition channel. HubSpot is a classic example of this.
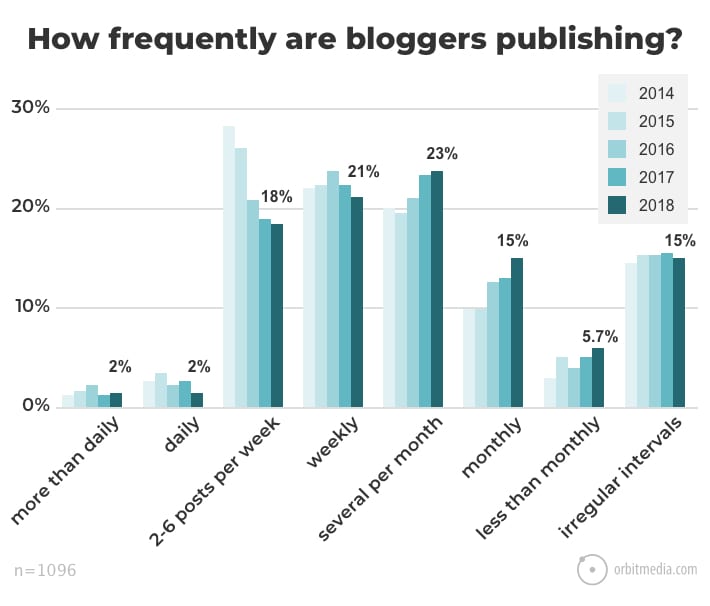
When I look at this chart of blog posting frequency from Orbit Media’s survey of more than 1,000 bloggers, I’m not surprised that 21% of bloggers are infrequent or less than monthly. (Let’s get real, less than monthly is not regular enough for most readers to know when you’ll be posting a new blog.) If you post weekly, you’re already posting more regularly than 57% of other blogs — this gives you a huge advantage.

I know writing isn’t easy. After writing blog posts full time for three months, I always want to throw my MacBook out the window. It’s a grind for all of us. This is why I recommend one post per week. That still gives you the majority of the week to focus on other aspects of your site while also giving you a break from writing blog posts all the time.

A really great post should take you two days to complete. The first day is for research and outlining, along with as much writing as you can complete. The second day is for finishing the writing, proofreading, and publishing the post in WordPress.

Also, push quality as hard as you can. The key to building a site and traffic over time is to write posts that are more valuable than what other people have already published in your category.

Step 11: Build an audience around your blog

There’s a super famous article in blogging circles: 1,000 True Fans.

Basically, getting 1,000 true fans means you can fully support yourself. You can quit your job, work from wherever you like, and be in complete control of your life. All from hitting a very reasonable goal of 1,000 true fans.

With blogging, you’ll build your audience of 1,000 true fans slowly and consistently.

As long as you keep it at, you will get there. Typically, it takes a few years.

Here’s what to focus on in order to get there faster:

  • Always post at least once per week. Never skip a week.
  • Start posting 2–3 times per week if you can.
  • On every post, push on quality as hard as you can. Google the topic and see what other people have done, then ask yourself how you can write something even better.
  • Write stuff that hasn’t been written to death already. Find a new take or perspective on your topics that other people haven’t already covered.
  • Find your voice and be authentic so people can get to know you. This builds connections with your audience faster. A quick hack for this is to pretend that you’re writing your posts to a close friend.
  • To push even harder, get active in other online communities. Post in Facebook groups, subreddits, on Twitter, do podcast interviews, get speaking engagements when you can — anything and everything. Be as helpful as you can be in these communities.
  • For all of your content, constantly ask yourself, “How can I make this as valuable as possible?”

As your blog audience matures you will want to change your traffic strategies as you grow.

Step 12: Monetize your blog

There are really only two ways to monetize a serious blog.

Yup, only two.

Bloggers try a ton of different ideas, maybe about a dozen.

Out of those dozen, only two work at scale.

So what are they?

Affiliates and infoproducts.

Check out this list of of 21 bloggers making money.

Out of the entire list, all but three or four of them make the majority of their revenue from infoproducts, affiliates, or a combination of the two.

How Infoproducts Work

I could write a book on this. For now, we’ll keep it simple. Here’s the model:

  1. Get people to visit your site.
  2. On your site, give them a reason to subscribe to your email list.
  3. Once they’re an email subscriber, run them through a launch funnel. These are email funnels specifically designed to sell infoproducts. Usually, these are courses that include a bunch of video lessons.
  4. Depending on your volume and target market, you’ll convert about 0.5% to 1% of new email subscribers into a customer at a price of $500–$2,000 for your course. At volume, that adds up fast.

Now this sounds too good to be true. While there are a few catches, it’s mostly true. What are the catches?

First, you’ll need to get extremely good at direct-response copy.

Second, it helps to be in the right category. People want money, status, and relationships.

How Affiliates Work

It’s pretty simple: You go about creating as large of an audience as possible. Then, throughout the your content, you recommend products that are helpful to that audience. When your audience clicks through the link of that recommendation, they get a special tracking code. If they end up purchasing, you get a cut of the sale.

The main downside is that only a small percentage of people will ever click through and an even smaller percentage of people will purchase. So it really helps to have a massive amount of traffic in order to make enough money from your blog.

Monetizing a Blog for Beginners

Those are really only the two options? Is there anything else for beginners?

Yes, there is.

While infoproducts and affiliates are the main ways to make serious money, you also need serious traffic in order to make them work. At least if you want them to work well enough to make six figures per year…

And to get that much traffic, you’ll need a lot of time on your blog. As much as I love blogging, getting a new blog off the ground doesn’t rain dollar bills right away.

There is one way to make a lot of money fast. It also will change your life.

Instead of trying to turn your blog into a completely passive money-making machine, go the other direction. Ditch passive and get active.

Start freelancing and consulting.

To make money quickly, this is by far your best option. It’s also the easiest to do.

When I worked at I Will Teach You To Be Rich, our freelancing programs taught thousands of people how to get started freelancing. What always blew me away was how life-changing those first few freelancing gigs are.

I went through that exact change myself. Years ago, I started my personal blog larslofgren.com and got a few freelancing clients doing it. I’ll never forget that first $100 payment sent via PayPal. The amount sounds so small now, but the real impact was knowing that I personally produced that income myself.

Guess how much traffic that personal blog of mine has? Only a few thousand visitors per month, spread across about 20 blog posts.

Anyone can create a blog that size and use it for freelancing lead generation. It’s enough to build a client base that pays you $3,000 to $5,000 per month. That’s enough to quit your job. That’s life-changing.

And it’s a much easier goal to hit than a full-ramped affiliates or infoproducts marketing machine. You always have the option to build that stuff later anyway.

What about all those other monetization methods?

Most of them are a waste of time. The impact on revenue is marginal, it’s a complete distraction. A few are worth doing for marketing and branding. The rest should be ignored entirely. Here’s the list that bloggers always try at some point:

  • Books – Great for marketing. Adds a ton of credibility to your brand. But you won’t feel the impact on revenue at all.
  • Events – I loathe events with every fiber of my being. All the risk is front-loaded, all contracts get locked up ahead of time, they’re a pain to sell, and you don’t even know if you’ll make any money until right before the event. Even if you do make money, the margins are terrible. For me, these are complete distractions and a huge opportunity cost for the business.
  • Banner ads (Google Ads, formally Adsense, for example) – The last time these made any decent money was around 2003. These days, I’m not even sure it’s possible to get banner ads to cover your hosting bill. I’m only partially joking.
  • Speaking – Done the right way, occasional speaking can be a great brand builder. And while it sounds amazing to get paid $20,000 per speaking gig, it’s not nearly as amazing once you learn most speakers never get paid, it’s takes months worth of work to create a talk that commands that kind of fee, you really need a New York Times Bestseller in order to charge real fees, and you’ll get so sick of hotel rooms after the first year that you’ll never want to travel again. Do speaking gigs when good opportunities come up; don’t build a business on them.

More articles on starting a successful blog

We’ve been writing about blogging and how to make money blogging on Quick Sprout for years. Check out Everything About Blogging for an annotated list of what you should read next.


from Quick Sprout https://ift.tt/2DXmCer
via IFTTT

How to Create a Website

Creating a website used to be a massive project.

And expensive too.

Everything had to be built by hand and businesses needed to work with an online marketing agency that would charge them tens of thousands of dollars to build the site. If you wanted a professional-looking site, that was your only option.

Things have gotten a lot cheaper over the years.

Now it’s possible to get a polished site for less than $100. About $10 to buy the domain, $30–60 for a good template, and $5–10/month to host it. It’ll look so good that people won’t even realize that you built it yourself. It’ll look like some high-flying marketing agency built it for you.

Not only has it gotten cheaper, it’s also gotten a lot easier.

I’ve broken down the 9 simple steps to create your website from scratch. You’ll easily be able to run through these steps over the next 120 minutes.

Step 1: Pick a name and find a domain for your website

These are not two separate steps, unfortunately.

I really wish I could sit down, pick any name that I want for my business, and be able to create the site that I want around that name. Now that the internet is a couple of decades old, we all have to face the reality that most of the good domains have been taken.

Here’s how a naming session always seems to go for me:

  1. In a moment of inspiration, we think of an amazing name.
  2. We hold on to this name for months, maybe even years.
  3. It’s time to start the business, so we go to purchase the domain.
  4. The domain is taken.
  5. We try a dozen small variations of our original idea, all taken.
  6. No biggie, we thought of one brilliant name, we’ll think of another one.
  7. Backup idea #2 = taken.
  8. Backup idea #3 = taken.
  9. Backup idea #4 = taken.
  10. Despair sets in.
  11. We start considering names that we don’t actually like, hoping that anything is available.
  12. We come up with 2 or 3 options that we don’t like at all.
  13. Then we spend a week trying to come up with a name that’s both available and a name that we can live with.
  14. Finally, we find one.

Websites have also become so embedded in our day-to-day lives that it’s better to change the name of the business to match an available domain than it is to pick a poor quality domain. Through this process, I almost always end up with a completely different name than I originally intended.

This is why I consider the “naming my business” and “buying the domain” steps for creating a business to be the same step. I try to only lock myself into a name once I have the domain.

We put together an in-depth guide on buying domains here.

The good news is that the rest of these steps are a breeze once you have your domain purchased. It’s the first and hardest step to create your website.

Step 2: Register your domain name

Real quick, let’s sort out the difference between a domain registrar and a web host.

A domain registrar is a company that specializes in buying (registering) domains.

A web host, on the other hand, specializes in running servers that host websites.

Every web host will desperately try to get you to also registrar a domain through them. The reason is that it’s a great upsell for them. They’ve spent most of their resources building out a hosting service, then they offer domain registration as a convenience, increase the price a bit, and collect a nice chunk of extra profit from you.

My philosophy is to buy things from businesses that specialize in that exact thing. Prices will be better and so will quality. That’s why I also use a domain registrar for buying domains and a web host for hosting. I never mix up the two.

The best domain registrar is NameCheap. That’s where I have all of my domain names.

We put together a detailed review of domain registrars here.

Step 3: Decide what kind of site you are creating

Most guides on creating a website will push you into using WordPress. It’s the most popular and flexible website builder. And that’s usually a good recommendation.

But there are a few situations where I recommend different options.

Simple Portfolio or “Business Card” Sites

Many businesses need a simple website that tells people a few things:

  • Who the business is for
  • What the business does
  • Sometimes a portfolio that shows off some work
  • Contact info

This kind of site gives the basic info for the business, nothing more. If this is what you need, Squarespace is your best option for creating your website. It’s incredibly simple to use and will give you a professional site at a very low price. It’s perfect for small businesses.

Squarespace will try to convince you that they can handle everything. That’s not true.

They’ve created the simplest and easiest website builder out there. Truly, it’s a joy to use.

However, they completely lack all the advanced features that an online business needs. The ecommerce functionality is extremely limited, and I don’t know any serious online marketer that uses Squarespace for a content site. If your business an online business, Squarespace isn’t a legitimate option. You’ll hit the limits of its features too fast.

If you know that you want an ecommerce store from the beginning, start on Shopify and skip Squarespace. And if you know you want a blog or are planning on doing lots of content, start on WordPress. The majority of this guide is around building a wordpress website.

Squarespace makes the most sense when you just need a clean, professional-looking site that gives some basic info on your business. It’s perfect for small businesses, freelancers, and artists.

Here’s another way to think about it: If you’re building a business that doesn’t live and die on its website, it just needs a website in case anyone looks for it, like a digital business card, then go with Squarespace. But if you’re website is your business, use one of the more tailored platforms.

Ecommerce Sites

If you’re planning on building an ecommerce store for your site, don’t use WordPress. We have an entire post here on when to use WordPress for ecommerce and when not to. The short story: it rarely makes sense to use WordPress for ecommerce.

The best option, by far, is Shopify. There used to be more competition in the ecommerce tool space but Shopify got too far ahead. Now they’re really the only option and they have an incredible reputation. You won’t regret using them for an ecommerce site.

If you’re going this route, we have a 9-step guide on how to create an ecommerce website. We also have a guide on how to start a store that drives real sales. Both of those guides will get you pointed in the right direction.

Blog Sites

If you want to create a blog with a bunch of content, you need to use WordPress. We have a detailed guide on starting blogs here. Most websites are really just blogs. Some of the biggest, and most well known websites on the Internet are blogs.

WordPress powers over 30% of the entire internet. So it’s the only real option for starting a blog these days.

What about Joomla or Drupal? Or Typepad?

WordPress left all those other platforms in the dust about a decade ago. They’re not even legitimate options at this point. Pick WordPress — there isn’t a single situation where you’ll regret it.

When I originally started with this online thing, Drupal sites were still pretty common. I partnered up with an engineer friend of mine and we did a lot of freelance work migrating sites from Drupal to WordPress. Even back then, WordPress was a clear winner.

Now when I come across a site on any of these other tools, it’s kind of exciting. It’s like finding an ancient artifact. “This still exists!? How fascinating!”

Don’t use any of these other tools, stick to WordPress.

Everything Else

If you’re not sure or have another vision for your site outside the categories above, use WordPress. It’s the most flexible platform out there. It will do ecommerce, it’ll do simple portfolios, it’ll do massive content sites, it’ll do Fortune 500 marketing sites, it’ll do it all.

You might have to customize it more than other platforms in some situations but you can make WordPress do whatever you want it to. And just about anyone in online marketing knows their way around WordPress so you’ll be able to find plenty of people to help you when the time comes.

Whether you want to build your site by hand or you have an online marketing agency to do it for you, you should still build on top of WordPress. It’ll shortcut a lot of the programming work and give you the ability to edit basic items on your site without having to edit any code. I’ve managed marketing sites of venture-backed tech startups that employed dozens of engineers — we still had our marketing site built on top of WordPress. It’s the standard choice.

Step 4: Get a host for your website

For the rest of this guide, I’m going to assume that you’ve picked WordPress to create your site. If you want an ecommerce site, skip the rest of this guide and follow our guide on creating an ecommerce site.

WordPress is the tool that you’ll use to build your website. But you also need a host that will store your site and make it available to anyone who visits.

The best place to go for most people is Siteground.

We have an entire guide here that goes through all the best web hosts.

Hosting plans usually start around $5/month.

Step 5: Install WordPress

Just about every website host has a 1-click install of WordPress. Siteground, the hosting provider I recommend the most has this feature. It’s usually under a section called Tools, Website, Software, or Content Management Systems (CMS). It’ll look something like this:

Install WordPress

If you have trouble finding it, contact support at your host and they’ll be able to walk you through it.

Step 6: Point your domain to your host

Let’s do a quick recap.

  • You bought your domain using a domain registrar.
  • You signed up for a hosting plan.
  • You installed WordPress on your host.

Now you’re going to connect all that stuff together by pointing your domain to your host. Then when people go to your domain, they’ll end up on your website.

There are a few technical settings you need to apply. This involves configuring a few nameserver settings on your domain registrar for your domain. Your host will give you the correct settings; you’re looking for their nameserver settings.

If you get stuck, contact your host and they’ll give you all the info you need.

Once you have the nameserver info from your host, go into your domain registrar and configure those settings for the domain that you want to point at your site. Once you’re done, it’ll look something like this:

Create a Website Name Servers

Step 7: Install a WordPress theme

Think of WordPress as the guts of your site, it’s all the pumping that makes your site work.

WordPress uses themes to determine how your website looks. This makes it really easy to change how your site looks without having to rebuild your site from scratch. Swap out your old theme for a new one and ta-da! Your design will look completely different.

These days, I purchase all my themes from StudioPress.

Heads up, WP Engine bought StudioPress and now includes all the StudioPress themes in its hosting plans. WP Engine is more expensive but it’s perfect for serious bloggers. It’s a great way to save money on your theme if you are planning on building a large site to begin with. WP Engine is another one of our recommended hosts if you’re looking for the best. The downside is that WP Engine tends to be more expensive than other hosts. It’s probably overkill if you are just starting out, or creating your first website.

Back to themes, are there other options?

You betcha. ThemeForest has a marketplace of WordPress themes. There are literally tens of thousands of themes to pick from. They’re usually in the $30–60 price range. When looking for theme, I rank them by the most popular or the highest rating. Then I pick one I personally like.

After you’ve purchased a theme, go to the WordPress Theme settings and upload your theme. The Theme settings are under Appearance in the WordPress sidebar menu. You’ll have to click through “Add new” and “Upload Theme” in order to see this option to upload:

Upload WordPress Theme

Go ahead and upload the .zip file you received when you purchased your theme.

After it’s uploaded, you’ll also have to click “activate” on the theme in WordPress to make it go live.

Step 8: Add content to your website

Now the fun part — it’s time to create the individual pages of your site.

You’ll do this within WordPress.

WordPress has two types of content: pages and posts.

Think of posts as blog posts that are published under a “blog” section of a site. If you’re not planning on having a blog, then you can skip posts entirely.

Pages are the more permanent pages on your website. Like your About or Contact Us pages. When you’re first creating your website, you want to get a batch of pages live so your site feels real.

Every website has a few standard pages you should create:

  • Homepage – Your WordPress theme usually has settings for this page.
  • Contact Page – Create a new page and install a WordPress form plugin so you can add a form to the page.
  • About page – Tell your story and why you’ve started your business.
  • Product or services pages – For the main services or products that you’re offering, it’s a good idea to create a dedicated page for each.
  • Blog – If you’re building a blog, make sure all your posts get listed here.

This list will get you started. You can always add more later.

Step 9: Continue evolving your website

At this point, you have a fully functioning site that looks great.

I’m not going to lie, there’s a lot of extra configuration you can do to your site: you can add WordPress plugins that upgrade your site, build out a blog, add an email list, grow traffic, the list is endless.

You don’t have to do any of this extra stuff — it’s all optional. It depends on your priorities and goals.

A website is an ever evolving thing. The way it looks after you first create it, won’t be how it looks a couple months later. At least that is the case if you are actively working and growing your website.

When you’re ready, these guides will walk you through the extra stuff that’s worth considering:


from Quick Sprout https://ift.tt/2Xnliua
via IFTTT
Thursday, August 15, 2019

2019 SiteGround cPanel Tutorial

SiteGround has one of the top reputations in the web hosting industry. Over 2 million domains are hosted on the platform.

That’s one of the many reasons why SiteGround made my list of the top web hosting services on the market today.

For those of you who are new to hosting your website with SiteGround, you might be wondering how to navigate your dashboard. Fortunately, if you read any SiteGround web hosting reviews, you’ll quickly learn that the platform is very user-friendly.

SiteGround uses cPanel, which is a highly responsive web-based control panel that’s used for managing your settings and account.

cPanel runs on Linux and is extremely versatile. It’s where you’ll customize your site and web hosting needs. SiteGround cPanel is well designed so anyone can use it, regardless of their technical skill level.

With cPanel, you’ll be able to do things like:

  • Install WordPress (or another CMS)
  • Back up your site
  • Review resource usage
  • Make changes to your server
  • Set up emails
  • Connect domains to your hosting plan
  • Manage databases
  • Manage security

As you can see from this list, the web-based control panel from SiteGround is very flexible.

I’ll show how to perform certain tasks with cPanel, to optimize your experience using SiteGround for web hosting.

Account Usage Statistics

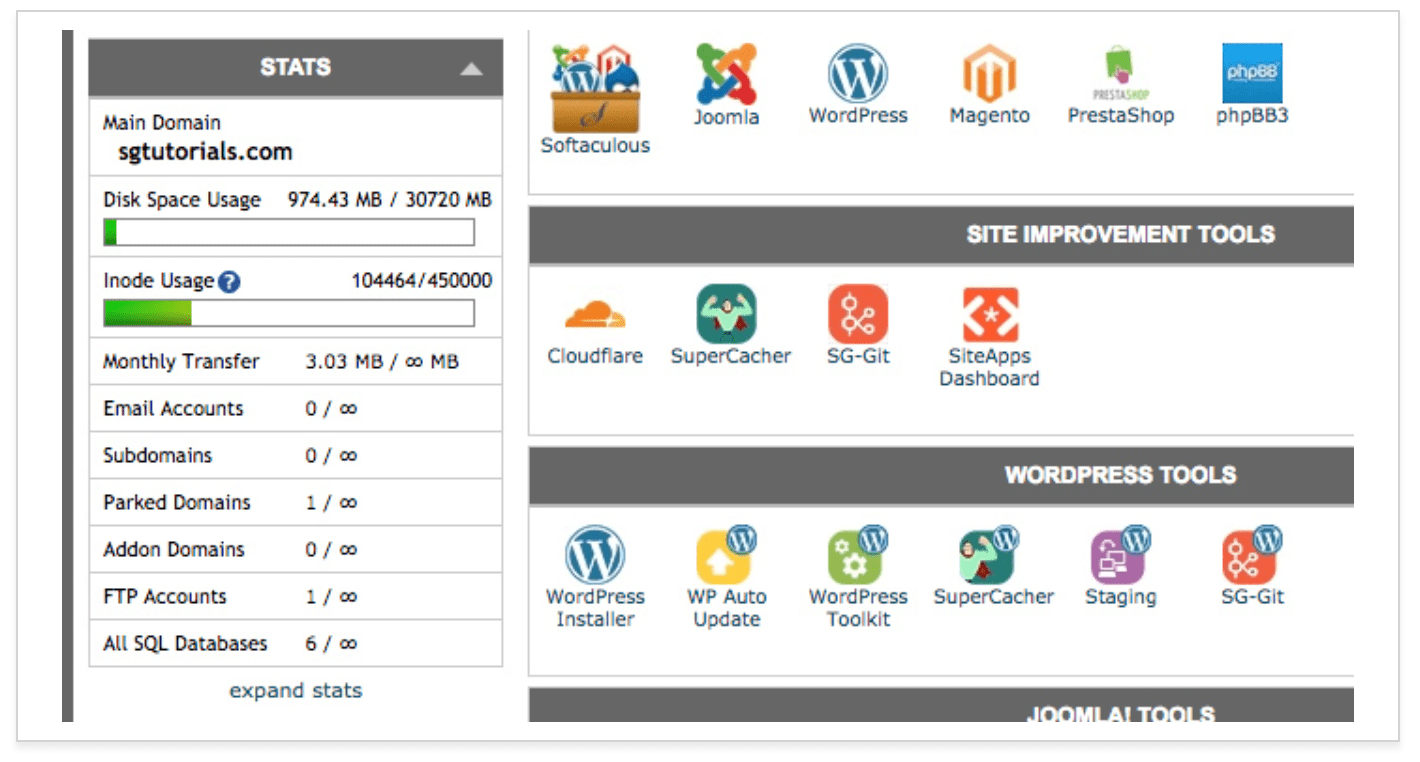
If you want to know how much web hosting resources you’re using, you’ll need to navigate to the “statistics” section of your cPanel menu.

stats

On this page, you’ll be able to see if you’re coming close to exceeding your plan limits.

In the screenshot above, you can see that disk space and inode usage are nowhere near capacity, so the plan is suitable from those standpoints. But if those bars were full, you’d want to upgrade to a higher plan to ensure that your site performance isn’t compromised.

This is just a quick overview. But if you want to see even more information, click on “expand stats” at the bottom left side of the page.

Now you’ll be able to see CPU time usage over the last two hours and 24 hours, as well as account executions over those same periods of time. The detailed stats will also show you all of the processes that are currently running on your account.

You can even view detailed graphs about your account executions and scripts.

Seeing this information on a chart is a great visual tool for analyzing your data. You can view the information for the day or for the week to gauge when you’re using the most resources.

This page will also show the top executed scripts, as well as the top IP addresses that access your site. You can use this data to protect against brute force attacks.

Visitor Logs

The cPanel visitor statistics has three main sections related to who is navigating to your website.

  • Raw access logs
  • Error logs
  • Awstats

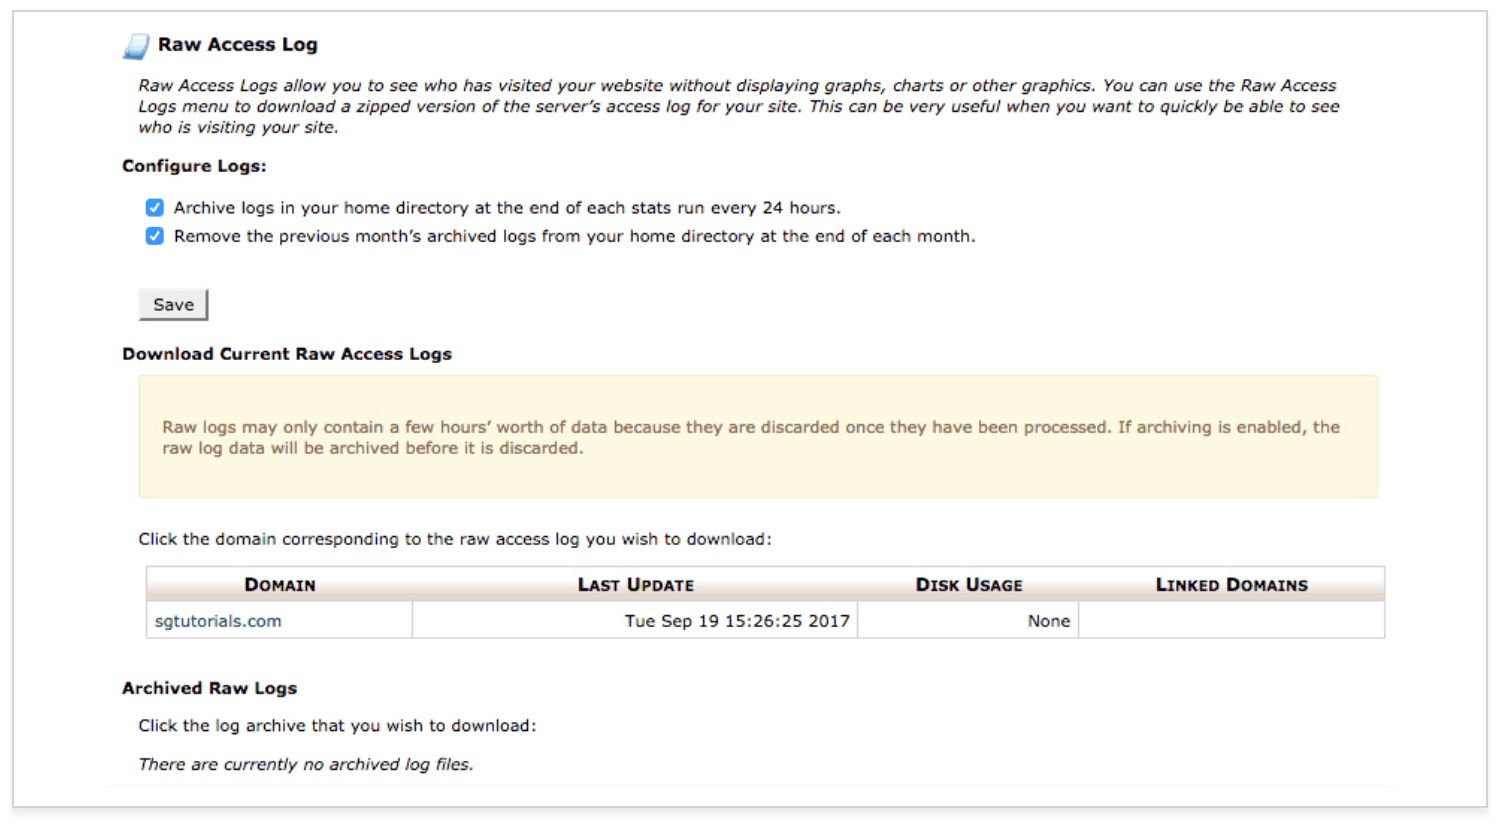
Here’s a look at an example of the raw access log.

raw access

If you want a quick way to see who has been visiting your website, the access log is the best place to find that information.

This tool shows you who visits your site, but without displaying any visuals or graphics. You have the ability to download a zip file of your access log as well.

As a webmaster, you always want to make sure that your site is running as smooth as possible.

Any problems with your website will impact the user experience, which is why the error log is located in the visitor logs area.

Your error log will show you any recent errors on your website, such as broken links or issues with files. I’d recommend checking this log often, so you can identify and address any errors as soon as possible.

The Awstats menu gives you an in-depth analysis of your website visitors. Some of the top statistics included here are:

  • Unique visitors
  • Number of visits
  • Pages opened
  • Hits
  • Bandwidth
  • Top 25 countries
  • Top robots and spiders
  • Duration of visits
  • Top files accessed
  • Top pages
  • Top operating systems
  • Top browsers
  • HTTP error codes

You’ll also have access to a quick summary of this information on a table. SiteGround cPanel will let you know the last time this information was updated. You can always click “update now” to view the data in real-time.

File Manager

With the cPanel file manager, you can manage your website using HTTP as opposed to a third-party app or FTP tools. The file manager isn’t advanced as other tools, but it’s perfect for managing basic functions.

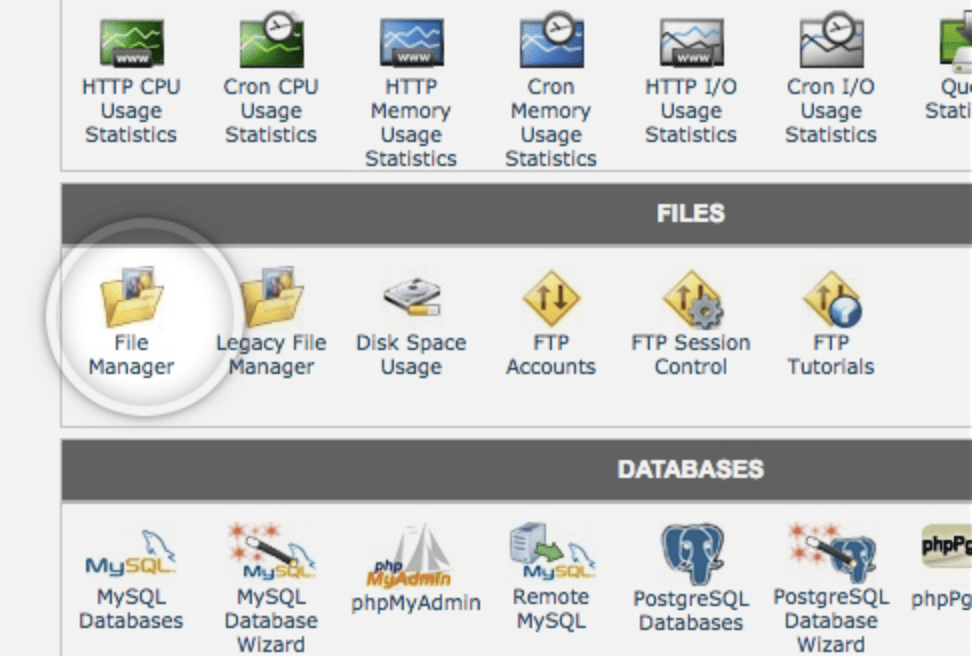
You can access the file manager by navigating to the files menu of cPanel.

file manager

The best way to keep your files organized is by adding new folders. Keeping your folders neat will make it easier for you to perform site maintenance down the road.

Adding new files to folders is as simple as clicking the “upload” button at the top of the page. All you have to do is choose the file location of your upload, and edit any permissions for the file.

If you’d rather create a file directly on cPanel, as opposed to your computer, just click on the “new file” button. Although I’d only recommend this for smaller file sizes.

Once files have been uploaded, you may want to edit them in the future. That’s no problem.

Just find the file name and click on the “edit” button on the main toolbar. This will let you make changes to your site without being forced to upload an updated version of that file. However, this is not recommended for big changes.

The file manager also allows you to extract files, compress files, and move files to another location.

Backup Management

SiteGround has automatic daily backups for things files, folders, and email accounts. You can also create manual backups on your own.

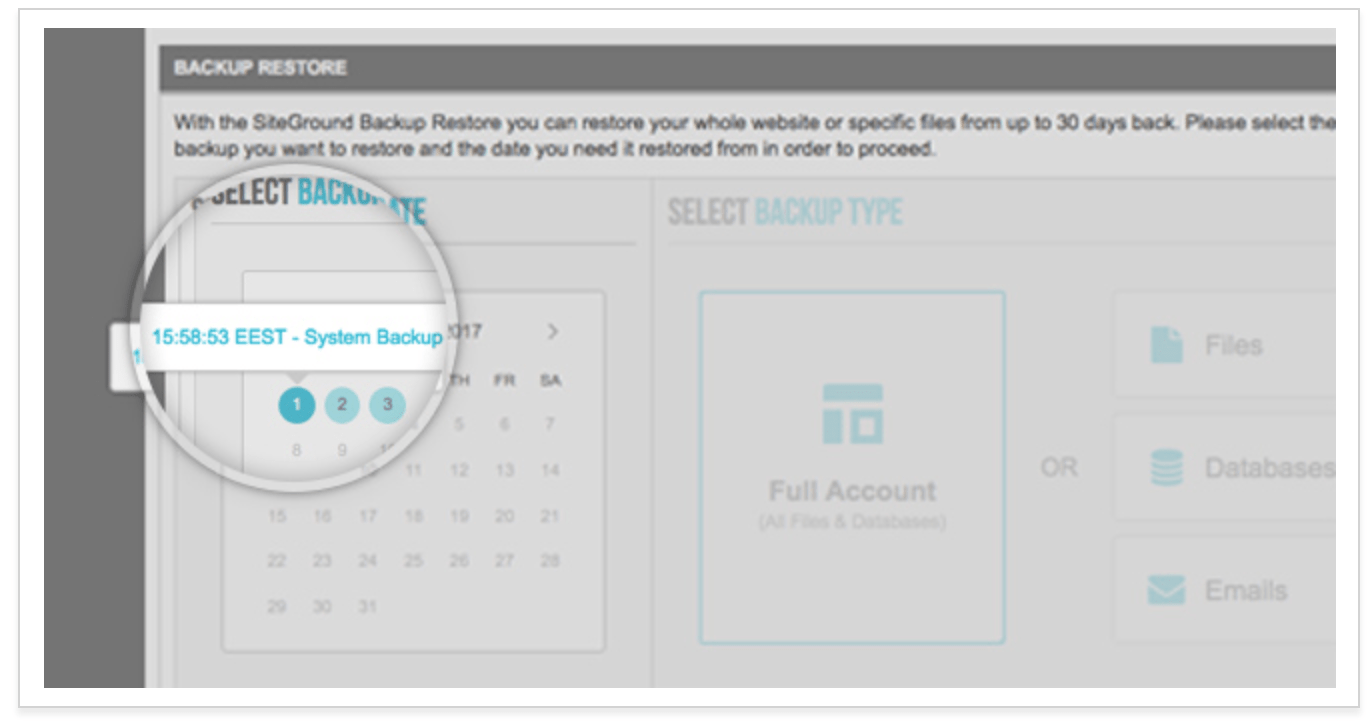
If something happens and you need to perform a file restoration, you can do this from the cPanel backups manager. Just click on the “backup tool” button.

From here, you’ll have access to a calendar showing all of your backups. If you click on one of the dates marked with a circle, you’ll see potential backups that you can use for restoration.

backup manager

Once you click on that date, you can decide what files need to be restored. These are your options:

  • Files
  • Databases
  • Emails

For files, you’ll be able to manually choose which folders need to be restored. Just scroll through and check off any boxes that were compromised and then click on the “restore” button.

SiteGround gives you the option to restore your files without replacing the ones that are currently being used.

Both databases and emails can be restored in the same way as other files. You simply navigate to the calendar, choose the date, and select the files that need to be restored.

Additionally, you can restore your entire account with SiteGround cPanel. This is the best option for those of you who aren’t sure exactly what files need to be restored. Choosing this function does not restore emails. So you’d still need to do the emails separately.

It’s also worth noting that the full account restoration impacts all domains on your hosting plan.

So for those of you who have more than one website, they’ll all be restored to the date of your selected backup.

Security

Website security needs to be a priority for all sites. SiteGround makes this easier for its customers by supporting Let’s Encrypt. All SiteGround plans come with a free SSL certificate.

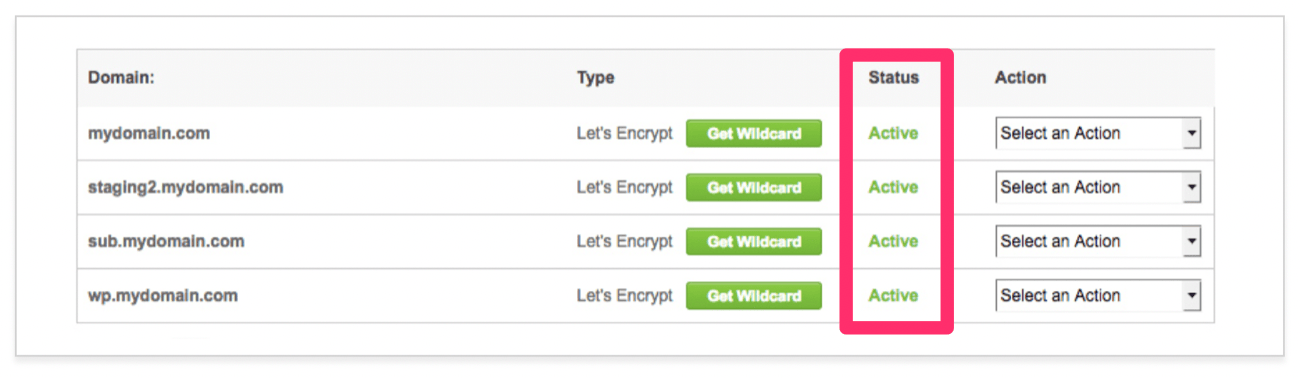
If you navigate to the security section of cPanel, you’ll see an icon for Let’s Encrypt.

After you click on that icon, you’ll see an active list of your SSL certificates.

SSL

You can manually install any SSL certificates that aren’t active. Just click on the domain choose the type of certificate that you want to install.

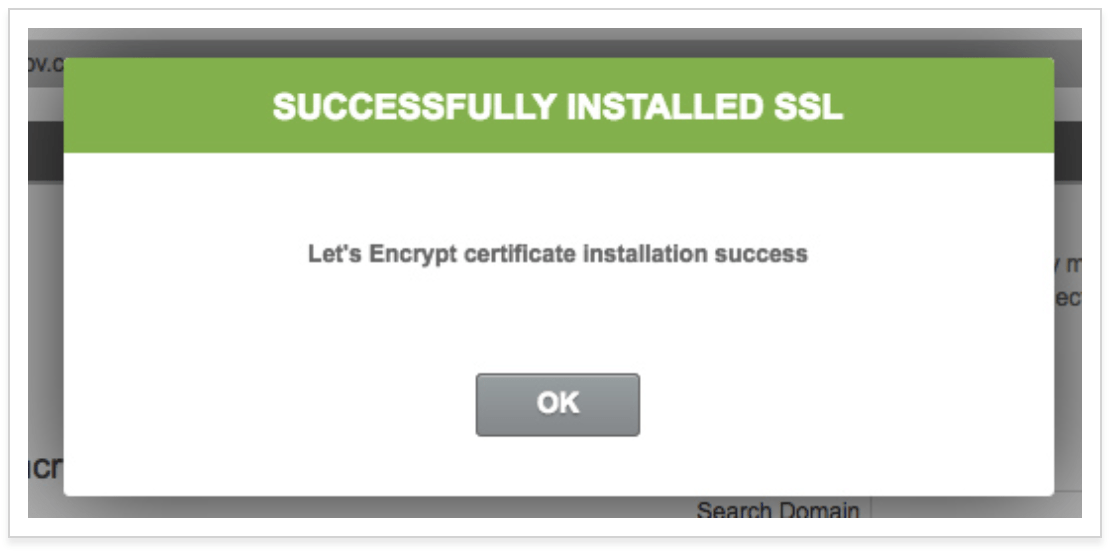
Once that’s complete, you’ll see this pop-up verifying that the installation was a success.

SSL Setup

After the certificate has been issued, it still needs to be configured on your site. Otherwise, your domain could have duplicate content running simultaneously over HTTP and HTTPS.

You might have to rewrite links so that mixed content warnings and errors don’t appear.

To configure your certificate, just choose “HTTPS settings” from the action menu. Then turn on HTTPS enforce, which will force your site to work on HTTPS.

All HTTP redirects will be performed at the server level. This is a great shortcut, so you won’t have to do hire a developer to do it for you.

In order for your SSL certificate to work, it needs to meet the following prerequisites:

  • Your domain and subdomain need to be pointed to the IP address of your cPanel account.
  • The hosting server needs to control the DNS zone for domain names with a wildcard SSL.
  • Temporary redirects need to be removed until the SSL has successfully been installed.

It’s also worth noting that any parked domains not pointed to your cPanel IP address would cause the SSL installation to fail. To work around this, just temporarily unpark them or point them to the cPanel account until the installation is complete.

Advanced Settings

You can also manage some more advanced options with SiteGround cPanel. “Chron Jobs” is something that you might want to consider setting up in the advanced menu.

This will let you run specific commands based on times set by the cron job. For example, you can set this up to delete temporary files each week so that you don’t waste disk space.

cPanel will email you every time a command is run with a cron job.

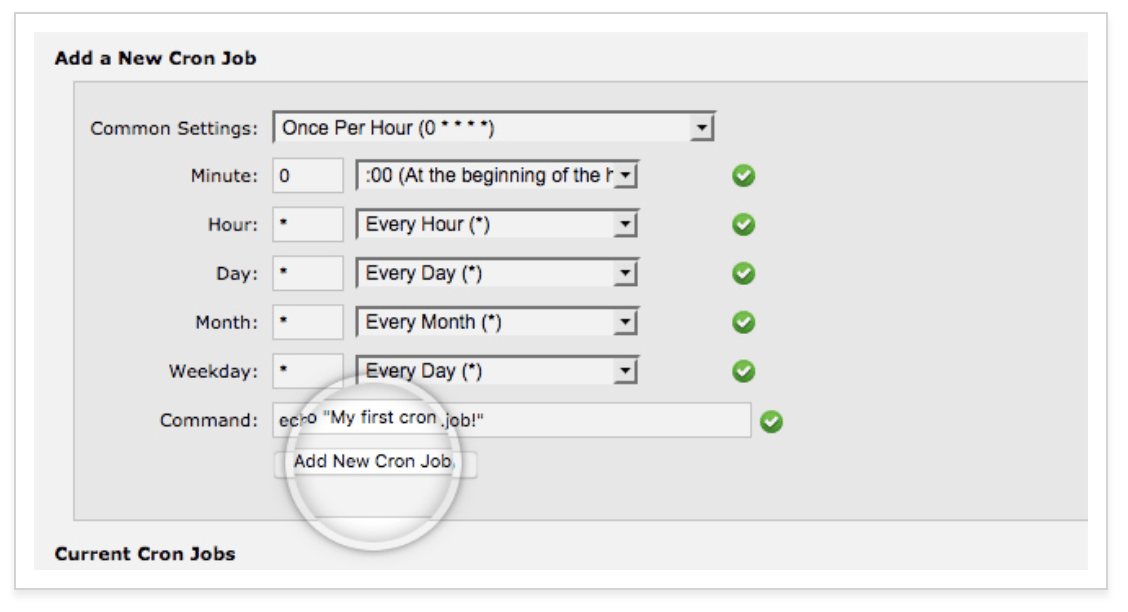
To add a new cron job, just adjust the settings for a specific command. Here’s an example of what that menu will look like in cPanel.

cron job

If you don’t need a cron job anymore, just click on the “delete” button to remove it.

Changing the PHP version is another advanced cPanel task that you might want to use. The PHP version manager icon can be found in the “1H Software” section of your cPanel dashboard.

Click on the folders and choose the directory that you want to change. Keep in mind, any subdirectory will be changed as well.

You’ll also be able to change the entire website. Just choose your new PHP version from the list of options and save your changes.

I’d suggest running your site on the “managed PHP version.” This will automatically run your site on the recommended PHP whenever it becomes available. So you won’t have to do anything manually, and your site will always be running a stable and secure PHP.

Conclusion

There’s a reason why SiteGround is so popular. cPanel makes it easy for its web hosting clients to manage all of their hosting and website settings in one place.

As you can see from what I’ve covered in this guide, the options are extremely versatile.

So if you’re new to SiteGround and don’t know how to navigate the cPanel, use this tutorial as a reference.

For those of you who are considering SiteGround for web hosting, but haven’t signed up yet, this information should make your decision that much easier.

If you review my resource on the best web hosting for small business, you’ll see that I named SiteGround as the choice for the best technology. cPanel was a big factor in that decision.


from Quick Sprout https://ift.tt/2MZU0aK
via IFTTT
Friday, August 9, 2019

The Future of Web Design: Artificial Intelligence

Artificial intelligence has been trending upward for years now. In fact, according to Google Trends, the search term piqued back in January 2018.

AI is being used for all different types of applications and technology. In the past, I’ve covered the marketing skills you need to survive in the age of AI.

That’s because marketers have been using AI technology to reshape the way that consumers are targeted. Brands and websites are using AI chatbots to improve communication with website visitors. They’re also using this technology to analyze big data. AI is helping business owners and webmasters gain a competitive advantage in their industries.

But today, AI is also changing the way that we design and develop websites. It’s also going to impact the way we design moving forward.

Traditionally, all websites have been created using HTML. While the code has changed and become more sophisticated over the last couple of decades, sites have become more visually appealing than they were in the past.

Although the technology is still in its infantile stages, ADI (artificial design intelligence) is being used for web design and development.

The thought behind ADI is that the majority of web design can be automated using AI technology. Talks of ADI have been growing over the years, which is what inspired me to write this guide.

I want to share all of this information with you so you can prepare for the future of your website and gain a better understanding of where ADI stands today. With that said, I’m not quite at the point where I’m saying every single site needs to leverage AI for design. I don’t think we’re there just yet.

Instead, I just want you to be aware of the technology and how it will impact the future of web design.

Growth and benefits of AI

Before we dive into the specifics of ADI and artificial intelligence used for web design principles, I want to take a moment to discuss AI as a whole. Essentially, here’s how AI works.

AI technology lets machines and computers perform human tasks. Then, the machines are supposed to learn from their experiences completing those tasks and adjust accordingly to optimize any new inputs.

In order for AI to function properly, the technology needs to be programmed efficiently with deep learning capabilities. All of this technology needs to be able to recognize patterns in the data that’s being processed.

AI is being developed at a rapid pace, and revenue from these applications is growing exponentially as a result.

AI growth

As you can see from the graph, it’s estimated that the revenue from AI enterprise applications in six years will be ten times where it is today in 2019. It’s already eight times higher than where it was just three years ago.

Clearly, AI is on an upward trend.

The technology needs to be applied somewhere, and the theory is that it can be used for both web development and design, in addition to other purposes.

It’s a common misconception that AI is only used for automating tasks that would normally be done manually. While that’s part of how it works, the technology goes so much deeper than that.

The idea behind AI is that it can be used continuously, at scale, and with precision, using data.

This technology is being streamlined for processes in homes and businesses alike. It can be used for applications like classifying images or object recognition. For example, a smart refrigerator using AI can theoretically create a grocery list for you automatically.

With deep learning capabilities, AI technology will continue to grow and become more advanced in the future.

How ADI works

Now let’s look at how artificial intelligence can be applied to web design with ADI.

In the simplest explanation, ADI can use machine learning to recognize and implement trends in web design. It’s just like anything else using AI technology. Computers analyze data, then automatically make input adjustments.

The idea here is that websites can eventually be made on their own, using AI. This is very different from the way websites are being built today.

Right now, there are only a few options for web design and development.

First, you can learn how to code and do everything yourself from scratch. This is definitely not the easiest approach. It takes time, trial, and error.

Alternatively, you can use website builders that don’t require any coding. Drag and drop interfaces make it easy for people with no coding experience to build a website on their own. But still, this approach requires time and manual work. Plus, you need to have an understanding of design in order for your site to be both appealing and efficient.

If you don’t have the time or the skills to do this, you can hire a developer or a designer to handle everything for you. While this frees up your time, you’ll pay a premium price for those services. Again, the work still needs to be done manually by someone.

Artificial intelligence is a newer method for web design, and it could be the primary design option of the future.

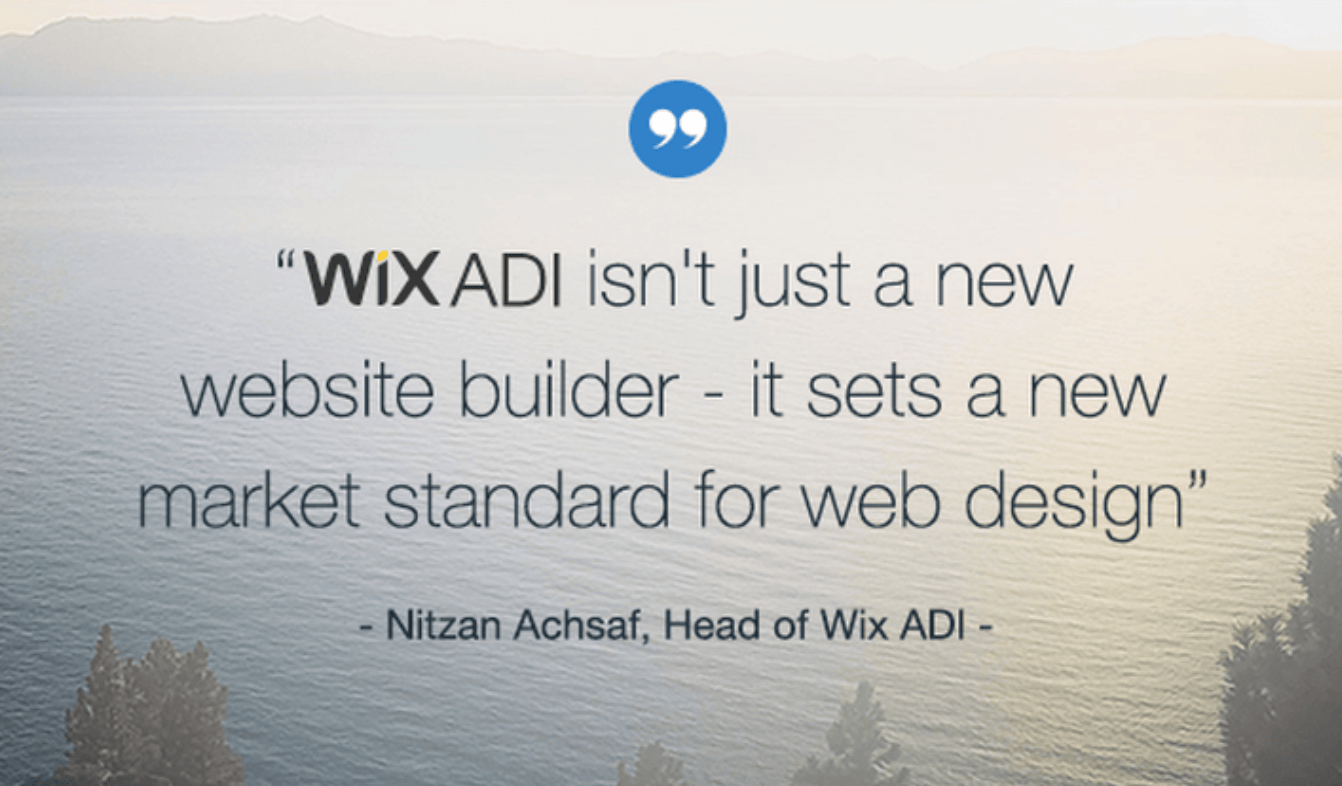
Wix, an industry leader in the website building space released their version and vision for ADI back in 2016.

wix

The concept is fairly straightforward.

Wix asks questions about the needs of your website. Then it takes those responses to create content elements that are both unique and robust from a design standpoint for your website.

Wix will also give you custom images and text if you use their ADI. I talk about this in my step-by-step guide on how to create a Wix website.

The foundation for ADI is supposed to be a machine that has the brain of a web designer. This is achieved by programming technology to observe existing websites.

Then, the technology takes those website design best practices and applies them to a new site that’s being built. All of this happens automatically.

In theory, this would even eliminate the need for templates. Sites could eventually be built without any input from humans.

Applying technology to web design

Let’s take a step back away from AI for a second and just focus on web design.

When most people think about design, they automatically assume that creativity is a requirement. In some instances, that’s true; but only to a certain extent.

Great web designers don’t necessarily need to be the most creative people on the planet or have a background in art. They simply need to know how to apply best practices.

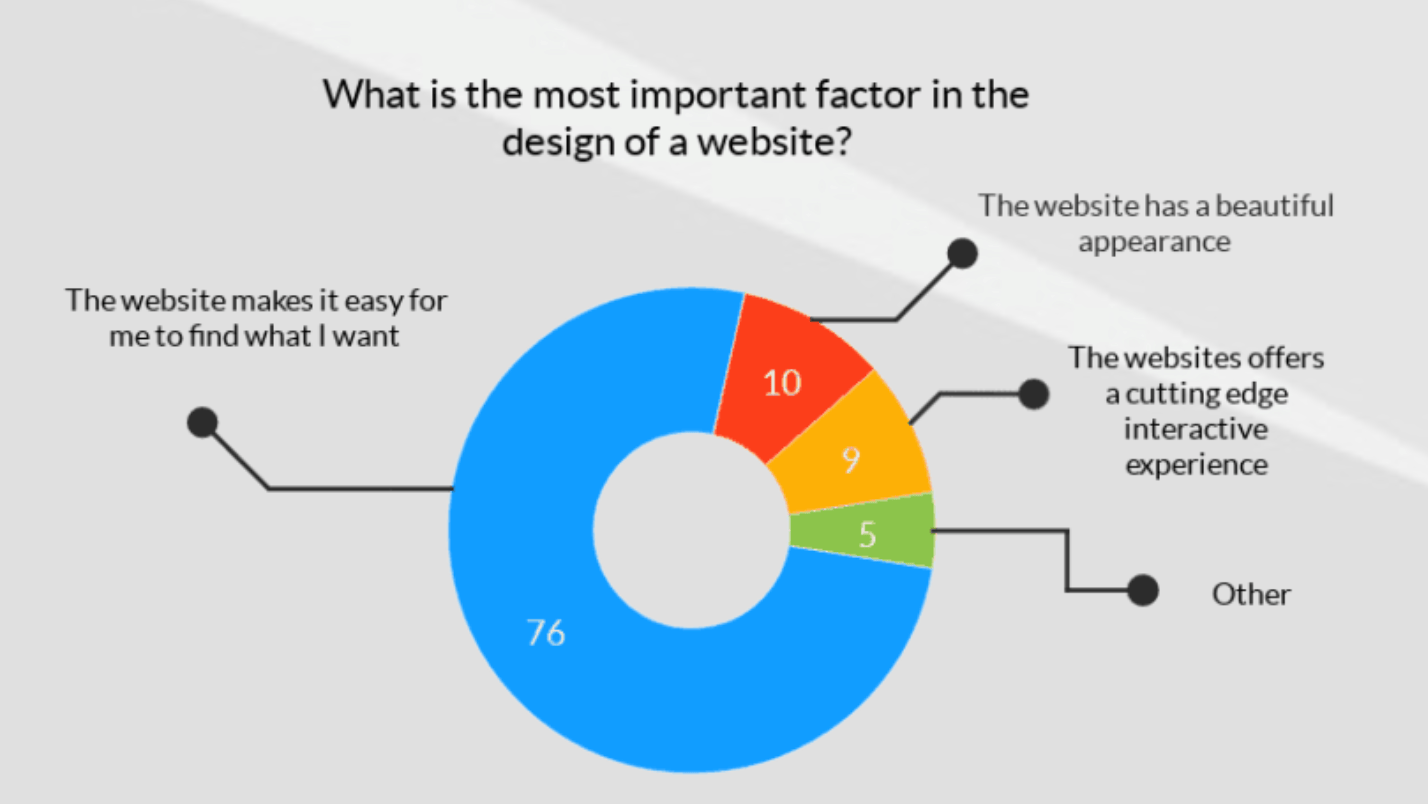
Take a look at the most important factors of web design, according to website visitors.

important factors

As you can see from the graph, 76% of people say that they want sites to make it easier for them to find what they’re looking for. Just 10% of people say that a beautiful appearance is most important.

Theoretically, you could design a website without any creativity whatsoever. It’s just a matter of knowing those best practices and implementing them.

That’s where AI can come into play.

AI solutions can be offered as an assistant for people who are building websites. Machines can analyze the design, and compare it to the databases of best practices.

Ultimately, the technology can be used to offer suggestions related to design.

Think of it like software used for SEO. SEO tools analyze your content and give you keyword suggestions based on what’s ranking or what other sites are doing.

This same concept can be applied to web design.

Since the best practices aren’t really creative, the applications can be taught and programmed into machines. For example, optimal CTA placement on a homepage is something that can be learned and applied by a computer using ADI.

Eventually, the idea is that AI will completely take over the design, but we just aren’t at that point yet.

Even platforms like Wix that are using AI in some form are another are still limited. Human inputs such as answering questions and things of that nature are required for it to work.

Examples of AI web design

In addition to Wix, there are a couple of other platforms that are using AI in web design at a more advanced level.

Again, these are still in the earlier stages of development and somewhat limited. But they are a good indication of where the future of design is headed with AI.

AiDA from Bookmark

aida

Bookmark has a website builder called AiDA, which uses AI to create websites. So you can use this platform to build a website, even if you don’t have any design or coding experience.

AiDA stands for artificial intelligence design assistant. By leveraging this software, you can have a custom website up and running in less than two minutes. Here’s how it works.

The software creates a design that’s unique to your needs and business.

All you have to do is choose your business type. There are more than 650 options for you to select, so it’s very specific. But again, it still requires some manual work.

AiDA has the capability to create personal portfolios, business websites, ecommerce stores, and anything in between. Type in your business name, and the software takes care of the rest.

Once the site and design have been built, it’s your responsibility to edit the images and content.

If you’re not happy with the way it looks, just go through the process again, and AiDA will create a new website for you that’s different than the first one.

Bookmark has three different pricing tiers. The first one is free, but it’s very limited and comes with a bookmark.com subdomain. They also have plans for $11.99 per month and $24.99 per month billed annually. Prices increase for month-to-month contracts.

Sacha from Firedrop

sacha

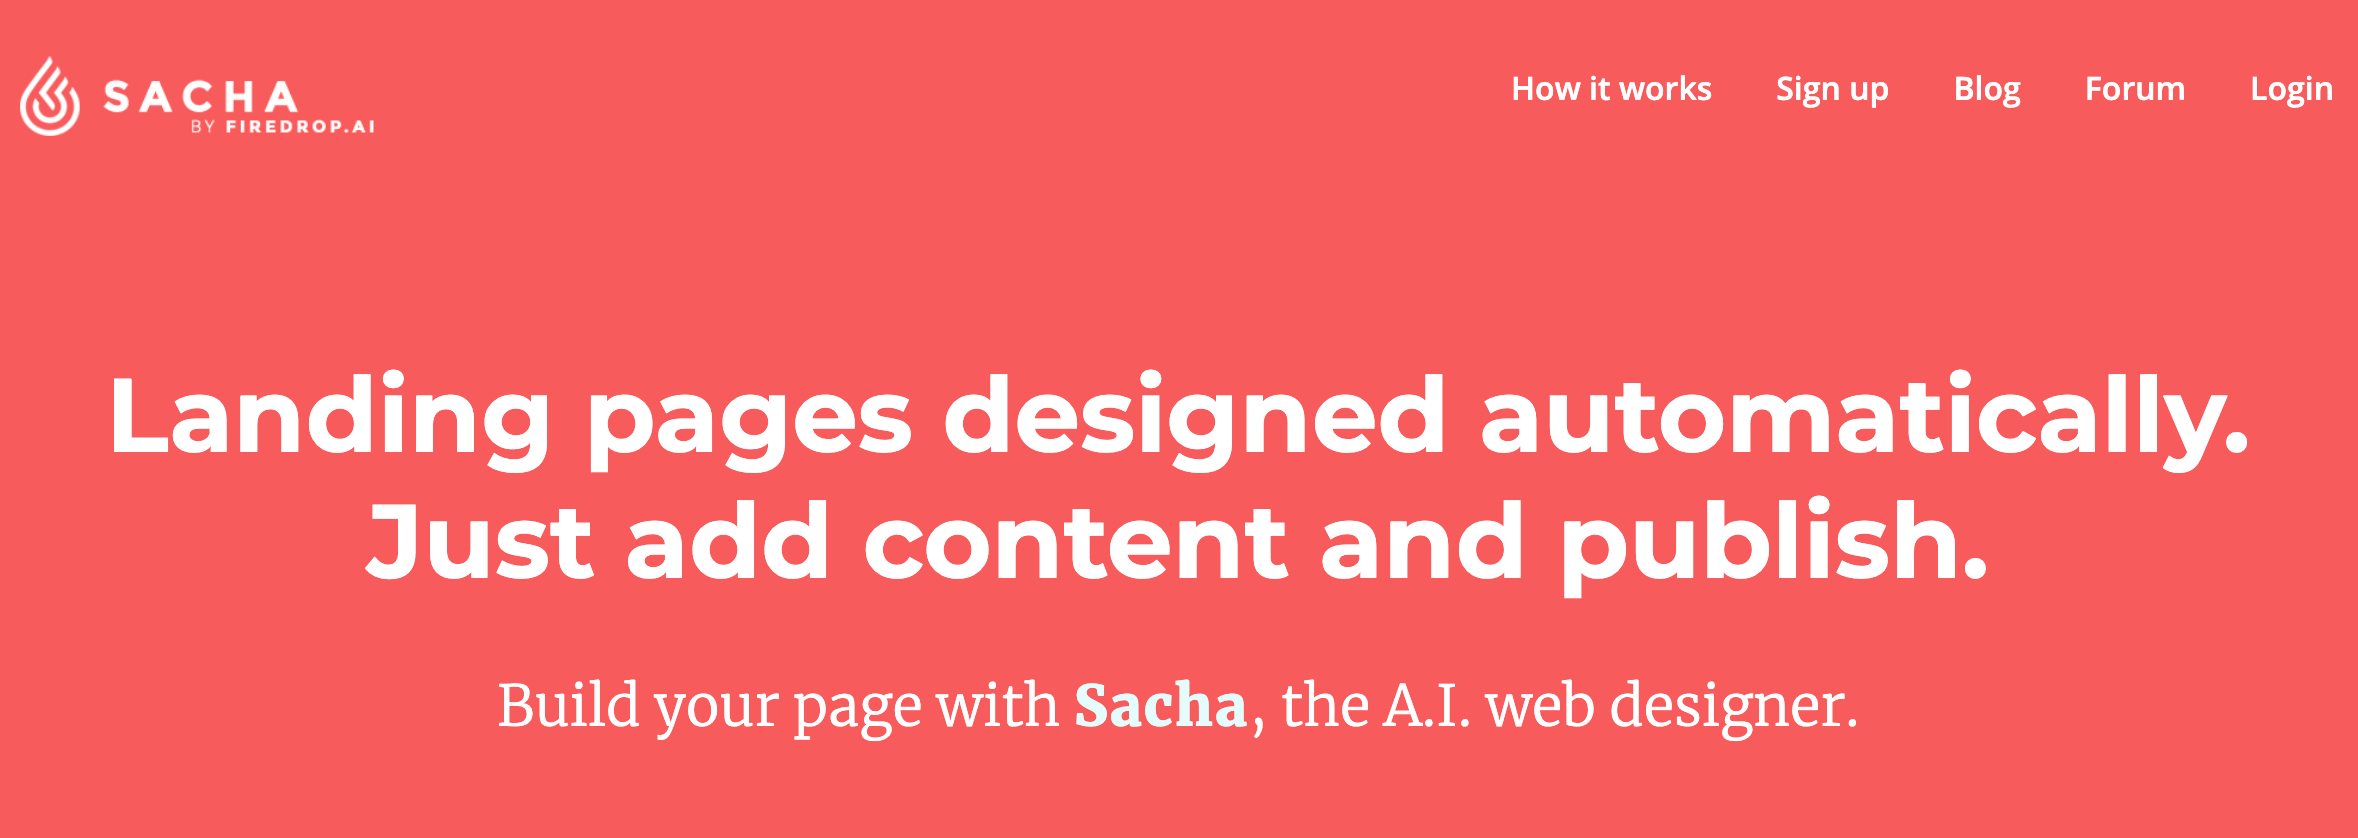
Firedrop has AI software called Sacha, which is used for building web pages, as opposed to entire websites.

In theory, you can use this AI platform to build your entire site, but you’d need to go through and do it one page at a time, which kind of defeats the purpose of automation. Either way, this is another example of what’s currently on the market today.

Here’s how it works. Instead of using drag and drop builders, all you have to do is talk to Sacha through live chat.

For example, you could type something like “change the color palette” to get a trending website color scheme on your landing pages.

It’s a great option for those of you who want simple landing pages that are completely customized, as opposed to choosing a template and then editing it to fit your needs.

Sign up for free to try Sacha. Then you can request a consultation to see customized pricing options from Firedrop.

Conclusion

AI is the future.

One way or another, it seems like this technology is slowly going to become apart of everything we do in the coming years. Web design is no exception.

There are already platforms out there that are leveraging AI technology to design and develop websites. Although this software has yet to reach its full potential, I don’t think we’re too far from seeing that day.

So what does this mean for you right now?

You don’t need to go out and start using ADI. But as the technology advances, don’t be so resistant to change. Keep an open mind and stay up to date with the latest trends to ensure that your website has an optimal design.


from Quick Sprout https://ift.tt/2YMGNIL
via IFTTT
Monday, August 5, 2019

Why Your Website Needs HTTPS

All websites need to prioritize security. However, I still see so many sites out there that aren’t using HTTPS.

For those of you who aren’t currently using HTTPS, that needs to change immediately. If you don’t think it’s necessary or that important, you’re mistaken.

The truth is, security impacts the performance of your website.

According to a recent study, 85% of consumers won’t convert if data is being transmitted through a connection that’s unsecured. 82% of Internet users won’t even browse on a website that’s not secure.

Lots of website owners that I consult with seem to think that their site is immune to malicious attacks or hackers because there are bigger and more important companies out there. Why would a hacker waste their time with a small website?

But 43% of cyber attacks target small businesses. So you can’t have the “it won’t happen to me” approach.

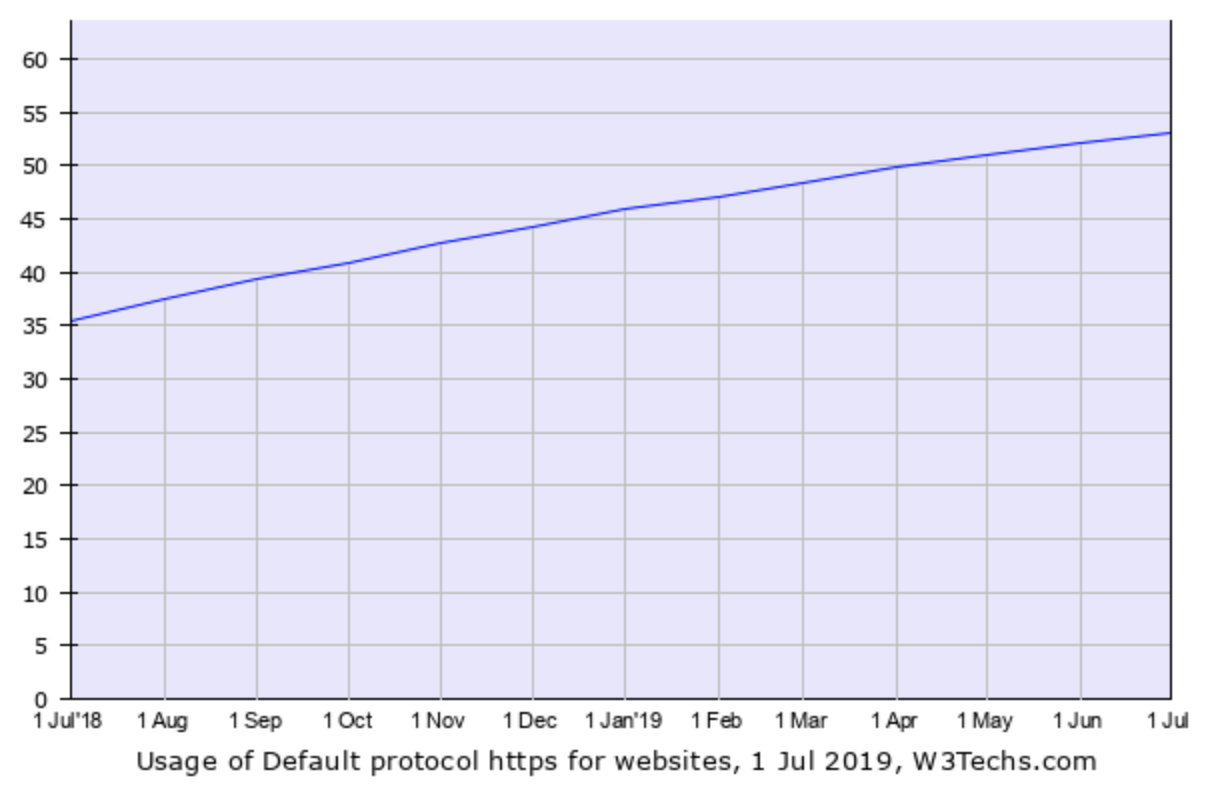
As of July 2019, 53% of all websites are using HTTPS.

53 percent

As you can see from the graph, there has been an increase in HTTPS usage over the last year.

There are still 47% of websites that aren’t using HTTPS. In my opinion, that number is just far too high. That’s what inspired me to write this guide.

If you fall into that category, I’ll tell you everything you need to know about HTTPS, why you need it, and how to get it for your website.

What is HTTPS?

Before we proceed, I just want to make sure you understand the basics of HTTPS.

HTTP stands for Hypertext Transfer Protocol. These are the rules used to transfer information on a web page from a server to a web browser. Any time an Internet user navigates to a URL, their browser essentially opens up a line of communication with the site’s server. The browser downloads the information required to render that specific web page.

With HTTP, this communication happens with plain text, meaning any third-party can access the communication between the server and browser. If this happens, personal and sensitive information can be stolen.

In order to make the communication private, websites use HTTPS. So HTTPS stands for Hypertext Transfer Protocol Secure.

With HTTPS, the same conversation takes places between a server and web browser, except the information is encrypted. The encryption prevents third-parties from stealing data.

Benefits of HTTPS

HTTPS uses TLS (transport layer security) or SSL (secure sockets layer) for encryption. These unique encryption keys are transmitted between the web browser and server to keep the communication safe.

Without these certificates and keys, a third-party could pretend to be the web browser to hack the server or pretend to be the server to hack the web browser.

Here are the top benefits of adding HTTPS to your website.

SEO

Any time you’re planning to make a change to your website, you need to know how that decision is going to impact your SEO ranking. After all, 93% of all online experiences start with a search engine.

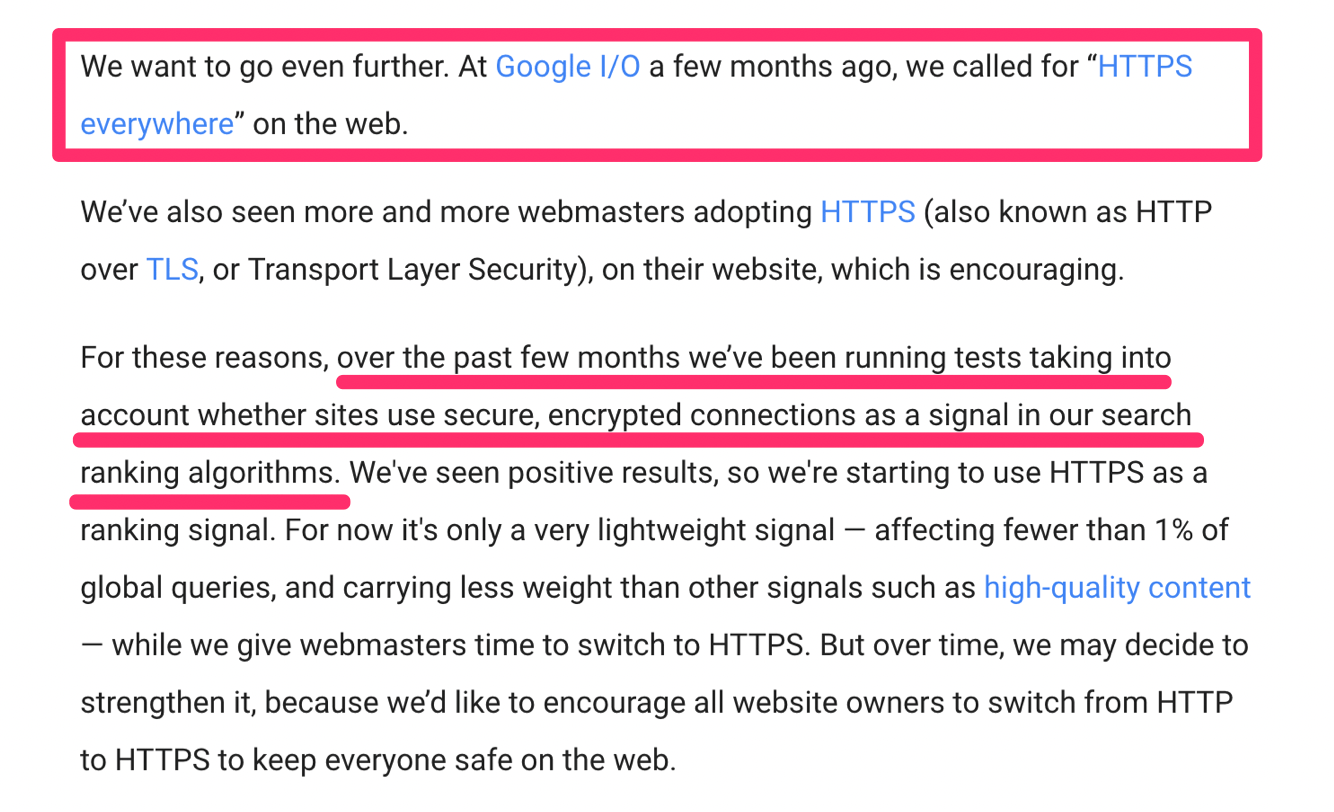
When it comes to search engines and SEO, Google must be the driving force behind your approach. Back in 2014, Google announced that HTTPS would become a factor in its search ranking algorithms.

Here is an excerpt from that announcement. In summary, Google was telling all webmasters that they are encouraging HTTPS, and will be rewarding sites who use it.

google

That alone should be enough for you to make the switch. If you’re not prioritizing SEO, you’re going to have a tough time getting traffic to your website. But by simply making the change from HTTP to HTTPS, Google will give you a boost in your search ranking.

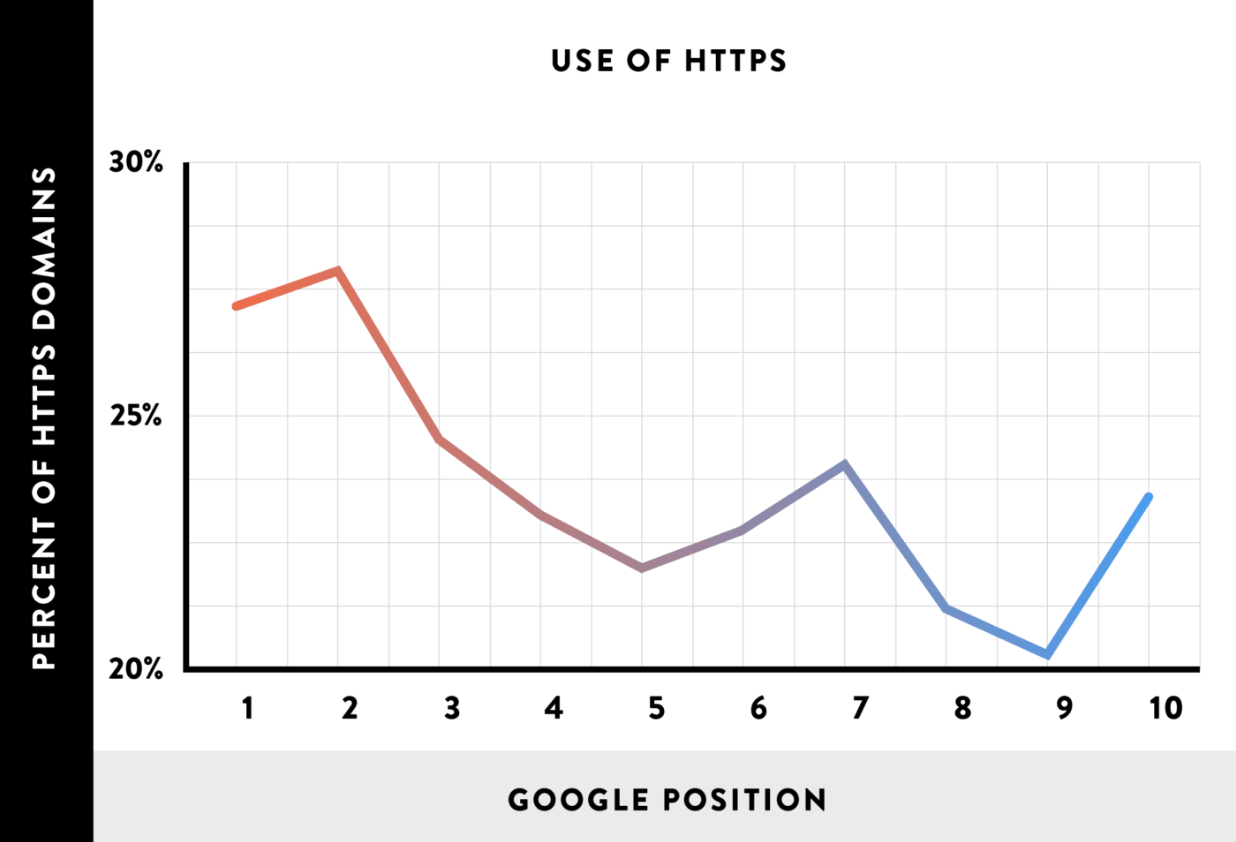
A few years back, Brian Dean from Backlinko analyzed one million Google search results. He discovered a correlation between HTTPS domains and their ranking position on Google.

ranking

Domains using HTTPS were more likely to have a higher position in Google’s SERPs.

Gary Illyes, a webmaster trends analyst at Google, was quoted saying that HTTPS would even break a tie between two websites with equal quality signals. So making the change to HTTPS could be the difference between your site making the first or second page of Google, which is a major difference.

User security

I briefly explained earlier that without HTTPS, your server could be vulnerable to a cyber attack from a third-party disguised as a user’s web browser. Obviously, you don’t want to put your server or website at risk for any attacks like that.

But what’s arguably even more important is the privacy, safety, and security of your website visitors. As a webmaster, it’s your responsibility to protect these people.

The last thing you want is for people to get hacked or have sensitive information stolen as a result of navigating to your website. An incident like that would be detrimental for the reputation of your website and brand. Recovering from this is seemingly insurmountable.

So for the sake of managing your online reputation, you need to be using HTTPS.

This is especially true for those of you who are collecting sensitive information like names, addresses, and credit card data.

If you have an ecommerce website, you need to use HTTPS to process transactions.

Even if you’re not processing credit cards, other types of websites legally need to keep user information safe. For example, if you’re collecting any health or medical data through form fields on your website, you could be violating HIPAA (Health Insurance Portability and Accountability Act of 1996) if you’re not using HTTPS to secure the information.

Trust

In addition to your duty of protecting your website visitors, you also want to make sure that people trust your website. Web browsers have started to take steps to draw more attention to websites that aren’t secure.

That type of warning or identification makes websites appear untrustworthy.

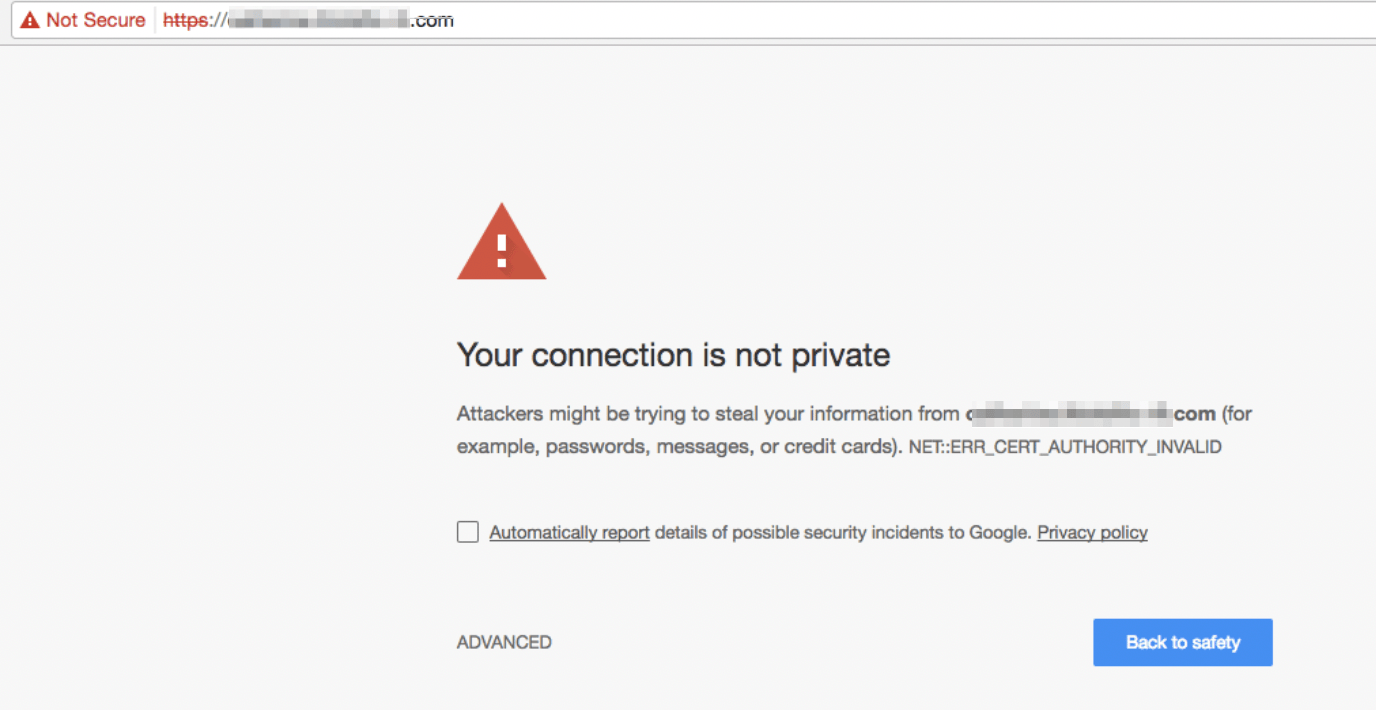
Here’s a look at the message someone will see from a Google Chrome web browser if they’re trying to access a site that’s not using HTTPS.

chrome

If you saw this message, would you continue to the website? Probably not.

So if people are getting this warning as they try to navigate to your site, there’s a good chance that they won’t continue. They probably won’t come back in the future either.

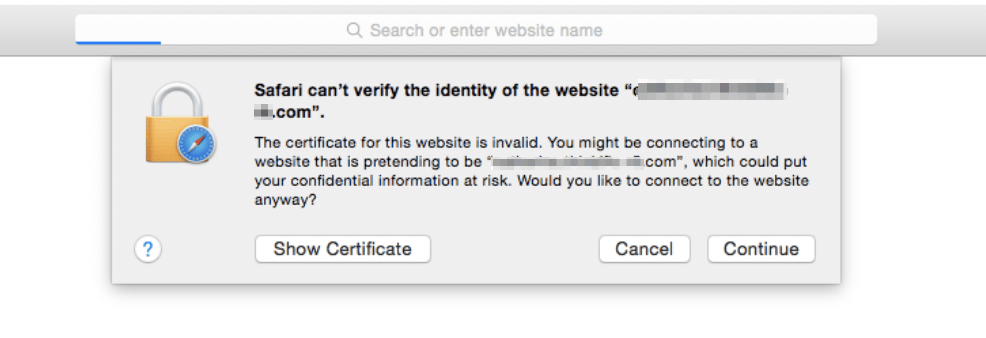
Chrome isn’t the only web browser that issues this type of warning. Users who browse the web using Safari will see a similar warning for unsecured sites.

safari

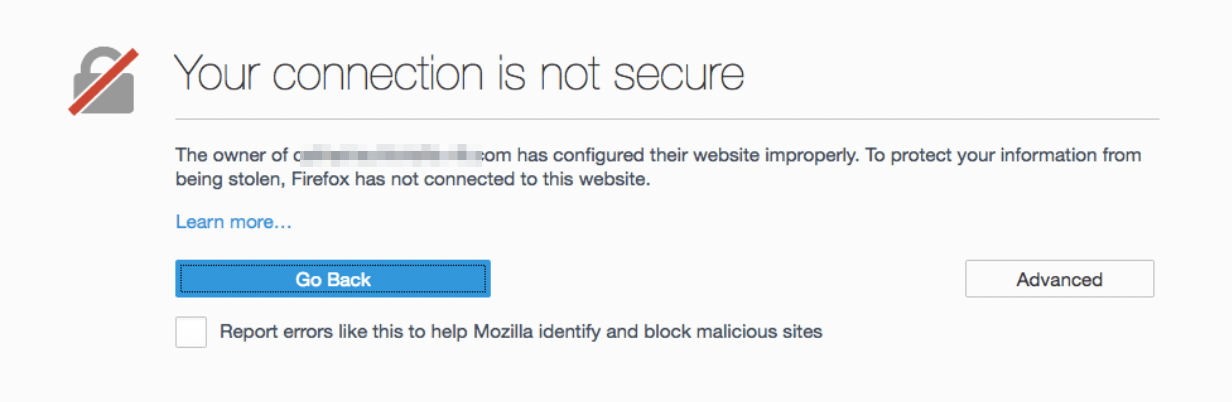
Just for good measure, let’s take a look at what happens if you’re using Firefox and navigate to a website that’s not secure.

firefox

While the text and layout of each notification vary from each web browser, the message is consistent across the board.

Each of these alerts is clearly a warning message, urging the user to stay away from the website in question. Adding HTTPS to your website will improve your perceived trust since the web browsers won’t issue this type of warning.

Lead generation and conversions

This piggybacks off of my last point about trust. If your website isn’t using HTTPS, users will be reluctant to navigate to your website. Even if they do manage to visit your site, they likely won’t fill out any lead generation forms.

Even if it’s something as simple as providing their email address, users will hesitate if they think that a third-party will get access to the information. Especially considering the fact that those third-parties could potentially send malicious emails pretending to come from your website.

But with HTTPS, website visitors can browse with confidence.

They’ll have a much easier time filling out form fields knowing that their information is safe. So in turn, you’ll get more leads.

Furthermore, you can’t expect anyone to convert on your website without HTTPS. People are nervous about credit card fraud as it is, so it’s your responsibility to let them know that the connection is safe.

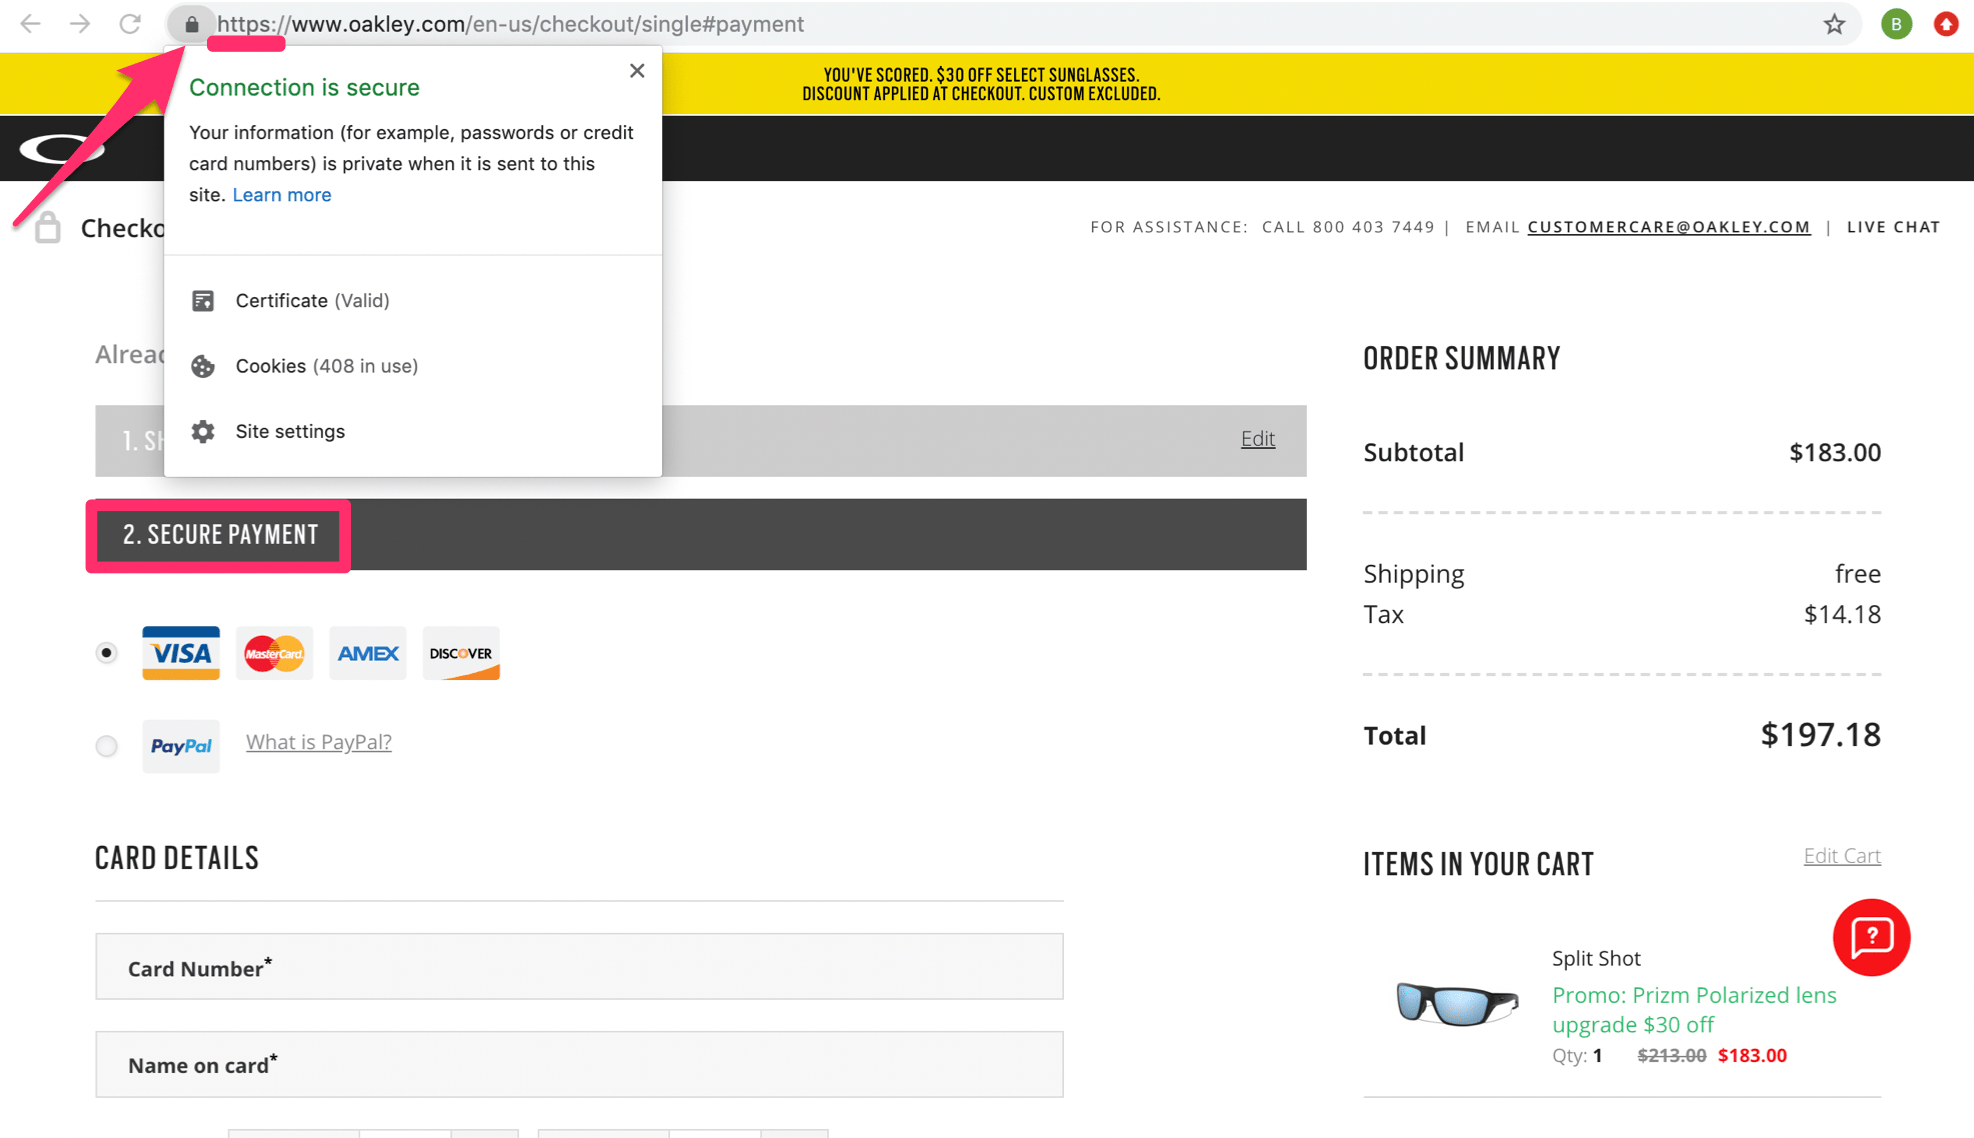
Here’s an example of a secure payment page from the Oakley website.

oakley

As you can see, HTTPS appears in the domain. But next to that, there is a lock icon, which is used by Google Chrome as another indication that the site is secure.

If you click on the icon, you’ll get a more in-depth explanation about the security of the website. It even specifically says that passwords and credit card information are safe and being sent over a private connection.

Oakley goes the extra mile here to even label this step in the conversion process as “secure payment” as opposed to just payment.

With HTTPS, site visitors will have that extra sense of security and feel safe when they’re completing the purchase process.

How to get HTTPS for your website

Now that you understand the importance of HTTPS, it’s time to get it set up for your website.

Step #1: Buy an SSL certificate

The first thing you need to do is purchase an SSL certificate. You can do this on platforms like SSLs.com or NameCheap. Both of these sites have SSL certificate options for less than $10 per year. So you shouldn’t have to pay much more than that, even if you look elsewhere.

The best web hosting services will usually offer a free SSL certificate. This is an added incentive for webmasters to use those providers. You should definitely keep this in mind if you’re creating a new website or if you’re looking to change hosting providers.

Step #2: Install the certificate

Next, a web developer will need to configure your site and install the SSL certificate on your server. Unless you have experience with web development, I wouldn’t recommend doing this on your own.

Alternatively, your web host can do this for you. It may be included in your hosting plan or offered as an add-on.

Step #3: Check for errors

Once the certificate has been installed, you’ll need to check all of your web pages to ensure that it’s been done properly. Look for mixed content errors, which happens if a web page is referencing non-HTTPS elements.

Usually, it’s easy to fix these. However, other times it can be a bit more complex. That’s why it’s important to have a professional handle the conversion to HTTPS. Fixing any errors will likely be included with their fee.

Step #4: Notify Google

Be proactive and notify Google once you’ve added HTTPS to your site. You can do this through Google Search Console. Update your Google Analytics settings as well.

Google will crawl your HTTPS site and re-index it in their database. You could wait for them to crawl it automatically, but there’s no reason to wait. The sooner this happens, the sooner you’ll get the SEO benefits.

Keep in mind, your search rankings might actually decline initially when you switch your website to HTTPS. That’s normal. But you can expect your site to be back where it was (or better) after Google has a chance to re-index all of your content.

Conclusion

Every website needs to have HTTPS.

HTTPS improves SEO rankings, adds security to your website, and builds trust with your website visitors. Switching your site to HTTPS will also improve leads and boost conversions.

Adding HTTPS to your website is easy. Just follow the simple four-step process that I’ve described above.

In addition to web hosting providers, it’s also worth noting that the best website builders and ecommerce platforms will usually offer a free SSL certificate as well. Wix, Squarespace, Weebly, Shopify, and BigCommerce are just a handful of platforms that offer SSL certificates when you sign up.


from Quick Sprout https://ift.tt/2KincI0
via IFTTT
Wednesday, July 31, 2019

How to Build a High-Converting FAQ Page on Your Website

FAQ pages represent a crucial component of the customer conversion funnel. Anyone who lands on this page has already identified the need for whatever you’re selling and is now entering the consideration phase of the purchase process.

Your FAQ page can provide them with the information required to finalize their buying decision.

However, I see so many websites that overlook the importance of this landing page. I read lots of FAQ pages that sound more like an afterthought, as opposed to a page that’s been designed to drive conversions.

FAQ pages must have a purpose. Don’t just add one to your website because you feel like it’s a requirement and you want to fill up space.

While most websites should have a FAQ page, yours could be doing more harm than good if it doesn’t have any clear intentions. It’s possible that your FAQ page is driving people away from buying, as opposed to drawing them in. Obviously, you don’t want that.

For those of you who are currently neglecting your FAQ page, it’s time to make changes. The rest of you might not have an existing FAQ page and want to add one from scratch.

Regardless of your situation, you’ve come to the right place. I’ll show you how to address common problems with FAQ pages and learn how to optimize them for conversions.

Ask the “right” questions

I’ve seen plenty of FAQ pages that have a great design, layout, and optimal user experience. But to be blunt, the questions are awful.

Somewhere along the line, so many sites have lost the meaning behind frequently asked questions.

Anything related to where your company was founded, how many employees you have, or where your CEO was born does not belong here. You can include details about the history of your company on your about us page. I have a separate guide on how to create an impactful about us page on your website.

But adding irrelevant or useless questions and answers to your FAQ page is just going to confuse your visitors.

They’ll end up having a more difficult time finding information that will answer their actual question. So you need to have questions that are more related to conversions.

Check out some of the questions on the Allbirds FAQ page.

All Birds FAQ

This company has an ecommerce platform for selling shoes direct to consumer. So all of the questions are intended to drive sales.

They have questions related to how the shoes fit, sizing, returns, exchanges, refunds, and shipping. All of these are important to the consumer buying decision.

Allbirds does not offer half sizes in their shoes, which is definitely something that might throw some of their shoppers off. But they have questions directly made to address this potential concern.

Do you offer half sizes? Will the shoes stretch? Do the shoes fit a wide foot?

These are all logical questions that someone would ask before buying. You want your customers to feel confident when they’re shopping.

Buying a product, such as sneakers, online can be a challenge. Customers don’t get a chance to try on different sizes, walk around, and see what feels good like they would in a store.

But Allbirds alleviates any uneasiness by asking the right questions on this FAQ page.

If you’re still unsure about how to ask the “right” questions, just see what your customers are actually asking. Take a look at questions and comments from:

  • Submission forms
  • Customer emails
  • Live chat
  • Social media comments and messages
  • Phone support

Keep a database to track all of these questions and group similar ones. If lots of people are asking the same thing, it definitely belongs on your FAQ page.

Simplify the navigation

Like the rest of your website, Your FAQ page must be frictionless.

You might have great questions and answers, but if your site visitors can’t find them, then your FAQ page is going to fail.

Do your best to try and emulate an in-person shopping experience. If a customer was in a physical store, all they would need to do is find an employee and ask their question. Sure, sometimes that employee might direct the customer to another department or something like that. But in the end, the question is answered directly and timely.

Don’t make people hunt for answers on your website.

If the format of your FAQ page is just questions followed by answers repeating all down the page, visitors will have to keep scrolling to find what they’re looking for. This is not ideal. They might even overlook their question, which wouldn’t solve their problem.

Take a look at how Microsoft simplifies things on their FAQ page for software downloads.

Microsoft FAQ

Right away, you’ll see that there are two categories to choose from.

So the website visitor can narrow the results depending on if their question is related to Windows or Office. That way any Office questions won’t have irrelevant Windows questions that need to be sifted through.

When a user clicks on one of the options, the menu expands, without redirecting to a new page.

Here’s what it looks like if I click on Office.

Office FAQ

All 12 questions can be read without having to scroll. This makes it extremely easy for people to find exactly what they’re looking for.

Now, imagine if there was an answer directly below each of these questions. It would take up probably four or five times the amount of space on the page.

That layout would be much more challenging and require additional scrolling and text to read through. But this approach by Microsoft is clean and simple.

If you want to know something specific, like how long it takes for software to download, just click on the question and the answer will expand below it.

Office FAQ Expanded

Frictionless.

If a site visitor has multiple questions, it’s still easy for them to navigate and find answers to everything.

Here’s the way you need to look at your FAQ page. If a site visitor has a question and it does not get answered, they aren’t going to convert. It’s that simple.

So if you approach your FAQ page trying to design the navigation in a way that’s optimized for user-experience, then it will increase the chances that people will find what they’re looking for.

Keep the answers short

Another common mistake that I see made on FAQ pages is the length of the answers. Everything needs to be clear and concise.

For the most part, your FAQ page should be fairly broad. You want everything to appeal to as many people as possible.

So you won’t have super-specific questions that require in-depth explanations.

But even for a general question that most people would ask, you still need to keep the answer concise. You don’t need to answer everything. Certain details can be left out.

I’d rather see FAQ pages with 30 questions that have short answers, as opposed to 15 questions with long answers. So if you currently have long paragraphs on your FAQ page, see if you can take one question and break it down into two or three.

This will provide a much better user experience.

Visitors shouldn’t have to read through an essay or short blog post to get a simple answer.

Let’s say that a website visitor is able to locate their question and ends up reading through a long answer. They might end up having additional questions, based on the length and details of that answer. You don’t want that to happen.

So sharpen your writing skills and only include the most important information related to the question.

Check out this example from the PayPal FAQ page.

Paypal FAQ

Look at the first question—what is PayPal?

Talk about a loaded question. PayPal is so many different things. They offer services for businesses, consumers, and websites. They could probably answer this question in 50 pages if they wanted to, going into details comparing PayPal and Stripe for ecommerce.

But no, they take a much simpler approach. The entire answer is just three sentences.

If they got into all of the specific details of PayPal, what it is, what it does, and who it’s for, it would only confuse the initial question. The answer above is clear, concise, and still answers the question.

Offer added support

While a FAQ page should be written to help most of your website visitors with broad questions, sometimes it’s just not enough.

No matter how good your questions are, how great the answers are, or how simple the format is, some people will still need additional assistance. That’s OK.

If it’s going to take a little bit of extra support to get people to convert, then give it to them.

Just make sure that all support options are available. Here’s how Samsung approaches this on their FAQ page.

Samsung FAQ

The first thing I noticed when I landed on this page was the list of categories. Samsung is a huge company, so it makes sense for them to start this way.

But as I stayed on the screen without making any actions for a while, this pop-up window appeared prompting a live chat session.

They obviously have this triggered to appear whenever someone doesn’t scroll or click since the implication would be that they can’t find what they’re looking for. I love this approach.

It’s much better than forcing the site visitor to go back and find another support page or make them go through countless questions manually until they find an answer. That’s just too many added steps.

Put a live chat window directly on your FAQ page.

Furthermore, Samsung has a phone support button in view at all times as well, as I pointed out in the screenshot above. So the customer has options.

Can’t find a solution on the FAQ page? No problem. Just pick up the phone or speak with one of our live chat representatives. This strategy should be incorporated into your FAQ page if you want to drive as many conversions as possible. The extra effort will go a long way.

Optimize for SEO

When you’re crafting a high-converting FAQ page, you need to keep the big picture of your website in mind. Nothing screams big picture louder than SEO.

For the most part, FAQ pages are designed with the idea that a visitor will land somewhere on your website, have a question, and then navigate to the FAQ page. In many cases, this very well might be the case.

However, you can set up your FAQ page to get traffic directly from organic searches as well.

So every question doesn’t need to be brand-specific. For example, let’s say your website offered web hosting plans for small businesses. Your FAQ page could ask, what is shared web hosting?

This question isn’t exclusive to one of your products or services. But it’s definitely something that one of your prospective customers will search for online. Your question could end up in the SERPs, driving more traffic to your website, and ultimately leading to conversions.

A great tip for finding SEO questions is to just use Google.

Let’s say you sell sneakers. Type in keywords that you’re trying to rank for, like “sneakers for travel,” and then scroll to the bottom to view related searches.

Based on these search suggestions, you can get SEO-inspired questions for your FAQ page.

So you can add questions related to shoes for walking all day or stylish shoes for Europe.

Another way to improve your SEO is by creating dedicated landing pages for your questions. Now, this slightly contradicts what we talked about earlier in terms of user experience. Redirecting people every time they want to see a new question could be a bit annoying.

However, these dedicated landing pages that interlink with each other can give you a boost in terms of SEO, if your website architecture and sitemap are optimized properly.

Conclusion

FAQ pages are critical resources for your website visitors.

Anyone who lands on this page is on the verge of converting. Sometimes getting a question answered is all it takes for them to finalize a decision.

So stop wasting time and space with FAQ pages that don’t add real value to your site.

Focus on questions that are related to conversions. Keep the user experience in mind by simplifying your design and writing concise answers. Offer additional support options for people who still have questions. Go the extra mile and optimize your FAQ pages for SEO.

If you follow the tips that I’ve covered in this guide, you can turn your FAQ page into a conversion machine.


from Quick Sprout https://ift.tt/3310yvh
via IFTTT